|
"Free" On-Board Air
or, "What to Do With Your Old Compressor Now That Your A/C Doesn�t Work"
Contributed By: Ethan Brady
I have an 83 Wagoneer Limited that used to have working air conditioning when I got it way back in 1992. Over time, the system leaked and I ended up just a bunch of empty hoses and condensers that blocked airflow to my radiator.
After reading somewhere about converting them for use as an air supply, I took the plunge. Before YOU plunge, read through everything first!
Here�s what I used (I�m recalling from memory as I didn�t exactly save the receipts!) and how I used it. At the end, I�ll talk about what I would do over again!
Supplies:
- 25� 3/8" air hose, 300 psi max.
- 2 Five gallon air tanks bought at Parts America (used to be Western Auto). It has pressure gauge, 1/4" NPT output, & valved input
- 1/4" NPT hose repair barbs to fit the 25� hose and clamps to match
- quick disconnect couplers from Ace hardware (the style is not important, just make sure you use the same style all around). You�ll need a male and a female for each connection that calls for a disconnect
- Air chuck for filling tires.
- 15� yellow coiled hose (like you see at mechanic�s shops)
- 2 four foot long pieces of strap steel with the continuous row of holes in it)
- 1 three foot long piece of the same stuff listed above
- 1 1/4" NPT Tee Connector to tie the tanks together
- Another 1/4" NPT Tee Connector if you�re going to have a train whistle
- Train whistle (OK, that�s really optional for most folks!)
What I did:
- Start by making sure your A/C system is COMPLETELY DISCHARGED and NOT UNDER PRESSURE. If your system is still pressurized, you can be seriously injured or possibly killed. If you have doubts, take it to your mechanic, who probably knows you by name (you own a FSJ, right?), and have him/her ensure that your system is completely discharged. Remember, SAFETY FIRST.
- When you get back home, disconnect the - battery cable and start by removing the a/c heat exchanger (in front of your radiator) and all the related components. You could leave them in, but "why?" as they�ll never be used again. The connections on my exchanger were very tight and I just hacked the hoses off. Be careful if you do it with a knife like I did. You�ll probably have to remove the grille to get at everything, but it�s pretty easy access once the grille�s off.
- Your compressor is the squarish thing that is on the passenger side of your V-8 engine. the most obvious features are the 2 black hoses that come out and point towards the rear of the vehicle. On your compressor, there are 3 important things that concern us: The (2) hoses that come out of the compressor and the black (on my FSJ) wire that comes off the compressor and dives into the usually cracked/decaying wiring harness.
- Don�t cut the black wire too short, as you�re going to have to splice that to another wire. When you apply + voltage to the black wire, the clutch engages (electro-magnet I guess), the wheel turns and the compressor compresses. This is important to know, as you�ll soon see.
- You will notice that near one of the hoses, it is marked SUCTION on the compressor housing. Don�t cut this hose too short, either, as you will want to position it somewhere so it won�t suck lots of dirt or water. (Water is NOT good in your tires. And yes, it can happen!) You could be really cool and put a filter on it, too, but I didn�t. I also don�t do any deep water crossings, either.
- Obviously, the other hose is the output hose. This is the hose that you want to attach a hose barb to and secure it with a hose clamp. Then attach a portion of new hose (again with barb, clamp, etc.) and snake it along the frame rail to your air tank location. Keep well clear of exhaust and drivetrain stuff. Attach a FEMALE connector to the remaining end of your new hose.
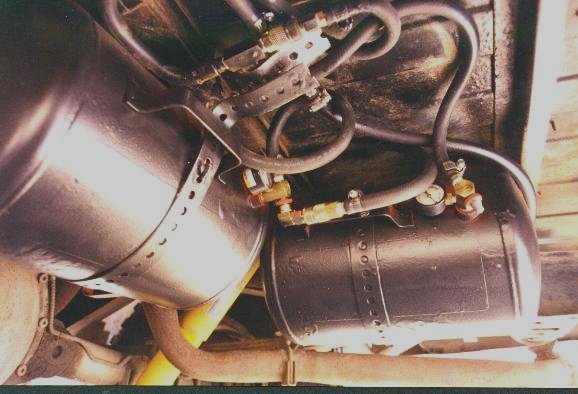
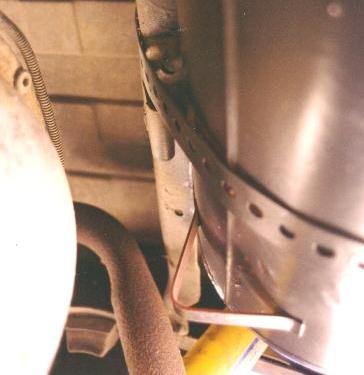
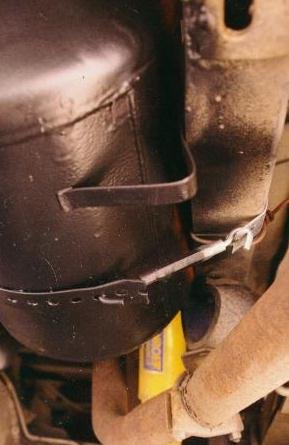
- I have my tanks underneath the rear end, where the spare tire used to be. They are attached to the passenger side frame rail and a frame crossmember. I used strap steel with a continuous row of holes (I�m sure there�s another name for it...) and used "turnbuckes" to tighten everything. I was planning on using 2 straps per tank, but it turned out I only needed one strap for each one. I used my floor jack to hold the tanks in place while I snaked the staps around �em. The tanks aren�t terribly heavy until you�re on your back trying to hold one at an odd angle while handling a very sharp steel strap. See photos for tank locations and where the straps go through and the best spot for turnbuckles. Be sure that your turnbuckles do not rub the tank. My tank mounted to the frame rail is on the passenger side because the fuel filler hoses are in the way on the other side and with my aversion to gasoline fires I decided to stay clear of them.
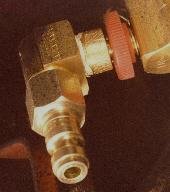
- Attach a MALE connector to the adaptor that allows you to screw it onto the bicycle style valve. (See photo) I found that adapter in a set of several different adapters, again, at Ace Hardware. I brought the air into the tank through the bicycle valve (It�s the same as your valve stem on your tires and I know there�s a tech. term for it) so that when/if the compressor loses pressure (when it�s off) or when the hose is disconnected, the air tank will hold its pressure and you will not have 10 gallons of air come flying out at you @ 100psi.

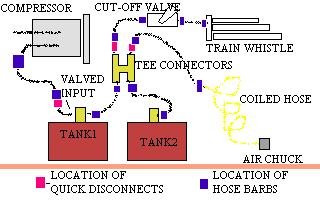
- Now, it�s a matter of rigging a hose to connect the two tanks. You want to connect the two tanks together using the same hose barb/clamp routine as before. No need to use connectors, as you won�t be needing to quickly change tanks or anything. INBETWEEN the two tanks, put a Tee connector. Thus, the sequence should be: Tank2 to hose barb/clamp to hose to hose barb/clamp to Tee connector to hose barb/clamp to hose to hosebarb/clamp to tank2. If it sounds confusing, follow the schematic diagram. That should clear things up.
- Now, if you�re not going to be fun and install a train whistle, skip this part.
- Attach a short length of pipe to the Tee connector and install ANOTHER Tee connector at the other end. I connected them so they form an H, but any way you want is OK. On the empty Tee connector, both ends get hose barbs/clamps and hoses attached. Attached to these go the FEMALE connectors. Prepare the make connectors to the other hose that goes to the train whistle and another hose goes to the air chuck.
- If you�re not as crazy about trains as I am...
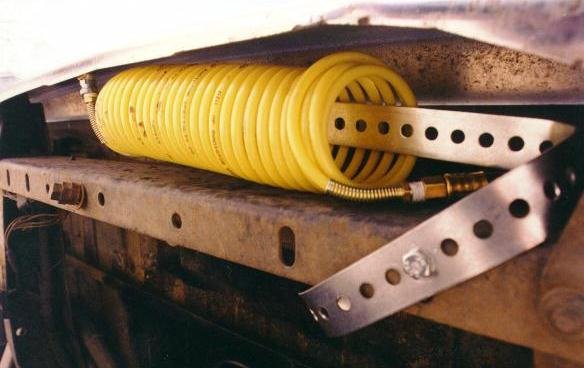
- Attach a MALE connector to a short (3ft) length of rubber hose and attach the remaining end to a 15� yellow coiled hose, (the kind you see in tire shops). This way, the yellow hose has less chance of rubbing on sharp edges and also extends the useful length of the yellow hose. Screw in the air chuck to the yellow hose and the hose stuff is completed. Keep in mind that this hose is always under pressure when hooked to the tank, so treat it nicely. The photos show how I hid the air hose and yet keep it handy. From this location under the bumper, I can reach the front tires.
- Now�s time to hook up the switch. I cut the black wire and spliced it to a completely new circuit. I mounted a normally open (off) MOMENTARY CONTACT switch inside the cabin and with a push of a button, your compressor is compressing air. A momentary contact switch ensures that you won�t accidentally leave the compressor on. If you do, you�ll find out if the relief safety valve on your tank really works or not! Remember, you are providing power (+12 volts) TO the compressor, not grounding it. If you ground it, it won�t blow up or anything (at least I don�t think you would), but it won�t work, either. Also, hook it up to switched power, as you don�t need it when the engine�s off and it would just run your battery down.
- "But, Ethan, you can�t turn it off/on when you�re filling tires!" you say. I also wired another remote normally open (off) switch (in parallel, meaning either switch can turn it on) with a length of wire. This way, I can be outside the truck, push the button and get more air pressure when I need it.
- Also, throughout this process, don�t forget to use teflon tape on ALL hose threads or you will have slow leaks, fast leaks and general hissing noises all over the place. Mine leaks anyway, but it takes all night to do it. Not a real problem.
- When hooking up your train whistle, I used a handle style valve and spring loaded it so it will turn off automatically. Attach a whistle cord and you�re set! It�s great fun blasting your whistle at grade crossings, esp. when some idiot has stopped on the tracks for a red light or whatever. (Aside: Don�t EVER stop on RR tracks in your FSJ for ANY reason. Stop behind the white line or be VERY sure you can pull forward and be well clear of the rails behind you. Our trucks are heavy, but any locomotive is many times heavier. Please be safe around grade crossings, as I don�t want to read about you in the newspapers.)
Review:
Installation is pretty straightforward. When routing hoses from the compressor, remember to keep �em away from hot spots and sharp metal edges. Notice that I arranged the quick release couplings so that I could only hook everything up ONE way. I also arranged it so that when you disconnect the compressor from the tank, the hose on the compressor is pressurized. With my connectors, that means the MALE connector is attached to the input of the tank. This allows you to disconnect the air chuck hose (to attach another device) without discharging the air from the tank. You will get a slight air discharge from existing pressurized air in the line. When you get the connectors, you should be able to see what I�m talking about.
Also, don�t run the compressor without it being connected to the tank, as pressure will build up in the hose, and there is no relief valve, although you could put one in.
About tank placement: I was very glad to get the tank out of the cabin. It�s not too big, but it does take up precious inside space. Don�t get the 9 gallon tank, as it�s too large to go where the spare tire is. If the rumors of rear gas tank existence are true, you could remove the big, long, coffin tank and put the air tank there. It would be better protected between the frame, too. I was looking at the QuickAir tanks and two or three of them might work better, however, they�re only 2.5 gal each and about the same cost as 1 of the Sears 9 gal tanks. About the 5 gal tanks: These tanks can�t be re-certified, but the destroy date one the ones I installed was 2004. That gives me a good 6 years use for $40 bucks!
Another warning/caution: There may be residual freon in your system. There was in mine. It was a green oily susbstance. Try to get as much as possible out before hooking everything up. Also, follow all instructions with your tank, especially the part about draining the water from it periodically.
I�ve read elsewhere about these compressors using and/or requiring oil or some other lube in them. I�ve never lubed mine and so far it has not failed. (Knock on vinyl woodgrain)
It fills my 235/75R15 Mud terrains from flat to full in less than a minute or so. And it blasts my train whistle pretty loud, too!
Check out the photos to see how it looks. If you have any specific questions, send me a message on the fsj list.
Ethan Brady
83 Wagoneer with a very loud train whistle
|