
|
KC Driving Light Installation
Contributed By: William Trautman
PLEASE READ ALL DIRECTIONS BEFORE YOU BEGIN. THERE ARE SOME RECOMMENDATIONS AT THE END OF THIS -HOW TO- AND THIS ONLY COVERS THE BRACKET INSTALL AND THE GRILLE CUT OUT. I WILL COVER THE WIRING AFTER I GET MINE WIRED UP.
These instructions are for a 79 Wagoneer but you should be able to apply them to just about anything.
Heres a list of materials and tools that you will need.
- 1/8 sheet metal or thicker, use your own judgment on this.
- The proper size drill bit for your lights.
- lights! .
- Welder. For this I used a Cricket wire feed welder.
- Dremel tool with the sanding drum and a cutter bit.
- Saber saw.
- 6" torpedo level.
#9900FF
- Bench grinder or a file.
- Primer and paint.
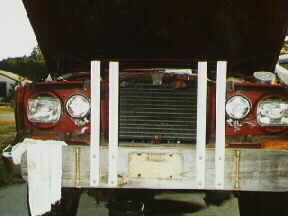
- Make sure that the vehicle is on flat ground and the tires are at the right pressure so when you level your brackets just before welding they will be straight and true.
- Remove the grille and set it aside. You won`t be needing this for a while.
- hold your lights in the hole that is beside your headlights (or where ever you plan on putting them and get a measurement on your sheetmetal. Make sure that you make it long enough to come out just past your rubber mounting pads and wide enough so your pads won`t over hang.
- Drill the hole in the perspective place and round off the sharp corners in the front of the bracket using a bench grinder or a file.
- Hold your level on the bracket and level it from side to side and put a mark on both sides of the body where the bracket makes contact with it. You will use this reference later to weld the bracket in place.
- Hold the level length wise and level it from front to back and mark the body where the bracket comes into contact with the bracket.
- Now its time to weld it into place. WEAR WELDING GLOVES and MASK for this step. It is a good idea to have someone standing by with a fire extinguisher for this.
- Put the grounding clamp on the bracket and use it to hold the bracket in place when you weld it. Hold it on the marks that you made with the marker and spot weld it in the front where it contacts the sides of the bracket.
Next, check that you have it on the mark on the back of the body and weld it there to.
- After it has cooled down enough wire brush it off and paint it with primer and paint of your choice.
- Mount the lights and check that they are aiming correctly, up and down, side to side. You may have to bend the bracket so the lights won`t hit the top of your grille. I had to bend mine down slightly.
 USE EXTREME CAUTION SO YOU DON`T CUT TOO MUCH PLASTIC OR BREAK YOUR GRILLE!!!!!!!!!
- Hold your grille up to the lights and get a ROUGH idea as to where to cut it. Use your marker to make marks on the grille and cut it out using a SABER saw. Hold the short pieces of grille firmly while cutting so you don`t brake it!!
- Keep cutting until you can BARELY clear the lights and install the grille and check all clearances. Make additional marks where you may want to trim up with the dremel tool.
- Sand all edges with the dremal tool and install your finished product. There are 2 screws that I can`t install because the lights are in the way.
 TIPS
TIPS
- Take your time!!!!!!!
- Do not cut to much at once.
- Remember... you can always cut more later but you can`t add it once its gone!!!!!
- You might even want to weld a small bolt to the back of the bracket so you can mount the ground wire to it later.
- Mask off all of the chrome and paint the rest of the grille with flat black to hide the cuts that you made with the dremal tool and to make your grille look new again.
William Trautman
79 wagoneer
51 willys 4x4 truck
|


