If this is your first visit, be sure to
check out the FAQ by clicking the
link above. You may have to register
before you can post: click the register link above to proceed. To start viewing messages,
select the forum that you want to visit from the selection below.
I'm starting to hook up all of the wiring in the engine compartment on my Chevy 350 swap and need to know where some of these go. I'm running HEI on the 350 and the Jeep is a 79' Cherokee. Thanks.
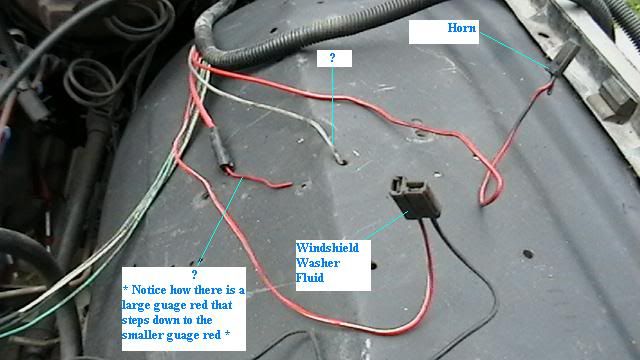
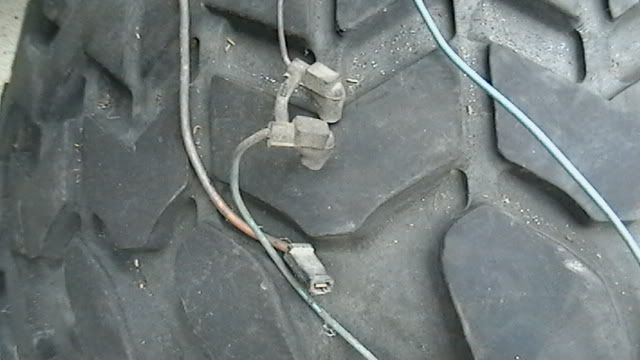
Picture #1 shows the connector for your windshield washer pump.
What you really need to do is lay the harness out of the ground and sort it out that way. Then many of the things will become obvious. There are distinct branches to the harness. For example, the windshield washer pump plug is nowhere near the starter solenoid plug (the dual plug with the short rubber piece between it in picture #6 of your original post).
Then take pictures of it. One wide shot and many CLOSE UP shots. LABEL each plug with a letter or number and then we can say "Plug D is for your choke", etc.
Ethan Brady
1987 Grand Wagoneer, slightly longer than stock.
Picture #1 shows the connector for your windshield washer pump.
What you really need to do is lay the harness out of the ground and sort it out that way. Then many of the things will become obvious. There are distinct branches to the harness. For example, the windshield washer pump plug is nowhere near the starter solenoid plug (the dual plug with the short rubber piece between it in picture #6 of your original post).
Then take pictures of it. One wide shot and many CLOSE UP shots. LABEL each plug with a letter or number and then we can say "Plug D is for your choke", etc.
Thanks for the reply and info. Ya, now I see that the plug in picture # 1 is for the washer pump and the other one next to it must be for the horn.
I tried laying out the harness as best as possible under the hood but I don't want to take it out as I spent part of today putting it in. I'll play around with the photos in Paint and get some labels on them that way.
Since I'm not using the factory starter solenoid on the fender anymore, how does that part of the wiring get hooked up to the new solenoid on the starter? Just cut off both rubber boot connectors and splice both the wires into one new ring connector?
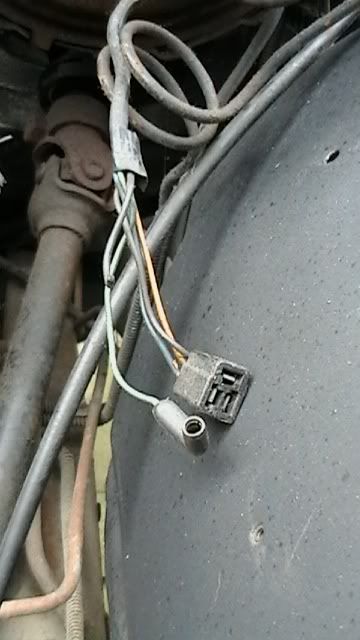
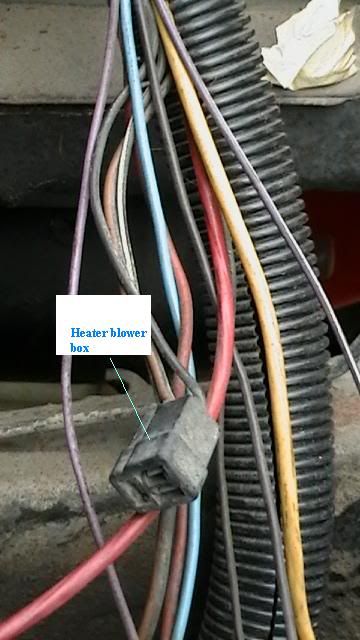
Pic #4 looks like the plug that goes to the heater motor resistors on the heater core box.
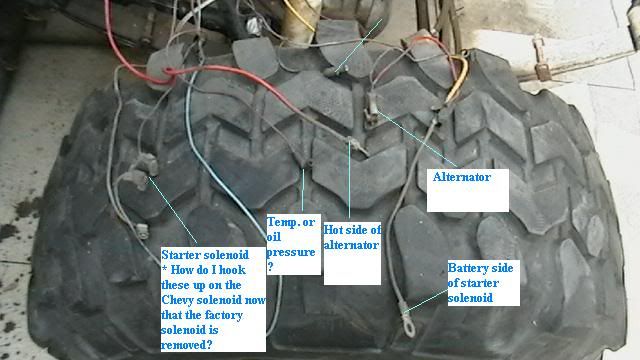
Pic#5 Ring terminal on right hand side of pic goes the the battery side of starter solenoid.
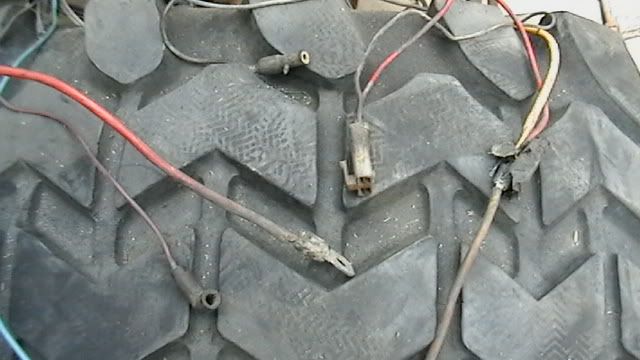
Pic#6 The two joined connectors go to the starter solenoid.
Pic#7 Fat red wire goes to the alternator along with the white rectangle connector. The purple wire goes to either the temp or oil pressure sender.
Thanks for the info. That helped out a lot. I started labeling the photos now so there are just a few left I'm unsure about. Also, how does the HEI on the Chevy setup get hooked up? Do new wires have to be ran or can existing ones from the factory harness be used?
Pic #4 looks like the plug that goes to the heater motor resistors on the heater core box.
Pic#5 Ring terminal on right hand side of pic goes the the battery side of starter solenoid.
Pic#6 The two joined connectors go to the starter solenoid.
Pic#7 Fat red wire goes to the alternator along with the white rectangle connector. The purple wire goes to either the temp or oil pressure sender.
Chris,
I had a buddy of mine come over with a new meter toy and did some testing on the electical for me.
He says that the fat red wire in picture # 7 goes to the positive on the battery where as you were saying it hooks up to the post on the back of the alternator.
Also, he was saying the ring terminal wire in picture # 5 goes to the back of the alternator instead of the battery side of the starter solenoid. Anyway, I just wanted to get your input on it as I would like to see which way is correct.
Lastly, the small gauge black wire with the boot on the end in the upper part of picture # 7, where does it go? We applied power to it and couldn't see what it powers up.
Thanks again for all your help.
* Edit - Well, after spending a few minutes looking through the electrical diagram on www.oljeep.com , it looks like the original way you stated is correct. Any ideas with that last wire at the top of photo # 7 though? Thanks.
One more thing, my buddy sniped off the double boot connector for the starter solenoid and I now only have one light blue wire going to it. You had mentioned both wires were supposed to go there. I looked around the engine bay and didn't see the other wire hanging anywhere so I'm confused with that as well. Thoughts?
It looks a lot like the A/C clutch wire. Are you sure its not brown?
The blue wire is what triggers the solenoid. The other one provided 12v to the coil during cranking on the stock ignition system. Now that you have HEI, you don't need it.
It looks a lot like the A/C clutch wire. Are you sure its not brown?
The blue wire is what triggers the solenoid. The other one provided 12v to the coil during cranking on the stock ignition system. Now that you have HEI, you don't need it.
Ah yes, that sounds about right. It's dark out right now so I'll check again in the morning but it sure looked black. Could be a dark brown with gunk maybe on the wire from over the years.
Ok gotcha, thanks. So I take it the ignition wire now goes straight into the HEI port on the distributor? No relay?

 Tweet
Tweet


Comment