Q-trac cable shift = awesome

Collapse
X
 
  • Filter
  • Time
  • Show
Clear All
new posts
  • elskeptico
    350 Buick
    • Sep 03, 2003
    • 821

    Q-trac cable shift = awesome

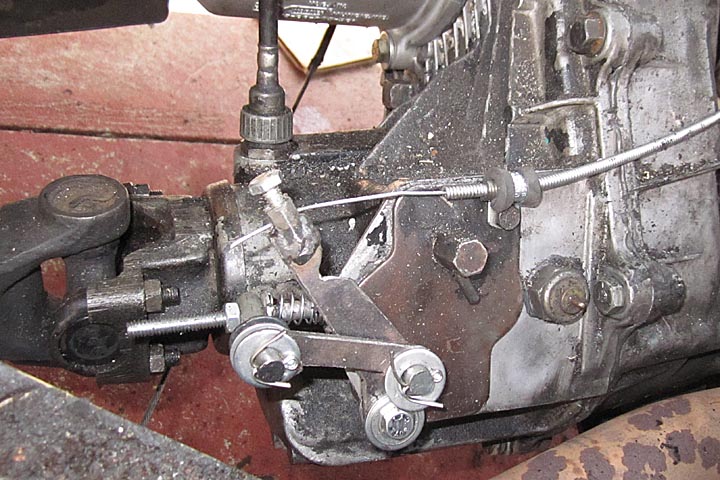
    I recently completed BigRedChief's cable-shift conversion on my QT case, and I'm really happy with the results. A huge THANKS to BigRedChief for pioneering that and posting up his instructions. I owe you a beer!

    I took it one tiny step further and drew up patterns for the metal pieces that are cut for this, I'll post that stuff up later this weekend.

    I highly recommend QT owners do this conversion. It's very much worth it to do away with the uncertainty of the vacuum shifter. It does take a bit of fabrication and welding, but it's simple and I actually really enjoyed putting it together.

    And the best part – IT WORKS.
    1979 Cherokee Chief S, 360, TFI, Part-time conversion, rust

    If you go lookin' for rust, you'll find it.
  • Heavy_Metal_Thunder_81
    Cherokee Outlaw
    • Jan 10, 2006
    • 7292

    #2
    -Jonny B.
    1979 Cherokee Golden Eagle - UNDER CONSTRUCTION
    7" Alcan springs, BJ's HD shackles - 35x12.5x15 BFG Mud Terrains
    AMC 401 - Pro-Flo 4 EFI
    NV4500/NWF BB/NP205 - Triple Stick'd
    F D44 - 4.10, Eaton E-Locker
    R M23 - 4.10, Detroit Locker

    1979 Cherokee Chief - Parts
    1979 Cherokee Chief - Parts
    1979 Wagoneer - Sold
    1981 Cherokee Chief - Cubed

    Comment

    • ol HICKS
      232 I6
      • Nov 02, 2006
      • 134

      #3
      Thats cool I would like to see this.
      79 J10
      stock 360, 600 carb
      6inch springs front
      waiting on the back
      F-250 shock towers
      33/12.50 BFG
      Camo paint done by me

      Comment

      • funhog
        350 Buick
        • May 30, 2005
        • 894

        #4
        That's a nice write up. Thanks BigRed!
        Don Martin

        79 cherokee chief
        2" Body Lift
        33"X12.5"

        79 Wagoneer limited
        Restored

        78,79, 82, 87 all rolled up into one.

        Comment

        • elskeptico
          350 Buick
          • Sep 03, 2003
          • 821

          #5
          Here's the template I made for the two linkage parts.

          I followed the write-up pretty closely, except I didn't use a nylon spacer (couldn't find one like that), and I used a spring with slightly less compression.
          Attached Files
          1979 Cherokee Chief S, 360, TFI, Part-time conversion, rust

          If you go lookin' for rust, you'll find it.

          Comment

          • ORNJKRUSH
            232 I6
            • Jan 01, 2010
            • 93

            #6
            BRILLIANT! I was under the Wag just today wondering to myself, "what if that actuator sh|t the bed?"
            '76 FSJ Wagoneer 360/TH400/Q-trac | SOA front | rear shackle flip in rear | Performer intake | 670 Truck Avenger | CS-144 | Mallory dizzy | 33" Bighorns |

            401 status: tore down, parts collection in progress... Aka "Beastie".

            NEWB to FSJ world, currently wandering... absorbing... learning all there is to learn.

            Comment

            • elskeptico
              350 Buick
              • Sep 03, 2003
              • 821

              #7
              Pretty much identical to the write-up's pics, but here's how mine turned out:


              I ended up putting a little notch in that arm to allow for a little more travel if necessary.

              Oh yeah, and having the pass. side floor cut out helps with this mod
              1979 Cherokee Chief S, 360, TFI, Part-time conversion, rust

              If you go lookin' for rust, you'll find it.

              Comment

              • fulsizjeep
                Señor Jackhead
                • Aug 21, 2002
                • 22496

                #8
                Nice Work elskeptico!


                Originally posted by ORNJKRUSH
                BRILLIANT! I was under the Wag just today wondering to myself, "what if that actuator sh|t the bed?"
                They are listed on eBay pretty often for $35. They are $90 at Bjs Offroad and may be more available. That, some new vacuum hose, 3 qts QT fluid and a few hours of work - good to go.
                Flint
                Ran when parked.
                http://jubileejeeps.org/quadratrac
                88 GW, 401/727/208, 5" lift, D44s/4.10s/locked up, 35s with a few Evil Twin & TT's Fabworks mods
                76 401 Wag, 77 401 Wag, 77 401 J20
                http://eviltwinfab.com http://www.ttsfabworks.com

                Comment

                • billyrb
                  BJ's Off-Road
                  • Aug 15, 2001
                  • 10032

                  #9
                  I bought Allen's rig and used that cable shift set-up for a while....worked GREAT.
                  BJ's Off-Road
                  [email protected]
                  Your source for '63-'91 FSJ Parts

                  Comment

                  • levi's chief
                    230 Tornado
                    • Nov 08, 2009
                    • 18

                    #10
                    how hard is it to make it work and do u beleave it s worth it ?????

                    Comment

                    • elskeptico
                      350 Buick
                      • Sep 03, 2003
                      • 821

                      #11
                      Originally posted by levi's chief
                      how hard is it to make it work and do u beleave it s worth it ?????
                      It definitely requires a time investment to fab up those little parts, but not a lot, and for the most part it's pretty easy. For me, it's totally worth it, as I don't like relying on the vacuum junk, but as you can see above, opinions differ on this.
                      1979 Cherokee Chief S, 360, TFI, Part-time conversion, rust

                      If you go lookin' for rust, you'll find it.

                      Comment

                      • jammer1
                        232 I6
                        • Jun 13, 2015
                        • 25

                        #12
                        Instructions link (for BigRedChief's cable-shift conversion) isn't working. Does anyone the the instructions. I'm probably going to have to do cable and it's nice to have a working unit. Thanks.

                        Comment

                        • memo43
                          232 I6
                          • Mar 02, 2016
                          • 40

                          #13
                          Looking to do the same
                          anyone save the instructions
                          Memo
                          US Marine
                          First jeep ever and loving every second

                          Comment

                          • rang-a-stang
                            Administrator
                            • Oct 31, 2016
                            • 5505

                            #14
                            Yes! Instructions please! And I don't see your picture either...
                            Chuck McTruck 71 J4000
                            (Chuck McTruck Build Thread)
                            (8.1L swap questions - PerformanceTrucks.net Forums​)
                            79 Cherokee Chief (SOLD, goodbye old buddy)
                            (Cherokee Build Thread)
                            11 Nissan Pathfinder Silver Edition 4x4
                            09 Mazdaspeed3 Grand Touring
                            00 Baby Cherokee

                            Comment

                            • jammer1
                              232 I6
                              • Jun 13, 2015
                              • 25

                              #15
                              Did the Q-trac shift cable. I had a extra case sitting on the shelf, so I was able to do most of the work on a bench. Pulled the cover off. Left side of shift fork has a spring that compresses the shift shaft housing. In the hole to the right of the shift fork is where the spring and detent ball. The spring and ball is under the actuator shaft. With the spring removed on the diaphragm you can slide the actuator out. I put a screw driver in the hole on the right to keep the ball from coming out.

                              Tried sending pics and not able to. Says I'm exceeding quota limit by 15.0 kb. Pic is 15.0 kb. Hopefully mods can set me on the right path.
                              Attached Files
                              Last edited by jammer1; 12-29-2017, 05:34 PM.

                              Comment

                              Working...
                              X