

 Tweet
Tweet
Check back soon more pics of the alt installed coming soon!
Hello again everyone,
Wagoneerlover is at it again. This time with a cs-144 install. I always try to write up the things that I do so that others out there can have additional resources to refer to. I know that many have done this in the past so here I am with an additonal write up. Hope that someone may find it useful in the future. (Anyone who wants to do any mods should try to read as many write ups on it as possible) maybe you can get something out of one write up that you dont get out of the other etc.
First off let me say that the Cs-144 makes the stock alt look like crap. These rigs should have come from the factory with one already installed. This is probably the easiest upgrade/mdification that I have done and I would recommend it to anyone. You can purchase a stock one that will be 140 amps or you can get them in 200 amp models (More money) and higher!! I think I saw one out there that was 260 and a 320 model (And with much money it can be had). Supposedly if you know how to pull them apart and work on them you can get the parts and mod them yourself (making a higher amp model) instead of purchasing an expensive modded one. (I did not check into getting parts to mod it so I am not sure).
Compare that to the meek 85 amps that the stock alt puts out. (Junk)
Things that you will need for this project (!Warning! If you have a rig equipped with ammeter then read extra step below. !Warning!) If you have a voltmeter equipped rig then ignore this warning.
1. cs-144 alternator from a 1994 cadillac deville concours with 4.9 litre engine. (This one is clocked correctly and it is 140 amps in stock form.) There are others out there but they may not be clocked correctly, if you pick up the wrong one the alternator vent ports will wind up right near the exhaust manifold and you wont have fun with it when it overheats. Secondly it will have the two wire connector that our rigs use. Some of them have three and four wire connectors in the rear so if you pick up one from a different vehicle you are rolling the dice. (Just be sure to check it and see how many pins the input connector has and what position its clocked in).
2. an m10 x 1.50 bolt and nut (This bolt is used for the adjustment bolt on the Cs-144.) The bolt for the stock alt is too small and will not fit.
3. 2 gauge cable (For 140 amp model) And a 0 gauge cable for models higher than 140 amp. A friend of mine installed a 200 amp model in his Monte Carlo and it melted a 2 gauge wire. if you get the 200 amp model please get the 0 gauge wire otherwise you will be riding along one day and bye bye wiring.
a 2 gauge cable that is 24 inches or so. It needs to have the hook type connector at the end (I found it in the battery cable section.) Do not get the one that has the battery cable clamp on one side and a hook connector on the other side. or you can go to an electrical shop or a stereo installation shop and have a cable made for you.
4. washers to shim the oem bracket bolts.
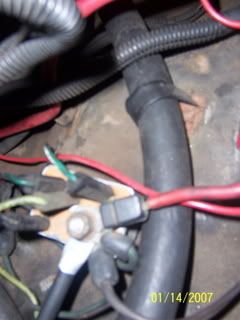
5. You will need an alternator cable adapter. This adapter plugs into the existing harness where the old alt went and the other side plugs into the cs-144. This way you dont have to mod your harness and start cutting and splicing. The part number for the cable is AC Delco 8028. (There are other manufacturers that make this harness too, like powermaster) I found mine in my local mom and pop automotive shop, but once I found it I begin to notice it in other places. Here are links to some places that have them if you cannot find it in your local shop. (But they have it in advance, Kragen and checkers if you can get there.) here are the links:


They also have it at Napa and its not in the catalog just give them the ac delco number and they will find it. It is also at many other parts houses too.
(Ammeter equipped rigs only)
6. A voltmeter. (Before you do a high output alternator upgrade you need to bypass your ammeter and install a voltmeter). If you send 140 amps through the ampmeter it will start a fire and you will be up the creek without a paddle and maybe less one rig. Bypassing the ammeter rquires some extra wiring under the hood etc. If you dont know how do a search on this board. I dont feel like writing it all out on how to do it.
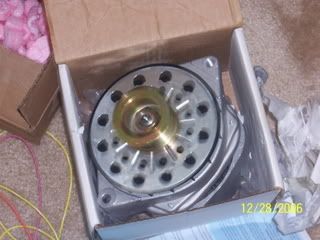
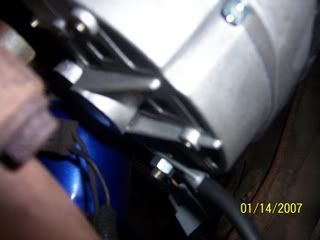
The new Cs 144 brand new in the box

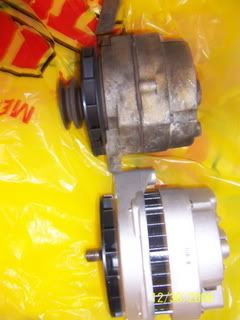
The stock alternator lined up next to the Cs144 as you can see the cs-144 is almost the same size!!!
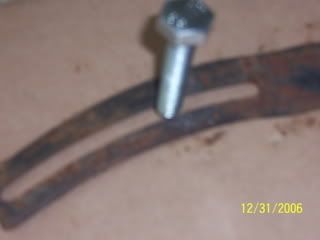
The stock alternator bracket with the cs-144 adjustment bolt. As you can see it wont fit. The hole in the stock bracket must be widened.
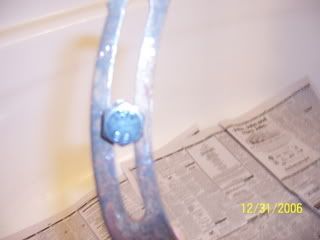
The stock alt bracket after modifying it to fit the m 10 x 1.50 bolt. I used a grinder to open the hole up a little more.
Check back soon more pics of the alt installed coming soon!
Wagoneerlover


 question, does the installer need to worry about anything else? Any potential problems with the factory wiring?

") ) on the bracket mod. That's been my one hang-up to going with the 144. The CS130 is a direct, no mod necessary drop in for our setups. Sure, it's 105A as opposed to 144A but I don't have a winch, electric fan, locomotive lights, etc...but if the bracket mod is a 1 Cuss Word on the patented Cuss Word scale, then it might be worth it. 3 Cuss Words is definitely not and 2...well that would depend on whether there are Fat Tires in the fridge or not.
) on the bracket mod. That's been my one hang-up to going with the 144. The CS130 is a direct, no mod necessary drop in for our setups. Sure, it's 105A as opposed to 144A but I don't have a winch, electric fan, locomotive lights, etc...but if the bracket mod is a 1 Cuss Word on the patented Cuss Word scale, then it might be worth it. 3 Cuss Words is definitely not and 2...well that would depend on whether there are Fat Tires in the fridge or not.


Comment