
 Tweet
Tweet
Installing GM Hydro Boost brakes in a Dauntless 350 powered FSJ.
Note, this covers installing the Hydro Boost in a Jeep with a manual transmission. Installing the Hydro Boost in a Jeep with a automatic transmission will be different, as the push rod for automatic equipped Jeep's goes through the firewall in a different location.
The swap was fairly straightforward. This write up is broken down in to several sections.
All of the parts I used came off of a 1979 Chevy K-30. To my knowledge Hydro Boost systems can be found on all GM 1 ton trucks and vans, as well as on 3/4-ton Diesel
trucks.
The Booster.
On a GM, the booster is held on by 6 studs, two pressed into the booster mounting plate, and 4 pressed into the firewall. In order to mount the booster on my Jeep I had to remove the two studs pressed in to the booster plate as I was unable to mount the push rod eye onto the brake pedal stud and align them (the studs) with the holes in the firewall at the same time.
The middle two mounting holes on the booster mounting plate line up with the stock Jeep master cylinder mounting holes in the firewall. I drilled two holes through my firewall (using the booster plate as a guide) in order to use the lower mounting holes on the booster plate. The top ones cannot be used.
The top left corner of the booster plate must be cut off in order to clear the wiper motor mounting bracket.
In order to connect the booster (or even fit it into place on the firewall) the push rod must be cut down. The length of the push rod may vary from Jeep to Jeep, so I will leave this measurement out. Jeep used a larger push rod mounting stud then Chevy, so you will either have to open the Chevy push rod eye up slightly, or use the Jeep push rod eye when you weld the push rod back together. I had mine TIG welded.
It helps to have two people to install the booster, as with out the studs one must connect the push rod to the pedal stud and support the booster at the same time. I used 3/8?X 1? grade 8 bolts in place of the studs. I chose to run my bolts in from the engine side of the firewall, though it makes no apparent difference as to which way they go.
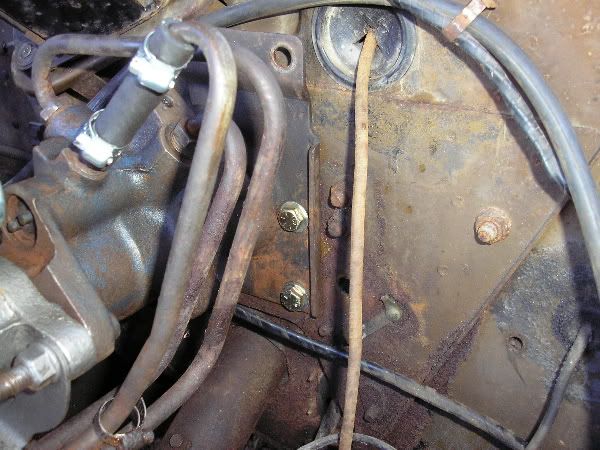
The middle bolt holes line up with the stock master cylinder mounting holes, the bottom holes need to be drilled through the firewall, and the top cannot be used.
The Pump.
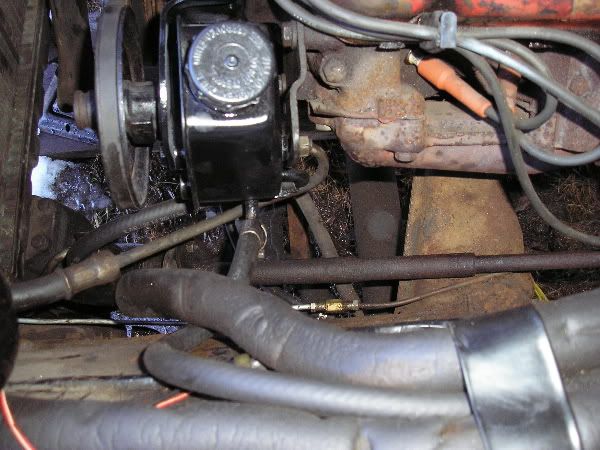
One can use the stock pump by connecting the return line from the steering box to the pump to the return line from the booster to the pump with a T fitting. However since I had the Chevy pump with the two return line outlets, I decided to use it. On my pump, I had to remove the pulley in order to remove the pump mounting bracket.
Here it should be noted that my Gladiator has/had an actual Buick power steering pump and brackets. The factory Jeep power steering bracket and pump on my Wagoneer is different, so the following may or may not affect you.
In order to mount the pump, I had to swap the top left plug with the bottom right stud on the back of the pump. This stud is simply threaded in and is used as a part of the adjusting system. The Chevy pump pulley was larger then the Buick power steering pulley, however I was still able to use the belt.

The positions of the stud and the plug must be swapped. (Grimy, ain't it?)
The Master Cylinder.
Any master cylinder for the JB8 Hydro-Boost brake system should work. The one I used is a Fenco part number M1584. The ports for the brake lines are on the driver?s side of the master cylinder, as opposed to the passenger?s side of Jeep master cylinders. The GM master cylinder uses a 1/4" line for the front port, VS Jeeps 3/16?, so an adapter is necessary. Any good parts store should carry one. Mine came from NAPA and was just under $4.
On GM's the front reservoir supplies the rear brakes, and the rear reservoir supplies the front brakes. Remember this when installing your new brake lines.
GM uses a plunger style stop light switch mounted to the brake pedal arm, VS Jeeps master cylinder mounted pressure switch. I don?t care for the plunger style switch, so I plumbed my original pressure switch into my front brake line using a T style hydraulic fitting. This part should be available at all better auto parts stores. My local Auto-Zone did not carry this part. I purchased it from NAPA for just under $5 with two 3/16? line fittings.

The master cylinder, brake line adapter and pressure switch.
Hoses.
There are three hoses that attach to the Hydro boost, the booster to pump return hose, the booster to pump pressure line and the booster to steering box pressure line.
You discard the factory steering box to steering pump pressure line, as its attaching points are used by the booster to pump pressure line, and booster to steering box pressure line.
I found two different booster to pump pressure lines. One is off a GM trucks with a small block, and the other is off a GM trucks with a big block. Either will work, however the big block hose is shorter and fits better.
The stock steering box to pump return hose fitting is smaller then the one used on GM?s. This did not affect anything as this in the one hose that stays in place (besides disconnecting it from one pump and reconnecting it the other).
As you can see, there is alot going on in this area with all the hoses attached.
Misc.
There are two brackets designed to secure the hoses, one that holds the metal part of the lines and mounts under the master cylinder attaching nuts, and one that mounts to the inner fender and holds the rubber part pf the lines. They are not necessary, however they do make routing the hoses easier, not to mention better looking.
I moved my windshield washer fluid bag to the passenger?s side inner fender (the same position Jeep mounted the bags in vehicles with power brakes). I could have left it on the drivers side, but with the brake lines now on the drivers side, and the hoses that particular are was getting crowded. A longer hose from bag to washer nipple is needed to do this.
Alternatively, one could mount the later model plastic washer fluid tank,
However the coolness factor of your washer system would be diminished
The washer bag in its new position. This is the correct location.
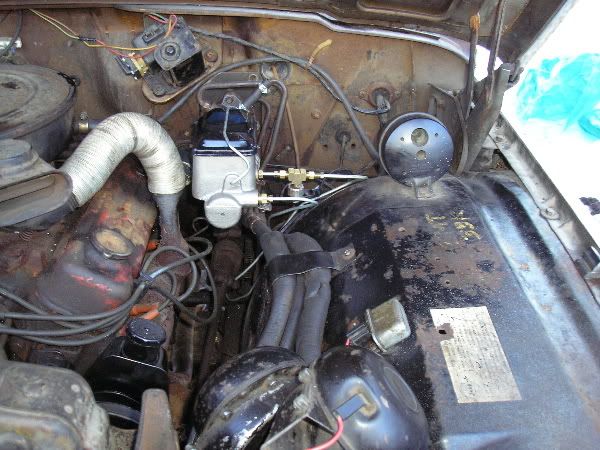
Overall, the finished install is pretty clean.
Note, this covers installing the Hydro Boost in a Jeep with a manual transmission. Installing the Hydro Boost in a Jeep with a automatic transmission will be different, as the push rod for automatic equipped Jeep's goes through the firewall in a different location.
The swap was fairly straightforward. This write up is broken down in to several sections.
All of the parts I used came off of a 1979 Chevy K-30. To my knowledge Hydro Boost systems can be found on all GM 1 ton trucks and vans, as well as on 3/4-ton Diesel
trucks.
The Booster.
On a GM, the booster is held on by 6 studs, two pressed into the booster mounting plate, and 4 pressed into the firewall. In order to mount the booster on my Jeep I had to remove the two studs pressed in to the booster plate as I was unable to mount the push rod eye onto the brake pedal stud and align them (the studs) with the holes in the firewall at the same time.
The middle two mounting holes on the booster mounting plate line up with the stock Jeep master cylinder mounting holes in the firewall. I drilled two holes through my firewall (using the booster plate as a guide) in order to use the lower mounting holes on the booster plate. The top ones cannot be used.
The top left corner of the booster plate must be cut off in order to clear the wiper motor mounting bracket.
In order to connect the booster (or even fit it into place on the firewall) the push rod must be cut down. The length of the push rod may vary from Jeep to Jeep, so I will leave this measurement out. Jeep used a larger push rod mounting stud then Chevy, so you will either have to open the Chevy push rod eye up slightly, or use the Jeep push rod eye when you weld the push rod back together. I had mine TIG welded.
It helps to have two people to install the booster, as with out the studs one must connect the push rod to the pedal stud and support the booster at the same time. I used 3/8?X 1? grade 8 bolts in place of the studs. I chose to run my bolts in from the engine side of the firewall, though it makes no apparent difference as to which way they go.
The middle bolt holes line up with the stock master cylinder mounting holes, the bottom holes need to be drilled through the firewall, and the top cannot be used.
The Pump.
One can use the stock pump by connecting the return line from the steering box to the pump to the return line from the booster to the pump with a T fitting. However since I had the Chevy pump with the two return line outlets, I decided to use it. On my pump, I had to remove the pulley in order to remove the pump mounting bracket.
Here it should be noted that my Gladiator has/had an actual Buick power steering pump and brackets. The factory Jeep power steering bracket and pump on my Wagoneer is different, so the following may or may not affect you.
In order to mount the pump, I had to swap the top left plug with the bottom right stud on the back of the pump. This stud is simply threaded in and is used as a part of the adjusting system. The Chevy pump pulley was larger then the Buick power steering pulley, however I was still able to use the belt.
The positions of the stud and the plug must be swapped. (Grimy, ain't it?)
The Master Cylinder.
Any master cylinder for the JB8 Hydro-Boost brake system should work. The one I used is a Fenco part number M1584. The ports for the brake lines are on the driver?s side of the master cylinder, as opposed to the passenger?s side of Jeep master cylinders. The GM master cylinder uses a 1/4" line for the front port, VS Jeeps 3/16?, so an adapter is necessary. Any good parts store should carry one. Mine came from NAPA and was just under $4.
On GM's the front reservoir supplies the rear brakes, and the rear reservoir supplies the front brakes. Remember this when installing your new brake lines.
GM uses a plunger style stop light switch mounted to the brake pedal arm, VS Jeeps master cylinder mounted pressure switch. I don?t care for the plunger style switch, so I plumbed my original pressure switch into my front brake line using a T style hydraulic fitting. This part should be available at all better auto parts stores. My local Auto-Zone did not carry this part. I purchased it from NAPA for just under $5 with two 3/16? line fittings.
The master cylinder, brake line adapter and pressure switch.
Hoses.
There are three hoses that attach to the Hydro boost, the booster to pump return hose, the booster to pump pressure line and the booster to steering box pressure line.
You discard the factory steering box to steering pump pressure line, as its attaching points are used by the booster to pump pressure line, and booster to steering box pressure line.
I found two different booster to pump pressure lines. One is off a GM trucks with a small block, and the other is off a GM trucks with a big block. Either will work, however the big block hose is shorter and fits better.
The stock steering box to pump return hose fitting is smaller then the one used on GM?s. This did not affect anything as this in the one hose that stays in place (besides disconnecting it from one pump and reconnecting it the other).
As you can see, there is alot going on in this area with all the hoses attached.
Misc.
There are two brackets designed to secure the hoses, one that holds the metal part of the lines and mounts under the master cylinder attaching nuts, and one that mounts to the inner fender and holds the rubber part pf the lines. They are not necessary, however they do make routing the hoses easier, not to mention better looking.
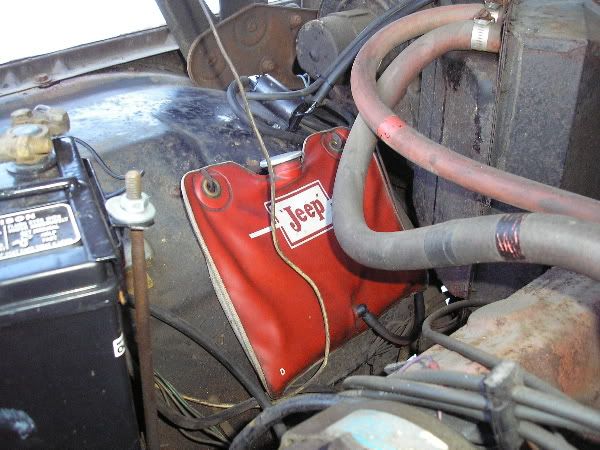
I moved my windshield washer fluid bag to the passenger?s side inner fender (the same position Jeep mounted the bags in vehicles with power brakes). I could have left it on the drivers side, but with the brake lines now on the drivers side, and the hoses that particular are was getting crowded. A longer hose from bag to washer nipple is needed to do this.
Alternatively, one could mount the later model plastic washer fluid tank,
However the coolness factor of your washer system would be diminished
The washer bag in its new position. This is the correct location.
Overall, the finished install is pretty clean.


 ......That's what those hooks on the side of my fender well are......Now I need a cool bag like that. Anybody got one?
 I'll go the cut and thread option for my long rod. BTW I understand these units are rebuildable, but unless you have a removable rod or are able to aneal and remove it you can't replace the pistons seals during the rebuild. There really isn't much to the seal kit, I picked one up on E-bay cheapo.


Comment