

 Tweet
Tweet
Here is the write up of my Conversion from Square Sealed beam headlights to Round H4 Lights. This will cover how to upgrade from sealed beams to H4 with Relays.
The parts list is very simple for this below is what I bought:
From JC Whitney
Part # Description Cost
311053 HIGH TEMP HEADLIGHT SOCKET FITS H4/9003 $8.99
750548 PRIMARY WIRE 10-GAUGE, 25' GREEN $12.99
312136 7" H4 HI/LO XENON HEADLIGHT $82.99
From a Local Auto Parts Store (I used O?Reilly?s)
Description
Generic Headlight/Horn Relay X3
On-Off-On Toggle Switch (I replaced the headlight switch with a toggle Switch, due to PO?s Wiring issue)
Misc. wiring connectors
Red 10 GA Wire
Getting ready:
The one thing that I didn?t check when I started was to make sure that I had the right size and enough wiring connectors. I had to make a couple extra trips to the parts store in the middle of doing something so I could pick up more connectors. I used 10 Gauge wire but looking at it, it is probably overkill. The High Temp Head light sockets use a smaller wire then 10 GA probably 12 GA. You could probably get by with 12 GA wire and be just fine. I ordered the headlights from JC Whitney and they sent me ones for a Wrangler that didn?t work so after a phone call and another week I had the correct one in my hands. While I was waiting on the correct headlights I started the wiring.
One quick word of advice; Spend the money to get different color wiring to avoid confusion. I worked on a friend?s car once that all he used was 8 Gauge black wire for anything that he added. It was a mess to try and figure out what went where and what was a power wire. I got zapped a couple of times. When he needed a bigger wire he just ran 2 strands of 14 Gauge Black wire. It was a mess. When I asked my friend why the 14 Ga black wire he said that he got a large spool of it at a garage sale and it was there so he used it. So to sum up the above paragraph GET DIFFERENT COLOR AND SIZES OF WIRES!!!! Some one will thank you for it later.
The Installation:
Over all not much else is needed to run and set up the wiring for the new headlights. I used a 10 Ga wire from the Positive side of the starter solenoid to power my relays. Connect the wire from your power source to a inline fuse holder, then connect it to the terminal marked #30 (the numbers are for the most part the same on a relay I had a couple different brands and the numbers and set up were the same). Terminal #85 is the ground. Run a wire from it to the body, I use a screw to attach the wire to the inner fender. See Photo 1. Terminal #87 is what will power the headlights when the switch is turned on. Run a wire to the Headlight socket. The headlight socket has 3 wires (Photo 4), a red, green, and a black. The black is the ground wire for the headlight. I used the factory ground location to the core support. The green wire is the low beam power wire. The red wire is the high beam power wire. Looking at the photos you will see that I have 3 relays. The reason is one of the relays I bought has 2 power outputs. I ran the high beam lights off of the 2 output relay because I will use my high beams less then my low beams. The low-beams each have their own relay. I ran the wires for the headlight following the factory wires. See Photo?s 2 and 3. Terminal #86 is the switch for the relay; this will ?turn? the relay on and send power to the headlights when you turn the switch on. In most cases you will use the wire that is currently supplying your headlight with power for terminal #86. I ran new wires because I replaced the factory headlight switch with a toggle switch.
If you are still confused about how to wire your relay, see here: http://www.ado13.com/techs/relay.htm
After I had everything hooked up I plugged the wiring into the old headlight and nothing happened I was confused at first. I re-checked the wring to make sure it was securely connected to everything. I found nothing loose. After scratching my head I stopped to think about it. I forgot to add a fuse to the inline fuse holder. Once the 25 Amp fuse was in place everything worked. It was an improvement with the sealed headlights. When I got the H4 Headlights from JC Whitney I connected one and flipped the switch. I was lighting up my neighbors yard that was across the street and a couple of houses down. This was with one headlight. I can?t wait to get the rest of the front end conversion done and have 2 headlights to play with. Photos 5-8 arent posted yet they will be a photos of the head light lighting up my back yard. I will take one int he day time, one with the old sealed beams w/o Relays, sealed beams with relays and the H4's with replays
Here are the photos:
Photo 1A
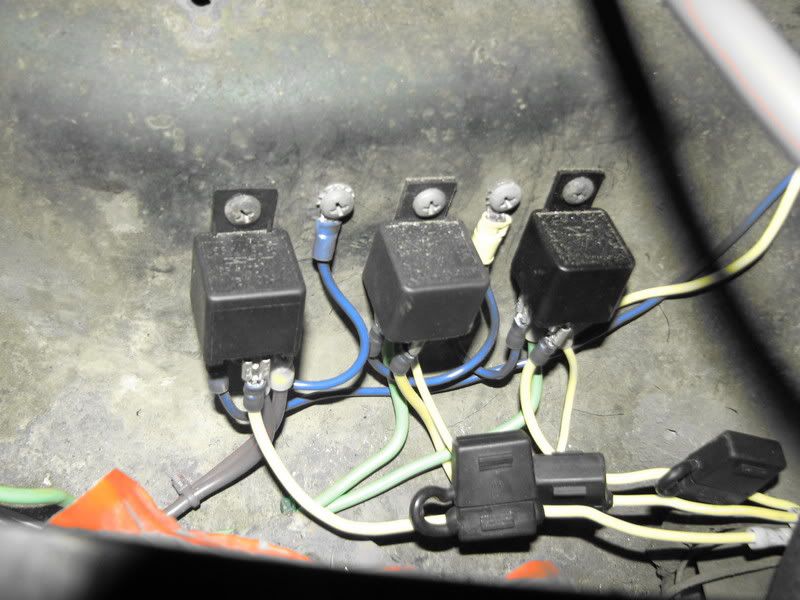
Photo 1B
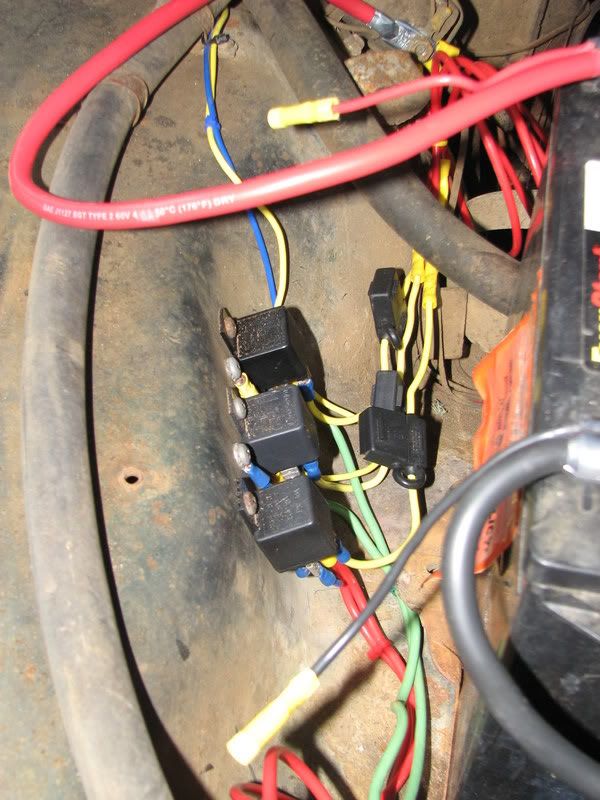
Photo 2
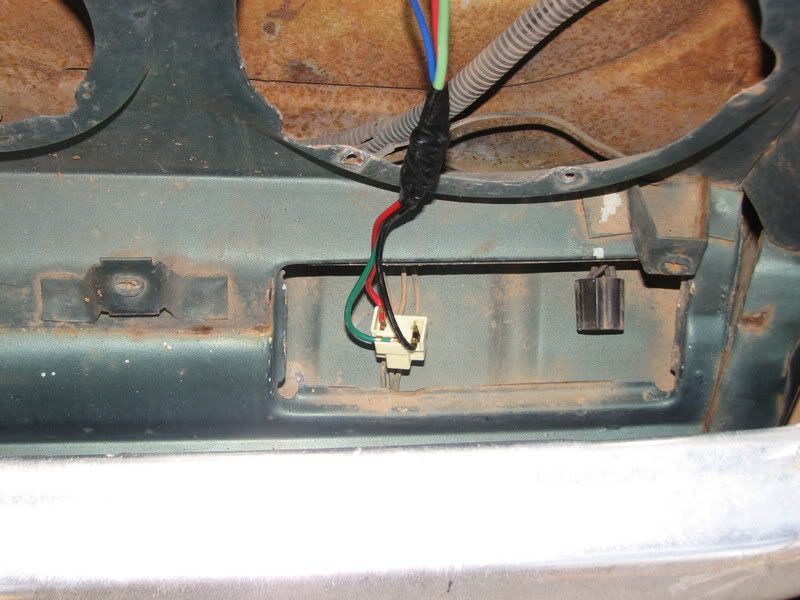
Photo 3
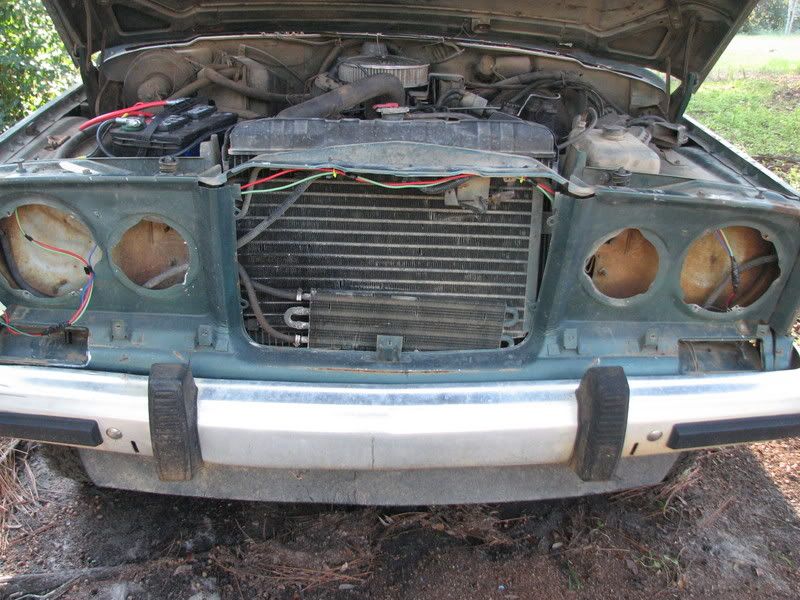
Photo 4
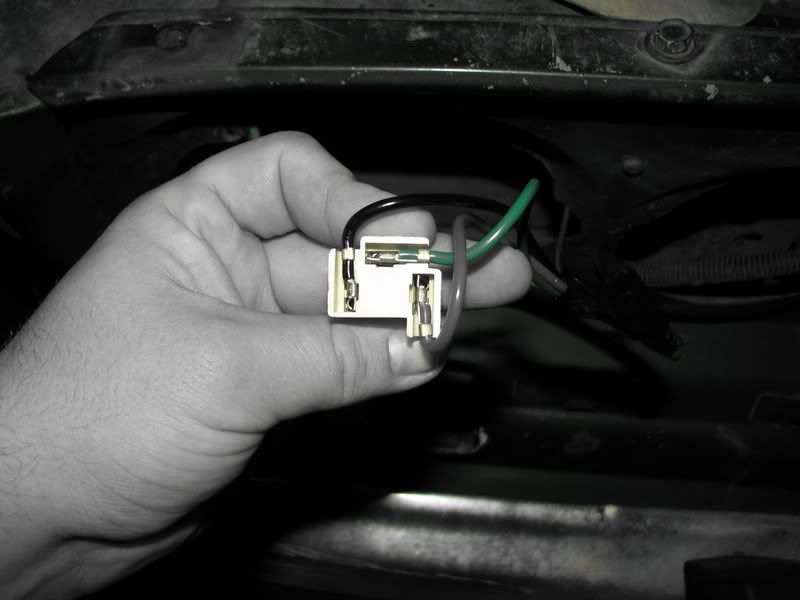
Photo 5
Comming Soon
Photo 6
Comming Soon
Photo 7
Comming Soon
Photo 8
Comming Soon
I hope you find this helpful in planning and buying what you need to do the H4 conversion. If you have more questions send me a PM and I will help you out.
I am also getting ready to convert from the Square Headlight to Round ones. I will be picking up the parts at the Bama Get together. I will post a Write up on it when I start working on it.
Thanks
MAHA
The parts list is very simple for this below is what I bought:
From JC Whitney
Part # Description Cost
311053 HIGH TEMP HEADLIGHT SOCKET FITS H4/9003 $8.99
750548 PRIMARY WIRE 10-GAUGE, 25' GREEN $12.99
312136 7" H4 HI/LO XENON HEADLIGHT $82.99
From a Local Auto Parts Store (I used O?Reilly?s)
Description
Generic Headlight/Horn Relay X3
On-Off-On Toggle Switch (I replaced the headlight switch with a toggle Switch, due to PO?s Wiring issue)
Misc. wiring connectors
Red 10 GA Wire
Getting ready:
The one thing that I didn?t check when I started was to make sure that I had the right size and enough wiring connectors. I had to make a couple extra trips to the parts store in the middle of doing something so I could pick up more connectors. I used 10 Gauge wire but looking at it, it is probably overkill. The High Temp Head light sockets use a smaller wire then 10 GA probably 12 GA. You could probably get by with 12 GA wire and be just fine. I ordered the headlights from JC Whitney and they sent me ones for a Wrangler that didn?t work so after a phone call and another week I had the correct one in my hands. While I was waiting on the correct headlights I started the wiring.
One quick word of advice; Spend the money to get different color wiring to avoid confusion. I worked on a friend?s car once that all he used was 8 Gauge black wire for anything that he added. It was a mess to try and figure out what went where and what was a power wire. I got zapped a couple of times. When he needed a bigger wire he just ran 2 strands of 14 Gauge Black wire. It was a mess. When I asked my friend why the 14 Ga black wire he said that he got a large spool of it at a garage sale and it was there so he used it. So to sum up the above paragraph GET DIFFERENT COLOR AND SIZES OF WIRES!!!! Some one will thank you for it later.
The Installation:
Over all not much else is needed to run and set up the wiring for the new headlights. I used a 10 Ga wire from the Positive side of the starter solenoid to power my relays. Connect the wire from your power source to a inline fuse holder, then connect it to the terminal marked #30 (the numbers are for the most part the same on a relay I had a couple different brands and the numbers and set up were the same). Terminal #85 is the ground. Run a wire from it to the body, I use a screw to attach the wire to the inner fender. See Photo 1. Terminal #87 is what will power the headlights when the switch is turned on. Run a wire to the Headlight socket. The headlight socket has 3 wires (Photo 4), a red, green, and a black. The black is the ground wire for the headlight. I used the factory ground location to the core support. The green wire is the low beam power wire. The red wire is the high beam power wire. Looking at the photos you will see that I have 3 relays. The reason is one of the relays I bought has 2 power outputs. I ran the high beam lights off of the 2 output relay because I will use my high beams less then my low beams. The low-beams each have their own relay. I ran the wires for the headlight following the factory wires. See Photo?s 2 and 3. Terminal #86 is the switch for the relay; this will ?turn? the relay on and send power to the headlights when you turn the switch on. In most cases you will use the wire that is currently supplying your headlight with power for terminal #86. I ran new wires because I replaced the factory headlight switch with a toggle switch.
If you are still confused about how to wire your relay, see here: http://www.ado13.com/techs/relay.htm
After I had everything hooked up I plugged the wiring into the old headlight and nothing happened I was confused at first. I re-checked the wring to make sure it was securely connected to everything. I found nothing loose. After scratching my head I stopped to think about it. I forgot to add a fuse to the inline fuse holder. Once the 25 Amp fuse was in place everything worked. It was an improvement with the sealed headlights. When I got the H4 Headlights from JC Whitney I connected one and flipped the switch. I was lighting up my neighbors yard that was across the street and a couple of houses down. This was with one headlight. I can?t wait to get the rest of the front end conversion done and have 2 headlights to play with. Photos 5-8 arent posted yet they will be a photos of the head light lighting up my back yard. I will take one int he day time, one with the old sealed beams w/o Relays, sealed beams with relays and the H4's with replays
Here are the photos:
Photo 1A
Photo 1B
Photo 2
Photo 3
Photo 4
Photo 5
Comming Soon
Photo 6
Comming Soon
Photo 7
Comming Soon
Photo 8
Comming Soon
I hope you find this helpful in planning and buying what you need to do the H4 conversion. If you have more questions send me a PM and I will help you out.
I am also getting ready to convert from the Square Headlight to Round ones. I will be picking up the parts at the Bama Get together. I will post a Write up on it when I start working on it.
Thanks
MAHA


Comment