
 Tweet
Tweet
If you have a GM Based TBI system you can stream, pretty much, all the data the EFI computer is using, creating, and storing. This is really helpful when troubleshooting and also some tuning. This How-To is purely, "how to connect to the computer and see the data". If you get to the point where you are watching your data you can record it too, and this is really nice so you can see how your engine is running. You can speed the replay up/slow it down. graph it, etc. This is not a “how to tune”.
There is an ENORMOUS amount of information on this topic already available on the interwebz. There are also many different ways to do this. I am not an expert; just someone that spent waaaaaaaaay to much time trying to figure this out, cashed in waaaaay too many favors to clear the air, and spent waaaaay too much money on things that did not work. So here is what works for me, in plain step by step English.
Generally speaking, here is what we are going to do:
1) Build/get a cable to connect your laptop to your EFI computer
2) Set up the laptop to connect to the cable, then the EFI computer
3) enjoy
Step 1 build the cable:
I bought a used Bluetooth cable from a guy on gearhead-efi.com a few years back. It was great...when it worked but then it died. There are many ALDL (GMs OBD 1 connector) to USB cables out there. If you buy one, you can skip down to step 2. It will probably come with instructions anyway. I did not want to spend $55+ on a new cable so I hit up Babywag and he sent me this link:
Gearhead-efi.com, link
That is a REAAllly long thread with lots of information you don't need. Here is the distilled version with pictures.
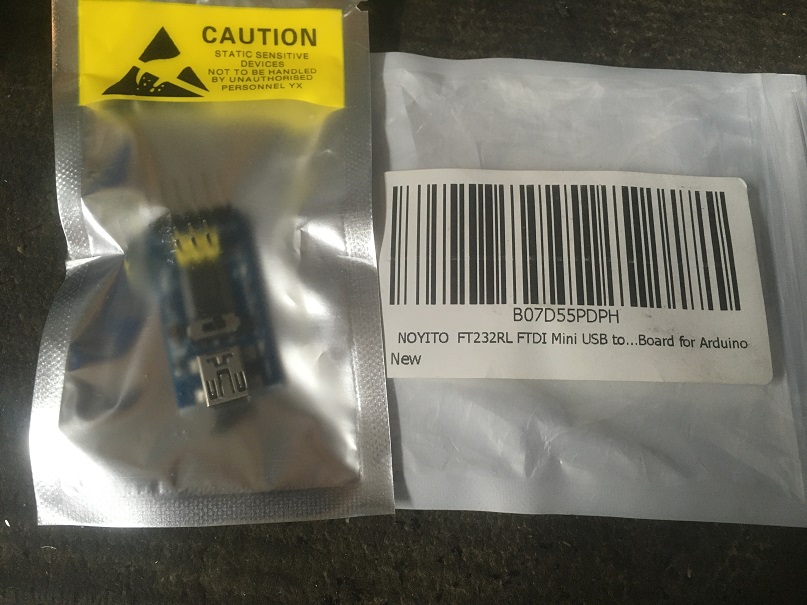
a) buy an FT232RL board. Google them, they are stupid cheap. I got mine on Amazon Jan 2021. Two of them were $8.99. You only need one but I bought two in case I messed one up. This one has a 5V and 3V slide switch. Mine seems to work best in the 5V setting.
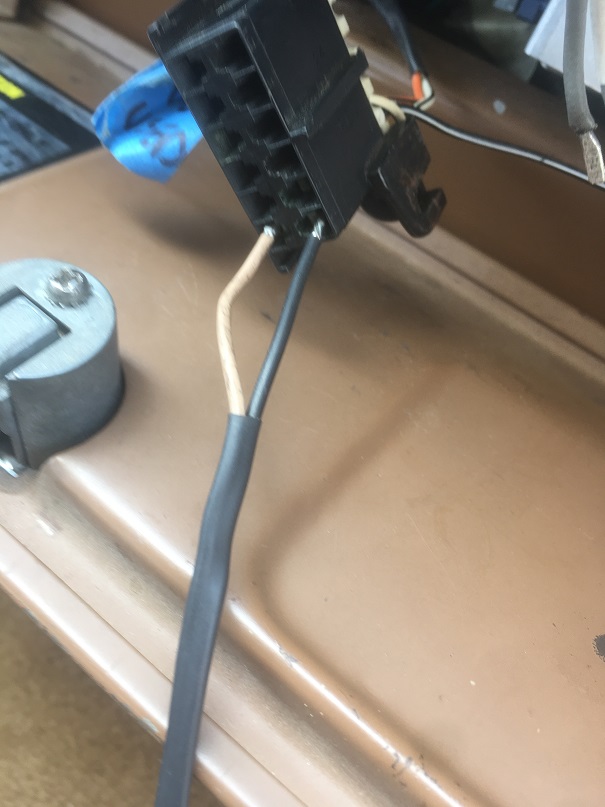
b) you are going to connect RX (or RXD on some boards) to TX (or TXD on some boards) pins together. Then that wire connects to you data pin on the ALDL connector. I soldered mine together and added a longer wire for mounting this in my truck when I was done. Then solder a wire from the ground pin. This will go to the ground pin on the ALDL connector.
I like to cover my connections with heat shrink wrap.
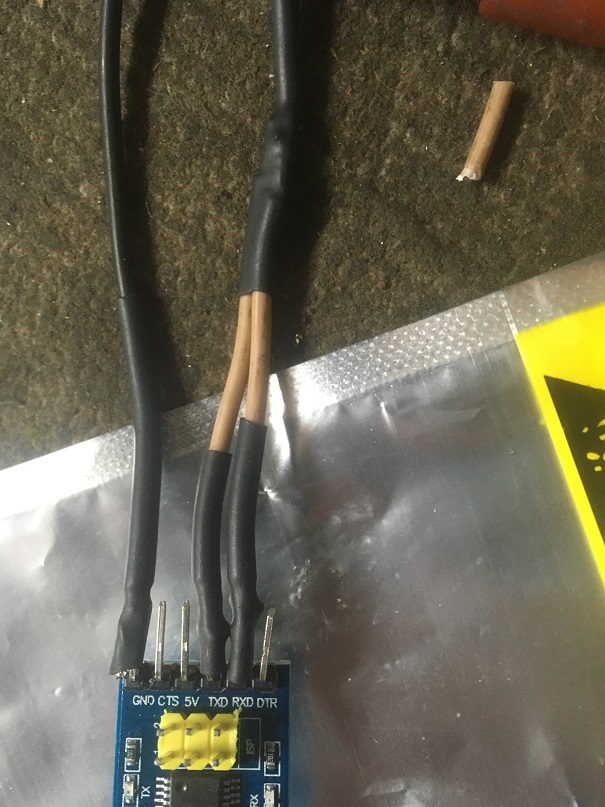
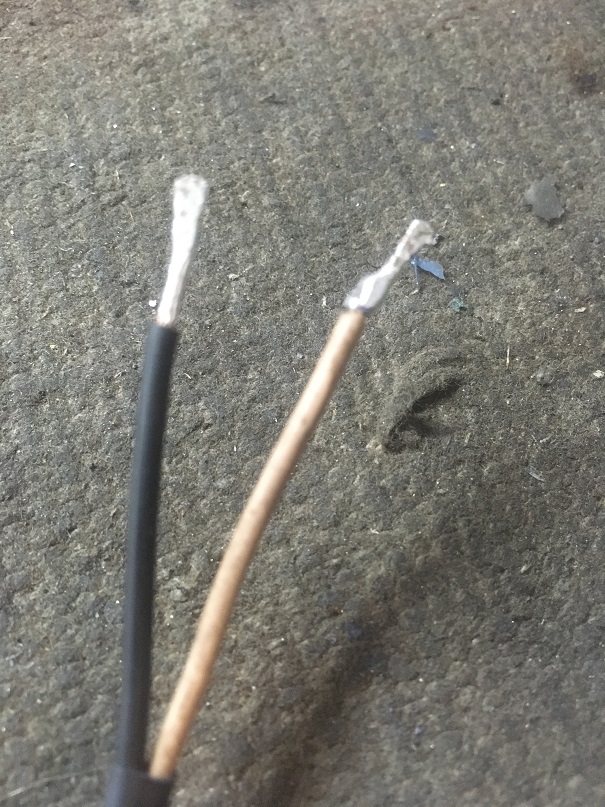
On the leads you just made (the two wires from RX/TX and ground), you have a few choices: you can put pins on them, wire them straight to the back of your OBD connector, or what I do is put a big blob of solder on the end of each wire and pound it, generally flat to make them like pins that you can push into the ALDL connector.
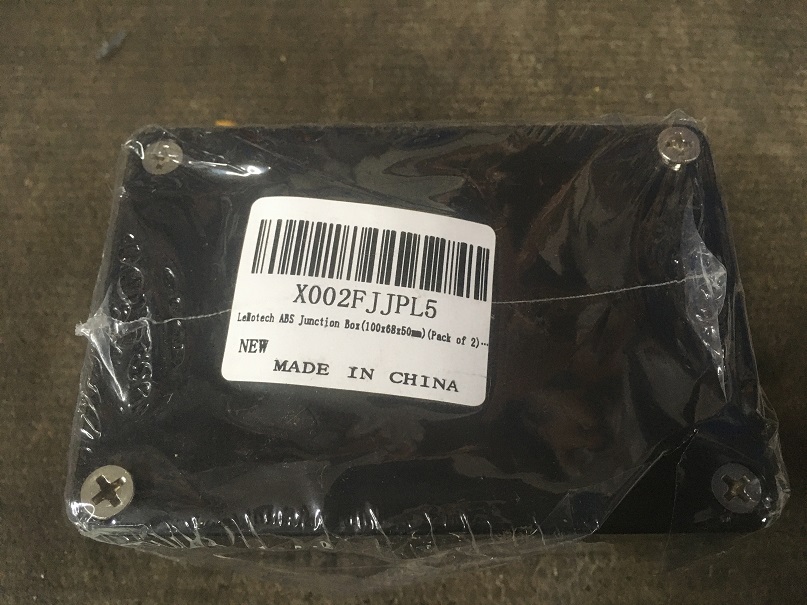
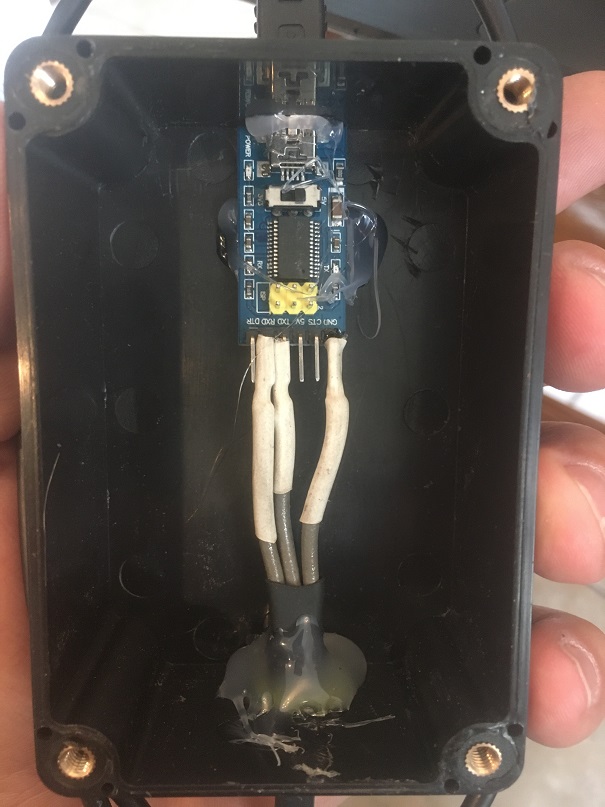
c) Stick it in a project box. Again, I got this one from Amazon. $10 for two of them in Jan 2021. I stuffed the holes with a grommet and sealed them with hot glue so it is somewhat water tight. I then Velcro’ed this B to the computer that is behind my dash.
d) get a USB cord. I had this one left over from something I threw away.

That's all you need, hardware wise. I leave all this stuff hooked up, all the time, in my glove box. Then when I need to use my laptop, I pull the USB cord out from my glove box, plug it into my laptop, and am good to go. My cord is long enough where I can put my laptop on my passenger seat while I drive with the glove box closed and the cord coming out.
Step 2)
I use Tuner Pro RT on my laptop. There are several different programs that will work but I only have experience with TunerPro RT. TunerPro RT is only $35 and does TOOooooons! If you decide you want to start tuning (writing new EFI programs) this software will do it.
a) Download and install TunerPro RT.
b) The first piece of information you need will come from your EFI computer. GM stuck a sticker like this on all their computers:
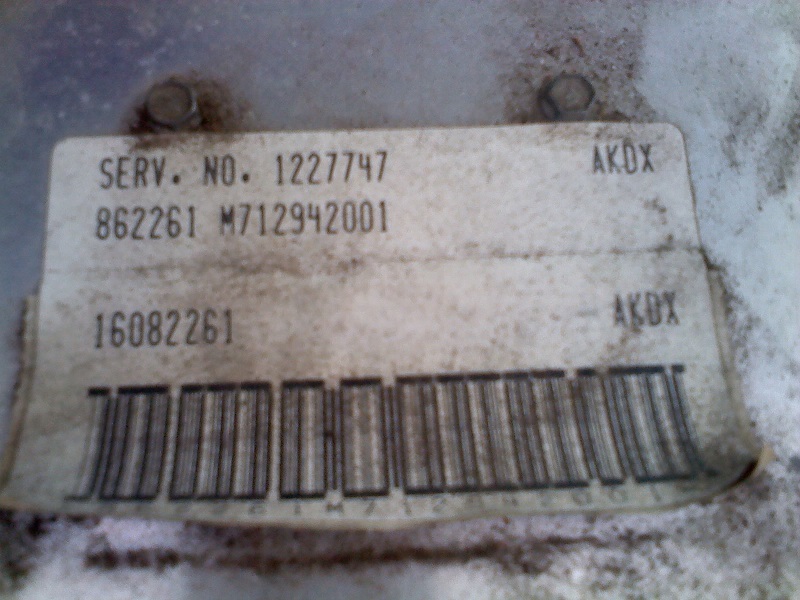
You need to your ECM version (1227747 on this picture) on your computer. If you have a Howell TBI system, you have a 1227747. Go back to the Tunerpro website, to the downloads tab, then definitions, then click on General Motors. It will bring up a table; find your ECM version in that table. To the right of your ECM version you need to save the "BIN Definition" (also called the XDF) and "Datastream Definition" (Also called the ADS or ADX) somewhere on your laptop that you will be using to stream.
c) In Tunerpro, Click on "XDF" Then "Select XDF". It will open a window. Select the XDF file you just downloaded.
Click on "Acquisition", then "Load Definition File". It will open a window. Load that ADX or ADS file you just downloaded.
d) Click "Tools", then "Preferences", then "Data Acq./Emulation" tab. Select:
Use Plug-in
TunerPro Data Acquisition I/O Interface
(Check) Load Last Data Acq. Def at Start
(Check) Warn of ADX/XDF link Mismatch
e) Plug in your cable from step one into the USB port on your computer (you do not need to hook it up to your EFI computer yet). Click "Configure Plug-in Component"
Port type should be "Standard Serial"
Port Number should auto populate.
The click "Test for Valid Interface using settings". If everything is configured correctly, you should get a popup that says "Cable Found and Functional"

If it does not work. Close that window, close the preferences window. Click on “Acquisition”, then click “Edit Definition”
On the window that opens, make sure the settings are:
Default Baud: 8192
Parity: none
RS232 Echo: (checked)
Stop bits: 1
Byte Size (bits): 8
Connection Command: <None>
Monitor command: Mode 1, Message 0 Macro
Disconnect command: <None>
Pause Command: <None>
Unpause Command: <None>
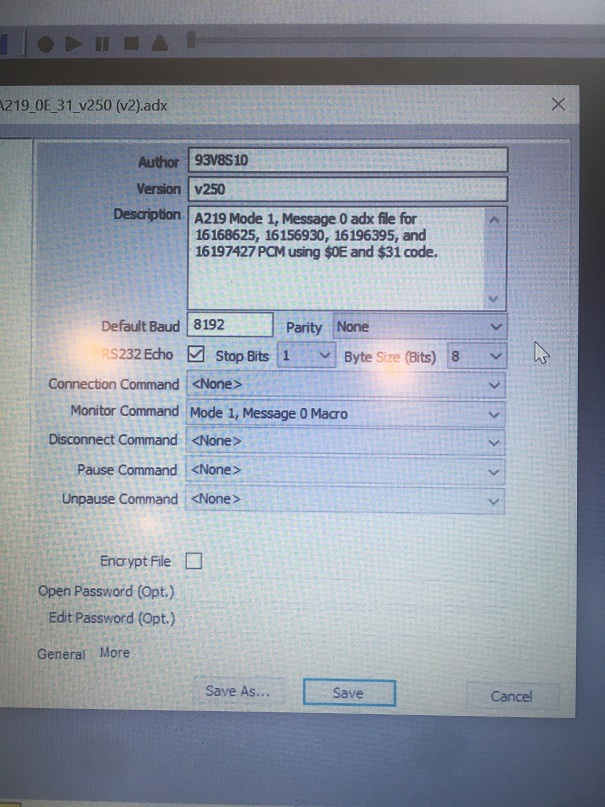
Click save. Then try step 2.d Again.
f) plug your cable into your OBD 1/ALDL connector on your truck. On mine, I plug ground into ground and then RX/TX connected wire into my Pin M. Then turn your key to “Run” or start it if you want.
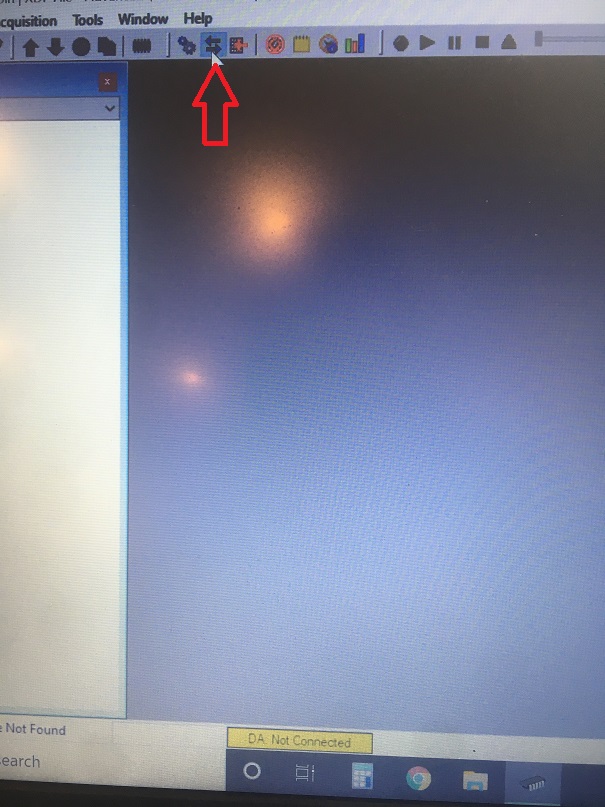
g) on TunerPro, click the two arrows at the top tool bar. When you do, you should see the yellow box at the bottom that says "DA: Not Connected" turn blue and say "DA: Connected"
Step 3) enjoy:
With everything hooked up, click "Acquisition" scroll down to the bottom, click "Load Dash". You should be looking at all the values on your digital dash. You can start your truck and you should see them moving.
Here is a video I took a while ago with mine connected:
There is an ENORMOUS amount of information on this topic already available on the interwebz. There are also many different ways to do this. I am not an expert; just someone that spent waaaaaaaaay to much time trying to figure this out, cashed in waaaaay too many favors to clear the air, and spent waaaaay too much money on things that did not work. So here is what works for me, in plain step by step English.
Generally speaking, here is what we are going to do:
1) Build/get a cable to connect your laptop to your EFI computer
2) Set up the laptop to connect to the cable, then the EFI computer
3) enjoy
Step 1 build the cable:
I bought a used Bluetooth cable from a guy on gearhead-efi.com a few years back. It was great...when it worked but then it died. There are many ALDL (GMs OBD 1 connector) to USB cables out there. If you buy one, you can skip down to step 2. It will probably come with instructions anyway. I did not want to spend $55+ on a new cable so I hit up Babywag and he sent me this link:
Gearhead-efi.com, link
That is a REAAllly long thread with lots of information you don't need. Here is the distilled version with pictures.
a) buy an FT232RL board. Google them, they are stupid cheap. I got mine on Amazon Jan 2021. Two of them were $8.99. You only need one but I bought two in case I messed one up. This one has a 5V and 3V slide switch. Mine seems to work best in the 5V setting.
b) you are going to connect RX (or RXD on some boards) to TX (or TXD on some boards) pins together. Then that wire connects to you data pin on the ALDL connector. I soldered mine together and added a longer wire for mounting this in my truck when I was done. Then solder a wire from the ground pin. This will go to the ground pin on the ALDL connector.
I like to cover my connections with heat shrink wrap.
On the leads you just made (the two wires from RX/TX and ground), you have a few choices: you can put pins on them, wire them straight to the back of your OBD connector, or what I do is put a big blob of solder on the end of each wire and pound it, generally flat to make them like pins that you can push into the ALDL connector.
c) Stick it in a project box. Again, I got this one from Amazon. $10 for two of them in Jan 2021. I stuffed the holes with a grommet and sealed them with hot glue so it is somewhat water tight. I then Velcro’ed this B to the computer that is behind my dash.
d) get a USB cord. I had this one left over from something I threw away.
That's all you need, hardware wise. I leave all this stuff hooked up, all the time, in my glove box. Then when I need to use my laptop, I pull the USB cord out from my glove box, plug it into my laptop, and am good to go. My cord is long enough where I can put my laptop on my passenger seat while I drive with the glove box closed and the cord coming out.
Step 2)
I use Tuner Pro RT on my laptop. There are several different programs that will work but I only have experience with TunerPro RT. TunerPro RT is only $35 and does TOOooooons! If you decide you want to start tuning (writing new EFI programs) this software will do it.

a) Download and install TunerPro RT.
b) The first piece of information you need will come from your EFI computer. GM stuck a sticker like this on all their computers:
You need to your ECM version (1227747 on this picture) on your computer. If you have a Howell TBI system, you have a 1227747. Go back to the Tunerpro website, to the downloads tab, then definitions, then click on General Motors. It will bring up a table; find your ECM version in that table. To the right of your ECM version you need to save the "BIN Definition" (also called the XDF) and "Datastream Definition" (Also called the ADS or ADX) somewhere on your laptop that you will be using to stream.
c) In Tunerpro, Click on "XDF" Then "Select XDF". It will open a window. Select the XDF file you just downloaded.
Click on "Acquisition", then "Load Definition File". It will open a window. Load that ADX or ADS file you just downloaded.
d) Click "Tools", then "Preferences", then "Data Acq./Emulation" tab. Select:
Use Plug-in
TunerPro Data Acquisition I/O Interface
(Check) Load Last Data Acq. Def at Start
(Check) Warn of ADX/XDF link Mismatch
e) Plug in your cable from step one into the USB port on your computer (you do not need to hook it up to your EFI computer yet). Click "Configure Plug-in Component"
Port type should be "Standard Serial"
Port Number should auto populate.
The click "Test for Valid Interface using settings". If everything is configured correctly, you should get a popup that says "Cable Found and Functional"
If it does not work. Close that window, close the preferences window. Click on “Acquisition”, then click “Edit Definition”
On the window that opens, make sure the settings are:
Default Baud: 8192
Parity: none
RS232 Echo: (checked)
Stop bits: 1
Byte Size (bits): 8
Connection Command: <None>
Monitor command: Mode 1, Message 0 Macro
Disconnect command: <None>
Pause Command: <None>
Unpause Command: <None>
Click save. Then try step 2.d Again.
f) plug your cable into your OBD 1/ALDL connector on your truck. On mine, I plug ground into ground and then RX/TX connected wire into my Pin M. Then turn your key to “Run” or start it if you want.
g) on TunerPro, click the two arrows at the top tool bar. When you do, you should see the yellow box at the bottom that says "DA: Not Connected" turn blue and say "DA: Connected"
Step 3) enjoy:
With everything hooked up, click "Acquisition" scroll down to the bottom, click "Load Dash". You should be looking at all the values on your digital dash. You can start your truck and you should see them moving.
Here is a video I took a while ago with mine connected:


Comment