Howell TBI / EFI Installation How-To for CARB E.O. #D-452-2

Collapse
X
 
  • Filter
  • Time
  • Show
Clear All
new posts
  • MysticRob
    350 Buick
    • Nov 26, 2019
    • 819

    #31
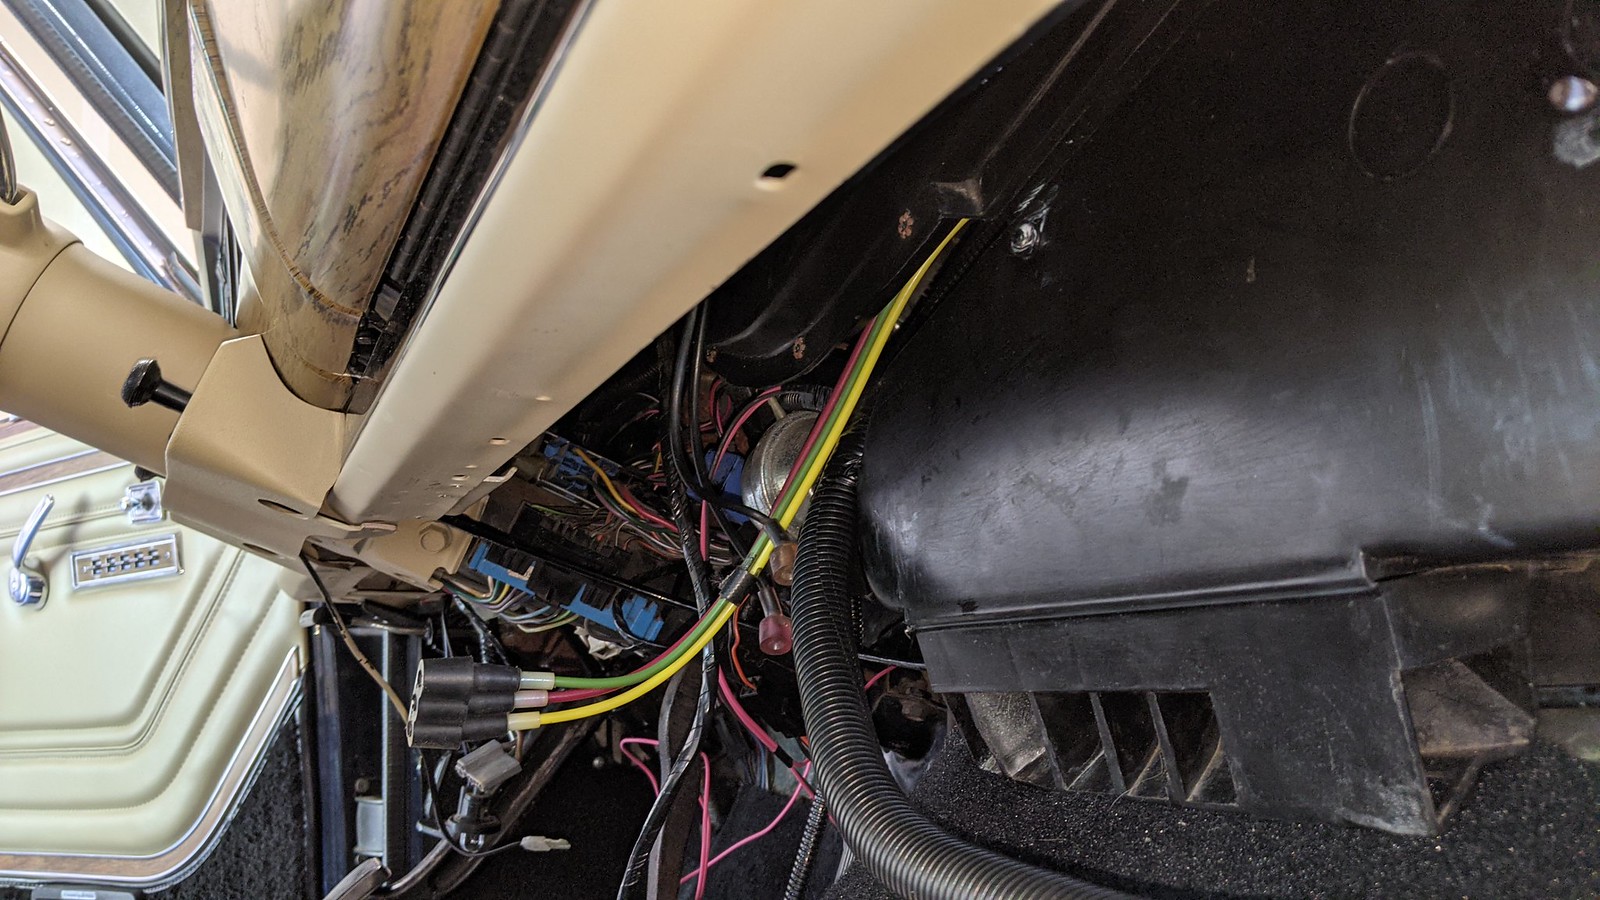
    Did the work up inside the dash today to run the harness and mount the ECM. I'd mocked up how I wanted to run the harness before, but I'll describe it better here. Since I chose to drill the 1.5" engine bay hole closer to the passenger side of the firewall, it allowed me to gently run the harness toward the steering wheel above the black HVAC ducting like the main factory waggy harness. The original waggy harness is closer in the pic with the clamp on it, and the ECM harness is behind it running toward the driver side on the left:
    PXL_20210518_174751659 by Robert Stone, on Flickr

    I then brought the ECM harness down and tucked it up inside the bottom lip of the dash, then continued running it along the inside of the dash till I curved it up back toward the inside flat part of the passenger dash:
    PXL_20210518_174736992 by Robert Stone, on Flickr

    Here it is tucked up inside where the HVAC assembly will keep it from dropping down into view:
    PXL_20210518_174922149 by Robert Stone, on Flickr

    Got the ECM mounted up along the inside flat part of the dash on the passenger side with massive velcro strips. Decided this would be the best location because of a few different reasons, much of it related to the size of the box!

    A. The main harness in the cabin is very long and this mounting location made it easy to snake the harness around gently to avoid pinching or odd angles.
    B. The ECM likely won't overheat with there being so much room.
    C. There isn't much room to mount that massive box anywhere else that I liked.

    In this pic the connectors are pointed toward the passenger side, driver side is toward the right. You can see the harness at the bottom of the pic coming up from the bottom of the dash lip where it won't get in the way of the HVAC assembly:
    PXL_20210518_174816632 by Robert Stone, on Flickr

    I got the A/C evaporator put back inside the HVAC assembly, then mounted the HVAC assembly, and now am pretty much done, except for eventual mounting of the OBD1 connector and the "check engine" light I still need to purchase.

    Otherwise, I'll update this thread again later if something requires relocating or troubleshooting.
    Last edited by MysticRob; 09-10-2021, 09:14 PM.
    --Rob--
    1988 Jeep Grand Wagoneer / Baltic Blue & Tan

    My build thread:
    https://forums.ifsja.org/forum/tire-...er-restoration

    My Howell TBI Install How-To:
    https://forums.ifsja.org/forum/tire-...rb-e-o-d-452-2

    Comment

    • MysticRob
      350 Buick
      • Nov 26, 2019
      • 819

      #32
      Originally posted by babywag
      Bust out inner flap or wire it open all time.
      WOT or even heavy load vacuum drops and it can close resulting in HUGE air restriction.
      Alright, so I stuck a couple of thick rubber vacuum hoses in that little guide to keep the flap inside the air cleaner wedged open. Seems to have done the trick:
      PXL_20210518_212708117 by Robert Stone, on Flickr

      I ended up rerunning the evap hoses from the gas tank and transmission up and over the rear of the block, across the back of the intake, then into the 3rd port on the evap canister to keep them much farther away from the exhaust. Took forever having to crawl under then back up to adjust things, etc, so didn't get a chance to put the hood on.

      Today was the first time I've actually installed the fresh air duct from the core support to the air cleaner. Had to do some minor fitting but I think it looks pretty stock in there now:
      PXL_20210518_233150950 by Robert Stone, on Flickr

      Head-on pic:
      PXL_20210518_233159515 by Robert Stone, on Flickr

      I started it up again after completing the work in the cabin, then drove around the neighborhood, then parked it in the garage again. I leave for CA tomorrow for six weeks, so won't be updating this thread till I get back. At that point I'll try to tune the TPS and IAC per previous conversations above.
      Last edited by MysticRob; 09-10-2021, 09:16 PM.
      --Rob--
      1988 Jeep Grand Wagoneer / Baltic Blue & Tan

      My build thread:
      https://forums.ifsja.org/forum/tire-...er-restoration

      My Howell TBI Install How-To:
      https://forums.ifsja.org/forum/tire-...rb-e-o-d-452-2

      Comment

      • SOLSAKS
        304 AMC
        • Jul 25, 2016
        • 1781

        #33
        nice write up

        I bet it runs good

        over my head, but really nice.

        dave in NC
        SOLSAKS - dave
        1976 J-10 HONCHO Fleetside
        1982 J-10 Fleetside
        1988 grand wagoneer
        2004 RUBICON jeep
        Benson, NC

        Comment

        • MysticRob
          350 Buick
          • Nov 26, 2019
          • 819

          #34
          Did some work yesterday and got the engine running very smoothly on open loop but discovered it almost died when it switched to closed loop, then had a slightly rough and hunting idle. Tapping the throttle was still very smooth without any hiccups though.

          I'll 'rent' a digital tach from O'Reilly's again and set the idle properly (did this last time with the bad lifter screwing things up), and see if I can hook up the adapter Marc sent me to diagnose/resolve any potential gremlins I may not be aware of yet.

          I'll also do some vacuum line diagnostics with the new EGR and some other stuff just in case of leaks or malfunctions there.
          --Rob--
          1988 Jeep Grand Wagoneer / Baltic Blue & Tan

          My build thread:
          https://forums.ifsja.org/forum/tire-...er-restoration

          My Howell TBI Install How-To:
          https://forums.ifsja.org/forum/tire-...rb-e-o-d-452-2

          Comment

          • MysticRob
            350 Buick
            • Nov 26, 2019
            • 819

            #35
            Originally posted by babywag
            tps should be adjustable,key on engine off, loosen screws rotate tps to desired voltage tighten screws.

            To read voltage you'll need an aldl cable & software.
            I think I've got all the mechanical issues worked out now, so wanted to revisit these posts about the TPS and IAC adjustments.

            The manual doesn't discuss whether the TPS setting should be verified or adjusted, or if adjustment should be done before or after the IAC adjustment.

            Tony was kind enough to verify the IAC should be done first, and during closed loop operation, prior to the TPS adjustments.

            Per quite a few youtube vids, I used a bed-of-nails alligator clip to pierce the blue wire going to the sensor, then hooked up my DVM to that lead, then grounded the other lead onto the negative battery terminal. Once everything was attached I turned the key on, and the sensor read 0.86V, which apparently is way too high.
            I then drilled out and filed out the TPS sensor holes a lot to be able to rotate the sensor counter-clockwise enough to get down to ~0.54V. Here's the sensor prior to drilling.
            I Drilled out the top of the left hole, and filing out the bottom right of the right-side hole.
            PXL_20210725_004640086 by Robert Stone, on Flickr

            Hard to tell, but here's the sensor remounted and rotated enough to get that 0.54V:
            PXL_20210725_175224672 by Robert Stone, on Flickr
            Last edited by MysticRob; 09-10-2021, 09:17 PM.
            --Rob--
            1988 Jeep Grand Wagoneer / Baltic Blue & Tan

            My build thread:
            https://forums.ifsja.org/forum/tire-...er-restoration

            My Howell TBI Install How-To:
            https://forums.ifsja.org/forum/tire-...rb-e-o-d-452-2

            Comment

            • MysticRob
              350 Buick
              • Nov 26, 2019
              • 819

              #36
              Alright, so I called Howell's tech support # to verify the target idle in the .bin file is 650rpm.

              I then did all the steps to dial in the IAC after it warmed up, set the minimum idle speed to about 550-600rpm, per Howell's instructions, then verified the TPS still shows ~0.54V.

              She now starts quickly, and idles nicely during both open and closed loop operation, which allowed me to finally drive it over the the Idaho DMV so I could transfer the title and register it (they need to see the vehicle in person and verify the VIN) almost 2 years after I bought it.

              License plates should be here in a couple weeks, at which point I'll drive it a few hundred feet to my nearest smog test place and complete that step.
              --Rob--
              1988 Jeep Grand Wagoneer / Baltic Blue & Tan

              My build thread:
              https://forums.ifsja.org/forum/tire-...er-restoration

              My Howell TBI Install How-To:
              https://forums.ifsja.org/forum/tire-...rb-e-o-d-452-2

              Comment

              • jeepjseries
                350 Buick
                • May 30, 2009
                • 1418

                #37
                Very amazing detailed write up MysticRob. Love all the pictures too. This will definitely help people do this in the future.
                -2000 Volkswagen Jetta diesel
                -1976 Wagoneer 401/Turbo 400/QT with 4 low/Dana 44s

                Comment

                • fsjcowboy
                  232 I6
                  • Oct 02, 2009
                  • 32

                  #38
                  Thanks to you and your instructions/ pics, I'll now tackle my Howell TBI install. I've been putting it off because I had so many questions. You've answered practically all of them! Thank you for taking the time for writing concise explanations and taking great color photos (take note, Howell). Your engine bay looks great. Happy motoring. I'll be installing on an unmolested '87 GW first. If all goes well, I may install on my wife's '88 GW.
                  '87 GW
                  '88 GW
                  '89 GW lifted
                  '89 GW chopped
                  '78 J10


                  "If someone ever tells you that you're eating too much bacon, STOP TALKING TO THEM! You don't need that kind of negativity in your life."

                  Comment

                  • rang-a-stang
                    Administrator
                    • Oct 31, 2016
                    • 5505

                    #39
                    Make sure you guys add some pics of your installs or any thing you did differently, or anything that was especially hard, etc. This thread was needed for sure!

                    Chuck McTruck 71 J4000
                    (Chuck McTruck Build Thread)
                    (8.1L swap questions - PerformanceTrucks.net Forums​)
                    79 Cherokee Chief (SOLD, goodbye old buddy)
                    (Cherokee Build Thread)
                    11 Nissan Pathfinder Silver Edition 4x4
                    09 Mazdaspeed3 Grand Touring
                    00 Baby Cherokee

                    Comment

                    • MysticRob
                      350 Buick
                      • Nov 26, 2019
                      • 819

                      #40
                      Originally posted by jeepjseries
                      Very amazing detailed write up MysticRob. Love all the pictures too. This will definitely help people do this in the future.
                      Originally posted by fsjcowboy
                      Thanks to you and your instructions/ pics, I'll now tackle my Howell TBI install. I've been putting it off because I had so many questions. You've answered practically all of them! Thank you for taking the time for writing concise explanations and taking great color photos (take note, Howell). Your engine bay looks great. Happy motoring. I'll be installing on an unmolested '87 GW first. If all goes well, I may install on my wife's '88 GW.
                      Thanks, guys. Hopefully it helps people figure out their own installs.
                      --Rob--
                      1988 Jeep Grand Wagoneer / Baltic Blue & Tan

                      My build thread:
                      https://forums.ifsja.org/forum/tire-...er-restoration

                      My Howell TBI Install How-To:
                      https://forums.ifsja.org/forum/tire-...rb-e-o-d-452-2

                      Comment

                      • fsjcowboy
                        232 I6
                        • Oct 02, 2009
                        • 32

                        #41
                        Howell TBI followup

                        Rob,

                        Thanks to you and your thread, I competed my first Howell TBI install. Now that I've "experienced" the install, I'd like to ask and add a comment or two.

                        For power to the 12VDC ignition wire, I teed off of the "IGN, LPS" fuse on the main fuse panel. Where did you connect yours?

                        Funny thing happened on the way to TBI installation.............. while I was contemplating using the hole saw for the pass-thru to the cabin, I noticed an oblong factory, two-screw panel behind the floor insulation. It's just above the black, flexible condensate drain for the A/C. That's where I pulled my cabin-related wiring through. Plenty of room for all of the plugs to pass through. It's only drawback is that it is closer to the right exhaust manifold.

                        I have not connected my Howell TBI VSS to my Dakota Digital cruise control yet. It the VSS input connection really needed? I've driven the Jeep about 40 miles and haven't noticed anything wonky. What do ya think?

                        My TBI is working great, so far. I only had to set the timing. Howell suggests 6-8 degrees BTDC. I set mine at 10 degrees BTDC. Other than that, no other adjustments!

                        I don't know how to send pics. I think my files are too large and I'm not very computer savvy.

                        Thank you for your documentation on your installation. I've been sitting on this Howell TBI kit for 6 years and never got the guts to start. Your info gave me a good push in the right direction.
                        Last edited by fsjcowboy; 09-09-2021, 07:40 PM.
                        '87 GW
                        '88 GW
                        '89 GW lifted
                        '89 GW chopped
                        '78 J10


                        "If someone ever tells you that you're eating too much bacon, STOP TALKING TO THEM! You don't need that kind of negativity in your life."

                        Comment

                        • MysticRob
                          350 Buick
                          • Nov 26, 2019
                          • 819

                          #42
                          Hey, thanks for the kudos, I'm glad someone found it useful.
                          I've read the VSS definitely helps with keeping the vehicle running properly, and since it was one of the easiest things to install, so I did it.
                          So, I had a chance to take a pic of how I tied it in. Turns out I also used the IGN/LPS fuse location on the right, as it serves the purpose well with key positioning.
                          The cable on the left is for the sunroof power:
                          PXL_20210910_173730736 by Robert Stone, on Flickr
                          Last edited by MysticRob; 09-10-2021, 09:21 PM.
                          --Rob--
                          1988 Jeep Grand Wagoneer / Baltic Blue & Tan

                          My build thread:
                          https://forums.ifsja.org/forum/tire-...er-restoration

                          My Howell TBI Install How-To:
                          https://forums.ifsja.org/forum/tire-...rb-e-o-d-452-2

                          Comment

                          • MysticRob
                            350 Buick
                            • Nov 26, 2019
                            • 819

                            #43
                            Finally remembered to post a pic of the vacuum hose routing for the Howell system:

                            Howell Vacuum Diagram by Robert Stone, on Flickr
                            --Rob--
                            1988 Jeep Grand Wagoneer / Baltic Blue & Tan

                            My build thread:
                            https://forums.ifsja.org/forum/tire-...er-restoration

                            My Howell TBI Install How-To:
                            https://forums.ifsja.org/forum/tire-...rb-e-o-d-452-2

                            Comment

                            • Theodore
                              258 I6
                              • Sep 10, 2018
                              • 253

                              #44
                              Originally posted by MysticRob
                              Finally remembered to post a pic of the vacuum hose routing for the Howell system:

                              Howell Vacuum Diagram by Robert Stone, on Flickr
                              Hey, MysticRob - wanted to thank you for documenting your build in such detail - have been following along; finding/adding missing parts back as we go. Used the diagram you posted to add back the charcoal canister, vacuum switch, & associated lines - had my first proper fill-up ever, without the pump continually cutting-off a couple of weeks ago!

                              I also have TBI EFI, am looking to get a new EFI wiring harness to move it from under-hood to under-dash (long story); A/C's out - awaiting the new harness; then on to A/C, carpet, & seats.

                              Comment

                              • MysticRob
                                350 Buick
                                • Nov 26, 2019
                                • 819

                                #45
                                Originally posted by Theodore
                                Hey, MysticRob - wanted to thank you for documenting your build in such detail - have been following along; finding/adding missing parts back as we go. Used the diagram you posted to add back the charcoal canister, vacuum switch, & associated lines - had my first proper fill-up ever, without the pump continually cutting-off a couple of weeks ago!

                                I also have TBI EFI, am looking to get a new EFI wiring harness to move it from under-hood to under-dash (long story); A/C's out - awaiting the new harness; then on to A/C, carpet, & seats.
                                Nice! Glad it helped.
                                Looking forward to seeing your continued resto of yours, and seeing more good scores from dilapidated derelict fields.
                                --Rob--
                                1988 Jeep Grand Wagoneer / Baltic Blue & Tan

                                My build thread:
                                https://forums.ifsja.org/forum/tire-...er-restoration

                                My Howell TBI Install How-To:
                                https://forums.ifsja.org/forum/tire-...rb-e-o-d-452-2

                                Comment

                                Working...
                                X