J10 Refurbish/repaint (moved from PRIS)

Collapse
X
 
  • Filter
  • Time
  • Show
Clear All
new posts
  • Towtruck
    350 Buick
    • Oct 11, 2001
    • 1026

    #31
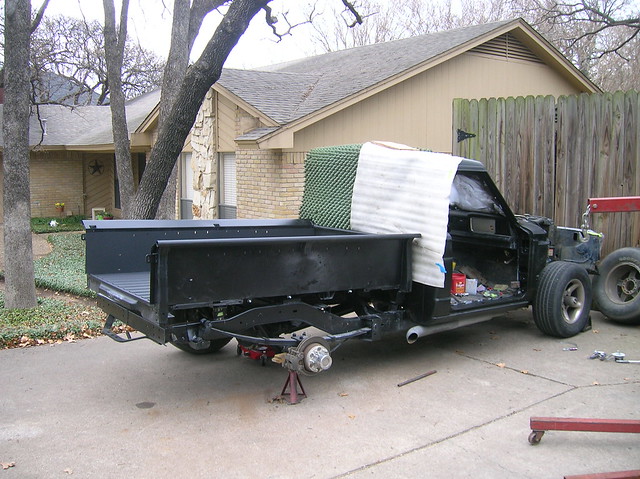
    Dodged a bullet early this morning...quarter sized hail about a mile south and golf ball size a couple miles north. That bed has to be mated to the chassis so I can get all the vehicles under a roof....Spring in NE Texas = Hail.

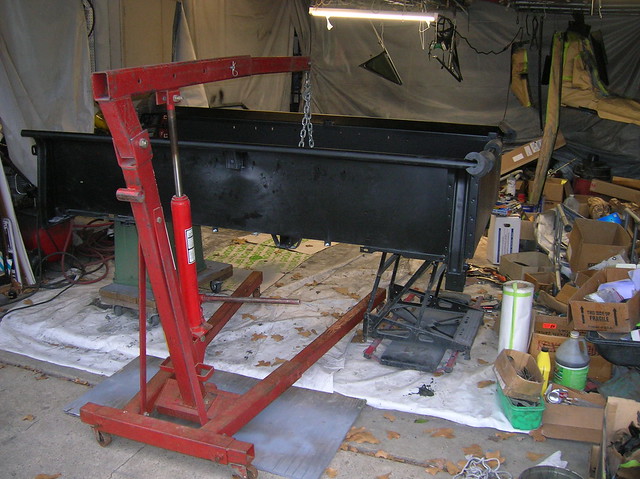
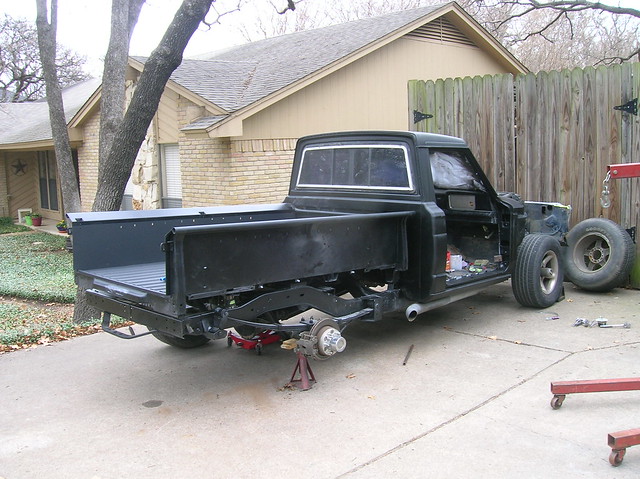
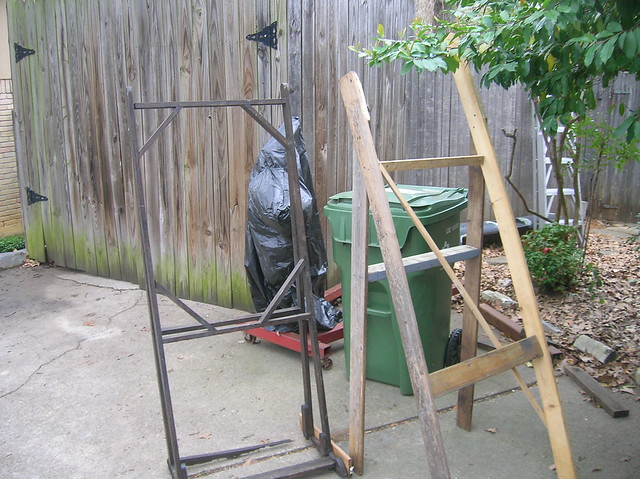
    First thing this morning I finished some small brackets along the bottom edge of the bed. Later on I'm going make some rubber sight barriers that hide the gap between the frame and the bed for a cleaner look. After that I finished some odds and ends on the rear of chassis...sanded and painted drive shaft and shocks, restrung the tail light wiring. Took all day, but the bed is ready to install on the chassis tomorrow morning...I get my garage back.

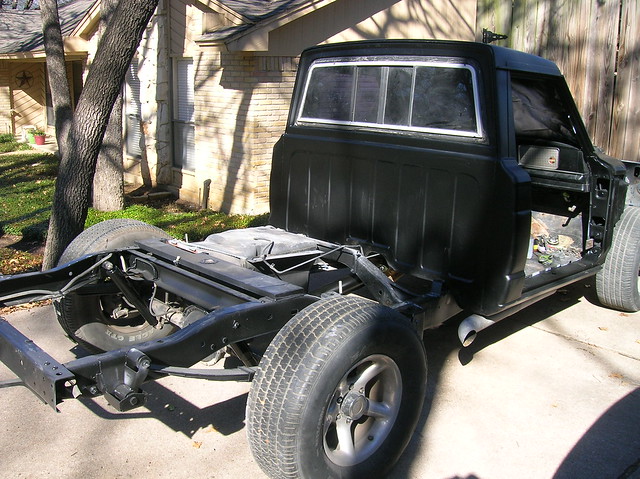
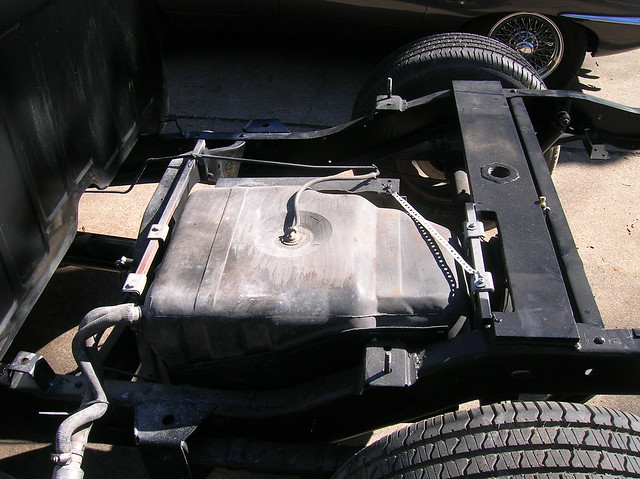
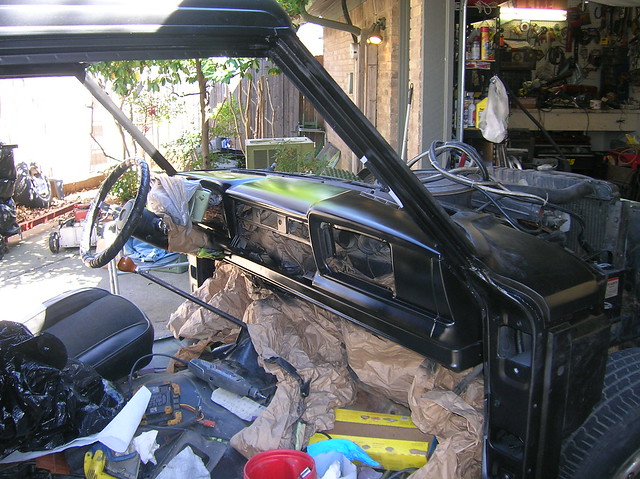
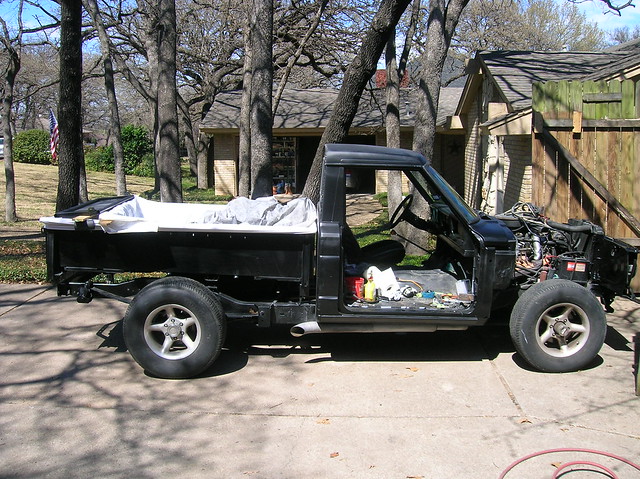
    Attached a couple of photos. ( I'm going to paint that rear window frame black). The second photo depicts the gas tank mounting brackets I fabricated to support the tank during the painting process. This allowed me to move the truck around. (I drove it back from the blaster with all front and rear sheet metal removed). The front bracket bolts into holes in the hoop shaped frame cross piece. The rear one is tack welded to the cross bar for the goose neck hitch. Anyway, I need to put the motorcycle jack under the tank in the morning and then remove those special brackets (the tank is normally suspended from the bed).

    DSCN1483 by Rufus, on Flickr

    DSCN1485 by Rufus, on Flickr
    Last edited by Towtruck; 03-09-2019, 06:21 PM.
    ___________________________
    J10 - Body channel (3 inch drop @ front); dechromed; shaved side parking lights, antenna, and hood trim bar. Ford mirrors, roll pans, side exhaust, 16 inch wheels, custom dash, new interior, Edelbrocked 360, HEI, T18/208 (J20), rear disk brakes, goose neck and bumper hitches.

    Comment

    • SJTD
      304 AMC
      • Apr 26, 2012
      • 1953

      #32
      Is the paint single stage or are you going to clear it? I ask because most base coats that are intended to be cleared only have a day or two window for the clear coat to be applied.
      Sic friatur crustulum

      '84 GW with Nissan SD33T, early Chev NV4500, 300, narrowed Ford reverse 44, narrowed Ford 60, SOA/reversed shackle in fornt, lowered mount/flipped shackle in rear.

      Comment

      • Towtruck
        350 Buick
        • Oct 11, 2001
        • 1026

        #33
        The Eastwood satin black is a catalyzed single stage urethane which is good to go for UV. It would have to be sanded to apply clear coat.
        ___________________________
        J10 - Body channel (3 inch drop @ front); dechromed; shaved side parking lights, antenna, and hood trim bar. Ford mirrors, roll pans, side exhaust, 16 inch wheels, custom dash, new interior, Edelbrocked 360, HEI, T18/208 (J20), rear disk brakes, goose neck and bumper hitches.

        Comment

        • Towtruck
          350 Buick
          • Oct 11, 2001
          • 1026

          #34
          ...got my garage back. My 110 pound spouse helped me maneuver the bed out of the garage and set it on the frame. (Third time we've done it, so we're both pretty practiced). Gas tank is bolted in place. I have to reset the angle of the bed, since I lowered the cab another 1/2" when the bed was at the sand blaster. The cab is at a 3 degree angle and the bed at 4.5 degrees, so the back end has to drop a bit.

          Photos attached. I thought some folks might be interested in a couple of the Cadillac Eldorado calipers that I added to the AMC 20 axle many years ago after one of the drums grabbed sooner than the other while towing in the rain. These calipers have a built in parking brake, which simplifies the overall installation. The only issue was finding a clocking position that would work with the handbrake cable. So they're mounted upside down and on opposite sides from the Eldorado. This requires that the calipers be removed from the brackets and flipped right side up to bleed them. I stick a piece of wood the thickness of the disk between the pads. When the air is bled, flip over nd mount them on the axle.

          The rest of the day is for straightening up the mess in the garage. Milestone day.

          DSCN1487 by Rufus, on Flickr
          DSCN1492 by Rufus, on Flickr
          DSCN1493 by Rufus, on Flickr
          DSCN1494 by Rufus, on Flickr
          DSCN1489 by Rufus, on Flickr
          DSCN1490 by Rufus, on Flickr
          Last edited by Towtruck; 03-10-2019, 04:45 PM.
          ___________________________
          J10 - Body channel (3 inch drop @ front); dechromed; shaved side parking lights, antenna, and hood trim bar. Ford mirrors, roll pans, side exhaust, 16 inch wheels, custom dash, new interior, Edelbrocked 360, HEI, T18/208 (J20), rear disk brakes, goose neck and bumper hitches.

          Comment

          • Towtruck
            350 Buick
            • Oct 11, 2001
            • 1026

            #35
            Nice temperatures, but bugs.....I'll take it.

            There's now some space in the garage to spread out projects a bit...and I can get two cars inside if the weather threatens. I finished an in-the-car respray of the dash yesterday...turned out decent...had to be done now so that I can install the windshield (that should happen early this week).

            I also epoxied and urethane primed the doors. A few very small dings became apparent when I sprayed on the wet, black epoxy, but I had to get the gray primer on while the epoxy was still "open". Hacks me off because I spend a lot of time prepping the doors. I'll do the guide paint spray trick when I block the primer, and fix the dings at that point. Oh, well, what's a couple more days.

            Since I had the inner wheel wells powder coated, I decided to clean up the front sheet metal to match. The chassis black paint is almost the same sheen, so it should look nice. I stripped the old paint and undercoating and then sprayed on two heavy coats of black epoxy followed by two more coats of chassis black. Should be a tough finish for that tough environment. By the way, the third photo shows where I cut out a section of the radiator support sheet metal as part of the body channel and revised front end treatment. It gives a more pronounced "scoop" look for the raised opening in the hood, especially with the horizontal trim bar removed (see the very first photo in this string). The trim bar holes are welded shut.

            So, the big remaining items are final paint on the doors, and prep/paint the rear fenders and rear roll pan....relatively small jobs in comparison to the cab and bed. Some more photos...

            DSCN1506 by Rufus, on Flickr
            DSCN1516 by Rufus, on Flickr
            DSCN1514 by Rufus, on Flickr
            DSCN1513 by Rufus, on Flickr
            Last edited by Towtruck; 03-17-2019, 07:26 PM.
            ___________________________
            J10 - Body channel (3 inch drop @ front); dechromed; shaved side parking lights, antenna, and hood trim bar. Ford mirrors, roll pans, side exhaust, 16 inch wheels, custom dash, new interior, Edelbrocked 360, HEI, T18/208 (J20), rear disk brakes, goose neck and bumper hitches.

            Comment

            • Towtruck
              350 Buick
              • Oct 11, 2001
              • 1026

              #36
              The windshield was installed today by a couple of pros. Took them about 45 minutes. Best $120 (plus tip) I've spent so far on this refurbish project. The windshield glass was $95, the very high quality seal from Team GW was about a hundred delivered. One thing I learned from the installation guys was that modern urethane sealant should not be used with old style rubber seals...use the old type goop. They put a bead on the cab flange, (added a little extra at the corners at my request), pushed the seal onto the flange. Then they slid the top right corner of the glass into the seal, then worked the rubber over the glass along the top edge with a special tool until they got the top left corner into the seal. With the top edge and corners in position, the sides and bottom fairly fell into place with only minor help from a special tool. Then they muscled it around a little to get it seated just right and used another tool to force the locking flap (no separate locking strip) into place. Once it was locked into position they inserted the tip of what looked like an old trigger actuated oil can under the outer flap of the and squeezed a second bead of adhesive between the glass and the seal. Perfect clean up, moved the rear view mirror lug to the new glass, moved my registration sticker, put the old glass on their truck, I paid the bill, and they were on their way. Fast and efficient. That said, I had the old glass removed, the flange was clean as a whistle, and the sheet metal around the perimeter of the seal was masked with tape.

              Earlier this morning I bolted the dash back in place (I had partially removed it for painting), then repainted the front radiator support sheet metal (that I painted yesterday) for a better match to the sheen on the powder coated inner fenders. Late this afternoon I sprayed guide coat paint on the doors and block sanded. The little dings that I had missed prior to epoxy and primer are easy to spot and an easy fix. Waiting on another quart of primer from Eastwood... By the way, this job will have taken two gallons of epoxy, six quarts of urethane primer, two quarts of chassis black, and about six quarts of black satin urethane top coat. The bed took three quarts of Raptor.

              Tomorrow I'll replace the power steering gear, and install the heater module, which has been out of the car for about twenty years! (The air conditioning will be installed later). The steering and heater are best done before installing the inner fenders. And then I can start bolting on the painted forward sheet metal.

              Photos with glass....boring, but a big step that required outside help to show up to keep me on schedule.

              DSCN1519 by Rufus, on Flickr
              DSCN1520 by Rufus, on Flickr
              Last edited by Towtruck; 03-18-2019, 05:27 PM.
              ___________________________
              J10 - Body channel (3 inch drop @ front); dechromed; shaved side parking lights, antenna, and hood trim bar. Ford mirrors, roll pans, side exhaust, 16 inch wheels, custom dash, new interior, Edelbrocked 360, HEI, T18/208 (J20), rear disk brakes, goose neck and bumper hitches.

              Comment

              • GWNashville
                232 I6
                • Dec 28, 2016
                • 229

                #37
                Looking good!!!
                Richard
                GWNashville
                Email:[email protected]
                1989 Grand Wagoneer 360 c.i.
                727 Transmission
                Sniper EFI Hyperspark
                Serehill Rear Glass and Fog Light Harness.

                Comment

                • bkilby
                  350 Buick
                  • Jan 10, 2016
                  • 1083

                  #38
                  Originally posted by Towtruck
                  Then they muscled it around a little to get it seated just right and used another tool to force the locking flap (no separate locking strip) into place.


                  Are you talking about the chrome trim for the windshield seal? I'd like to find one that doesn't require it. Or even have a provision for it.
                  Looks good btw.
                  1974 Cherokee S. It's driving but needs more work. As usual!

                  Comment

                  • babywag
                    out of order
                    • Jun 08, 2005
                    • 10286

                    #39
                    Originally posted by bkilby
                    Are you talking about the chrome trim for the windshield seal? I'd like to find one that doesn't require it. Or even have a provision for it.
                    Looks good btw.
                    No the gasket has a channel & locking strip to seal better.
                    You can buy gaskets for non stainless trim @ least they used to be available new.
                    Tony
                    88 GW, 67 J3000, 07 Magnum SRT8

                    Comment

                    • Towtruck
                      350 Buick
                      • Oct 11, 2001
                      • 1026

                      #40
                      Yes, the seal has a slot for the chrome trim. I tried and was unable to find one without the slot. But it's almost invisible for those of us who want to go without the chrome. Once again, the seal from Team GW is an extremely nice product. Perfect fit, supple rubber...the installers commented about the quality. They said they've had to deal with some really crap seals in the past. (No affiliation with TGW, just a happy customer). I also purchased the fuzzy forward track liners for the side windows from them and was pleased with the quality and fit. After struggling with poor quality aftermarket parts during my Jaguar restoration, this is a revelation.
                      Last edited by Towtruck; 03-20-2019, 04:08 AM.
                      ___________________________
                      J10 - Body channel (3 inch drop @ front); dechromed; shaved side parking lights, antenna, and hood trim bar. Ford mirrors, roll pans, side exhaust, 16 inch wheels, custom dash, new interior, Edelbrocked 360, HEI, T18/208 (J20), rear disk brakes, goose neck and bumper hitches.

                      Comment

                      • bkilby
                        350 Buick
                        • Jan 10, 2016
                        • 1083

                        #41
                        Originally posted by babywag
                        No the gasket has a channel & locking strip to seal better.
                        You can buy gaskets for non stainless trim @ least they used to be available new.


                        Yeah, that's what I meant. I haven't found the gasket without the trim. I have a new gasket that's meant for the trim on my rig but it looks incomplete.
                        1974 Cherokee S. It's driving but needs more work. As usual!

                        Comment

                        • Towtruck
                          350 Buick
                          • Oct 11, 2001
                          • 1026

                          #42
                          The plan for today was to finish up the last item in the steering refurbishment by replacing the leaking gearbox with the rebuild that I purchased last week and had waiting for the job. I had also found a spare intermediate shaft with a good u-joint, so I bought a new "rag" joint for that. The new joint is made from a hard rubber or neoprene ($46 at O'Reilly's...same part was $28 delivered from Rock Auto). Anyway, I pulled the old gearbox after much cursing while removing the pitman arm, installed the new "rag" joint on the rebuilt gearbox, and offered it up to the mounting bolts. WTF...there were only three bosses on the rebuilt box....the original has four. Back to Pep Boys...wrong part number...the correct one should be at the store tomorrow. I should have examined it more closely when I took it out of the box.

                          By the way, the gearbox castings are machined for 0-ring fittings. They are converted to a flare fitting unit with the addition of two one inch tall screw-in adapters.
                          ___________________________
                          J10 - Body channel (3 inch drop @ front); dechromed; shaved side parking lights, antenna, and hood trim bar. Ford mirrors, roll pans, side exhaust, 16 inch wheels, custom dash, new interior, Edelbrocked 360, HEI, T18/208 (J20), rear disk brakes, goose neck and bumper hitches.

                          Comment

                          • Towtruck
                            350 Buick
                            • Oct 11, 2001
                            • 1026

                            #43
                            Finally finished the power steering rehab this morning. Rebuilt pump, new hoses, new rag joint, lower steering shaft from a salvage truck, and rebuilt steering gear. Still needs new sway bar bushings, but it drives like a different vehicle...no more herding cats. Lots of headaches gathering up the correct parts, but the job itself was very straight forward (with all the front sheet metal removed). Cost was about $260 for all the parts. I'm keeping the original steering gear as some of you advised. Will install a seal kit after I finish the rest of the current horror show.

                            This afternoon, I installed the heater box, and then the inner fenders. I stopped short of bolting on the fenders as getting the doors in color has priority. Spent a few hours long boarding, adding skim coat here and there...long boarding....repeat....repeat...repeat. I'll shoot on some polyester high build primer in the morning and block them one final time before spraying the color. Wish it would freeze tonight (I need a major bug kill off). Anyway, I should have all the sheet metal bolted on in a few days. That will leave the rear fenders.

                            The final activity for today was a decommissioning ceremony for my Dollar Store jeans and ratty old long sleeve shirt. I've been patching the trousers with Gorilla tape for two weeks, but it keeps coming off in the washer. So, they're not gonna make it to the end of the project as I'd hoped....enjoy your retirement ol' friends...

                            DSCN1525 by Rufus, on Flickr
                            DSCN1524 by Rufus, on Flickr
                            DSCN1521 by Rufus, on Flickr
                            DSCN1527 by Rufus, on Flickr
                            Last edited by Towtruck; 03-22-2019, 04:53 PM.
                            ___________________________
                            J10 - Body channel (3 inch drop @ front); dechromed; shaved side parking lights, antenna, and hood trim bar. Ford mirrors, roll pans, side exhaust, 16 inch wheels, custom dash, new interior, Edelbrocked 360, HEI, T18/208 (J20), rear disk brakes, goose neck and bumper hitches.

                            Comment

                            • Towtruck
                              350 Buick
                              • Oct 11, 2001
                              • 1026

                              #44
                              After yet another masking job, I sprayed the doors in high build Eastwood polyester primer this morning. Should be ready for long board/blocking first thing tomorrow. Hoping for a cool night and cloudy day tomorrow...a little drizzle would be good...seems to keep the exploding insect population in check. No significant worries about humidity during the spraying process as the HVLP turbine supplies warm, dry air no matter what. The garage is a disaster again. Once these doors are finished, all that plastic comes down. It's been quite effective at containing overspray and sanding dust, although it still gets on shoes and gets tracked into the house if not meticulous about leaving shoes in the garage. That and the chemical smell has kept me in the dog house for the past two months.

                              The second photo shows an old easel my wife wanted me to throw away years ago. I naturally saved it...never know when an easel might come in handy in the garage. Looks perfect for mounting one of the doors for final paint. (Suspending them would be best, but I don't have a decent way to safely hang the heavy doors). I slapped the other one together from old fence material. I need to be able to get around the door jam edges as well as the face of the door. With my bottom cup type spray gun, it's better to have the part vertical. Never had a problem with runs with the HVLP setup.

                              So fingers crossed that the block sanding is the last of it...then on to color...and assembly.

                              DSCN1531 by Rufus, on Flickr

                              DSCN1532 by Rufus, on Flickr
                              Last edited by Towtruck; 03-23-2019, 02:35 PM.
                              ___________________________
                              J10 - Body channel (3 inch drop @ front); dechromed; shaved side parking lights, antenna, and hood trim bar. Ford mirrors, roll pans, side exhaust, 16 inch wheels, custom dash, new interior, Edelbrocked 360, HEI, T18/208 (J20), rear disk brakes, goose neck and bumper hitches.

                              Comment

                              • Towtruck
                                350 Buick
                                • Oct 11, 2001
                                • 1026

                                #45
                                The high build polyester did the trick for the doors. I should have used it a couple of days ago....no, I should have used it weeks ago on every panel. I always have trouble feathering the edges of filler areas into the surrounding sheet metal. When used in conjunction with guide coat paint and a long sanding board (120 grit) this polyester saved a huge amount of time and frustration. I broke through to bare metal on a couple of edges, so had to search for an airbrush to apply a thinned epoxy spot sealer. Done. Finish paint tomorrow for sure. The plastic liner in the garage will be dismantled ASAP thereafter.
                                ___________________________
                                J10 - Body channel (3 inch drop @ front); dechromed; shaved side parking lights, antenna, and hood trim bar. Ford mirrors, roll pans, side exhaust, 16 inch wheels, custom dash, new interior, Edelbrocked 360, HEI, T18/208 (J20), rear disk brakes, goose neck and bumper hitches.

                                Comment

                                Working...
                                X