D.I.Y Throttle body injection write up (With pics!!!!) and this is no haox

Collapse
X
 
  • Filter
  • Time
  • Show
Clear All
new posts
  • Wagoneerlover
    350 Buick
    • Jan 18, 2004
    • 1456

    D.I.Y Throttle body injection write up (With pics!!!!) and this is no haox

    Last updated 5/25/05 check back more updates coming soon!!!!!!!


    Greetings fellow jeepers,

    Wagoneerlover is at it again this time with a write up on D.I.Y TBI (Throttle body injection). I am not an authority on this subject and I don't claim to be. I simply attempt to help my fellow jeepers out there to work on and upgrade their rigs in the same fashion that I wanted to. I do write ups only on things that I have attempted, and succeeded at, that way i can at least get you from point a to completion. There are many on this board and on other boards etc, who are much more knowledgeable in this area than I am. So if I miss something or omit some info please let me know and I will add it immediately. (Of course this is within reason, I try not to add any info that I cannot verify myself, only because I don't want to give misleading information or post anything that I cannot actually answer questions on or verify. This article was written for those of you running V-8 AMC engines in your rigs, the buick and some of the other V-8 engines that were produced before my time that I have never seen would be similar in the adaptation areas, you would just need to figure out a few things. For those of you with the inline six engines, you may want to consider the chrycho multiport conversions before settling on a TBI setup. While the inline six can be adapted to TBI in a similar fashion to the 8, there are multiport setups and many have taken heads, intakes etc from the chrycho 242 engines (4.0 engine) and adapted it to the 258 thus creating a multiport setup. I must say that setting up and installing this TBI has been a great experience. Many argue that a well tuned carb will perform just as well as the TBI and that doing such a mod is almost useless blah blah blah (This may be true and for the ten people born in 1870 who are still alive who can super tune carbs then I guess that would be a valid point). For those of you are interested in such a swap there are several things that you want to consider before spending the money, effort and time to engage in such a modification. I agree that there are distinct pros and cons to installing TBI vs keeping a carburetor. Before I delve into the modification I will discuss some of the factors that you should consider before deciding to install Throttle body injection or simply keep your existing carb or upgrade to a better carb. If performance is your forte, then you should be aware of the fact that there are upgrades for TBI injection systems. Many will make the case that a 4bbl carb will outperform a 2bbl Throttle body any day. I agree that is true (At least in terms of horsepower gains) but for those of you willing to spend the cash they actually have 4bbl Throttle body systems. There will be four injectors mounted in the throttle body as opposed to two. Now how is that for performance? Secondly these injectors can be upgraded. Another performance option that I have taken note of is dual Throttle Body setups. These systems work in the same fashion as the hot rods that I have seen with dual carbs, only difference being that they have dual Throttle bodies. In the past such systems always had control issues when the computer tried to operate them, however there are now controllers which can handle them both effectively. I will not delve into the ramifications necessary for such mods, you will need to research them on your own. I will however detail as much as possible the methods necessary to adapt your rig to a stock 2bbl throttle body system. Before you attempt this modification there are many things which you will want to ask yourself and answer before going forward. First, how much of the project do you want to actually do yourself? This write up is written under the assumption that you will attempt to do most of the work yourself with little to no outside help. In this regard you will want to have distinct answers to the following questions once you have determined that you will go forward. How much of the work do I want to do myself? Should I simply purchase a kit and have some of the legwork taken out for me? Do I really want to spend the time pulling parts and gathering the things I need and installing them all and setting it up. Do I want to completely do this alone or will I do most of the work and get a third party to burn the chip for me (Sort of doing part of the work and having someone else do another part)? Before making your final decisions weigh your options and look at what is available out there on the market. There are pros and cons to complete systems, partial sytems custom systems and doing your own install (D.I.Y = do it yourself). I will not make arguments against the existing kits which are out there, nor will I badmouth any of the other developers out there. You should however be careul when being lulled into the claims of specialized chips made just for you and or other notions that might lead you into a hasty decision. Remember finally that when doing it yourself, you will learn the ins and outs of the system, you will have all GM parts for your fuel system which are easily and readily available on the shelf, and you will be able to tune, upgrade, repair and work on your system yourself at the completion of the D.I.Y install.


    Additionally you will want to also consider the following things and reasons to simply leave the swap alone or go forward.


    Reasons not to adapt to TBI

    1. If you feel that you will magically go from the traditional 8-12 mpg associated with our rigs to 25 mpg then you are going to be disappointed and you will have wasted your time. Granted you can see gains of 2 or more mpg depending on how well you can tune your TBI but it is within limitations. If you truly want to get extremely high gas mileage numbers then you need to consider a diesel engine swap or an alternative fuel efficient vehicle.

    2. If you think that by adapting to TBI you will somehow magically repair a tired, old and worn down engine then you are gravely mistaken. Do not adapt any worn down engine to fuel injection. It just is not a good practice. You may see some limited amount of pep re-injected into your engine but I can assure you that your engine will still meet the same end. (Meaning the piston knock, head leaks etc that were plaguing it before might possibly sort of have a temporary band aid on them but eventually the same thing will happen and you will have wasted money investing in fuel injection and you will need an additional wad of cash to get the engine back into running shape, thus wasting time and costing you tons of cash.) An engine with TBI on it that is locked up and not running is not cool!

    3. If you plan on selling your rig in the immediate future or are unsure of how long you intend to keep it. (While it may seem like a great idea, often at times custom mods etc do not net the same value in return when being sold. (Sometimes they do but don’t count on it)

    4. If you have no patience and you need things done the second you install them. Trust me TBI may run extremely well but there will be a period of adapting things to your engine, wiring and tuning headaches. Once you have it all set up it will all be worth it.

    5. Do you want to actually spend the money to adapt to TBI? While it is not necessarily and extremely expensive mod, you can find the costs associated with this project beginning to skyrocket. This is especially true if you intend on getting performance out of your TBI with upgraded injectors or other mods.

    6. Any other reason you can think of that might deter you from wanting to spend time, effort and money in such a project. If you just don’t feel like doing all the work, have a tight schedule with work and kids and cannot find enough time to even drink a soda, or you have a nagging wife or husband who is keeping accurate tabs on the checkbook and giving you that evil eye when such expenses are mentioned.


    Some reasons to consider injecting your engine

    1.You seek to gain improvements in off-road capability. (This capability will be seen in the steep angle sectors etc. The TBI and other forms of injection will keep running and pumping even at weird and strange angles, often at angles where a carb would shut off.

    2. You enjoy improved reliability in the area of starting. Walk outside on a cold morning and I can assure you that if you set up your TBI properly that cold weather will not affect its firing up.

    3.You seek great idle quality which may not be attainable by a carb (Note I say may not. I actually am not able to tune carbs so well but my grandfather could tune them like nobodies business. Unfortunately this art was lost just like the jedi arts in star wars!!)

    4. You seek a system which will adjust itself for altitude compensation and other areas which it may need to compensate in. No more getting out and adjusting your rig for above and below sea level conditions or for changes in weather and environment the TBI will do that by itself through the usage of sensors and computer control.

    5. You have run out of things to do to your rig, you don't want to swap in a more modern engine as of yet because your 401 or 360 runs fine and you simply are being true to form! (You cannot help but spending money on your rig and you need something to validate your urge to do just one more thing to it!)


    88 Grand wagoneer AMC 360 all stock
    89 Grand Wagoneer AMC 360 (Deceased)


    Upgrades

    1. Electric Radiator Fan 10/15/11
    2. Cs-144 Alt 10/1/11

    All completed long ago (cannot remember when)
    1. TBI
    2. New fuel tank
    3. AW-4 Transmission
    4. Aluminum condensor
    5. Custom Gauge Panel
  • Wagoneerlover
    350 Buick
    • Jan 18, 2004
    • 1456

    #2
    Things that you will need for the project!


    Now that we have gotten through some of the reasons that you may or may not want to modify your fuel system let us actually get into the project.


    Some tools that you will need and supplies

    1. Stud puller - Trust me you will need this to fully remove all remnants of your old carb.
    2. Hole saw (Metal cutting!) (I needed a 1 5/8 inch one for the firewall but remember the GM harnesses came with different grommets so I cannot tell you what size you will need. Measure it when you pull your harness)
    3. Common hand tools (Screwdrivers, wrenches, various sockets)
    4. Various metal cutting drill bits
    5. A cordless drill if you ddecide not to perform this swap in an area with sockets for a corded drill.
    6. A tube cutter (Yes you will need to cut tubing)
    7. Tube bender - Again you will be bending tube so get ready
    8. A digital multimeter (Electrical circuits galore to test)
    9. Good wiring schematics/diagrams of the stock rig and of the GM Throttle body injected rig/car
    10. Wiring connectors (Bullet connectors or whatever ones you may choose)
    11. Shrink wrap
    12. Soldering iron
    13. work gloves and goggles
    14. You might possibly also need additional wiring.
    15. you will need 1/8 inch blade type connectors for the HEI module. Sometimes they are refered to as .110 style male connectors.

    When pulling parts it is important that you know the following. If you are running the AMC 401 engine in your vehicle then you will need to get sensors and other components from a chevy that is equipped with a 455? For those running the 360 or buick 350 engines then of course you need to get components for a 350 equipped chevy. And for those with the 304 go with the chevy 305? engine (Sorry I am not so good with the displacements on the chevy's but you get the idea). Of course those with the AMC inline six engines you would need sensors and other components from the chevy 4.3. This is not to say however, that you cannot use the components from other engines etc. The injectors however are different according to engine size (Ie. the 305 engine will have smaller injectors that put out less than the injectors for the 455 engine etc.)


    Supplies and Components that you will need

    1. A laptop (Notebook) computer - no matter what method you decide to go with you will need a notebook in some form or another. It doesnt have to be anything fancy with advanced graphics, and other gadgets that make it like a super computer. It will need to just be a basic laptop with usb ports. I dont know if the software will work with the new windows vista as this softawre was written for the older 16 and 32 bit operating systems. With vista being 64 bit you might have headaches (Not sure I dont have a system running it yet) For those of you running linux, or other operating systems you might have a headache, might want to consider dual boot or buying another cheap notebook for the chip tuning process. Software may however be available for linux, I just have not checked into it and did not notice it off hand.

    2. A throttle body - from a 1989 -1991 gm or chevy vehicle. The older ones can also be used. I simply give this set of years as a reference point. There are supposedly some differences in the older ones but I cannot remember what they are. (new $300-$500 dollars) (Used $50-$150).

    3. Intake or adapter plate (Adapter needed for stock 2bbl manifold and some other manifolds)
    Option 1. For those of you who would like to retain your stock manifold and you have the 2bbl carbs and some 4bbl carbs (4bbl check your carb pattern first. look for the sqaure bore type pattern this is what you want!!), you will need an adapter plate to install the TBI. The adapter plate that you want it Holley part number 17-47. you can find it at summit and many other parts houses. (Warning! do not purchase the trans-dapt adapter it will perform poorly)
    Option 2. A 4bbl intake manifold like One made by offenhauser, I also think that holley manufacturers one (It isnt that some of the manufacturers don't make them, question is do they make them for the AMC engines?). This manifold should have the holley 4bbl sqaure bore bolt pattern. If your rig has an existing 4bbl manifold if it has te sqaure bore pattern then you should be ok with the stock manifold! For those with spread bore patterns or other patterns, I am sorry to say that you too will need an adapter or to change your manifold.


    4. Wiring harness -There are several options when selecting a wiring harness.
    Option 1. Painless or other aftermarket harness New ($150 - $300) (Used ??? Try e-bay)
    Option 2. Junkyard harness (used $50 – 150) If you pull a junkyard harness make sure that you are extremely careful in pulling the harness and that you don’t cut or strip any connectors or wiring unless its absolutely necessary. Make sure that if you pull the harness from the parts yard or junkyard that you get the corresponding computer. Many aftermarket harnesses can work with several different computers but the OEM harnesses often can only work with two or three different computers. (There are pinout differences and if you mix and match computers then you will be in for a true headache.)
    Option 3. OEM Harness - Expect to probably pay big dollars for one of these. I actually called a few local dealers and got outrageous prices on these things. Maybe your local dealer can give you a better price but in this area the dealers are like loan sharks. (Maybe worse)


    5. TBI computer (ECM) – There are several computers out there and I must say that if you do a junkyard pull on the wiring harness then it is extremely important that you get the corresponding computer. The wiring harnesses have a few pinout differences and if you get a junkyard harness that works with computer A and you try to connect it to computer type B then you will be in a pile of mess. Some of the universal harnesses can work with multiple computers (Not all computers though. If you purchase a universal harness then check the manufacturers instructions. One of the most important things is picking up a computer that is heavily used and widely accepted in the aftermarket world. the two TBI computers that have the most aftermarket support and software are computer # 1227747 and computer 1228746. When you pull th ecomputer at the local yard check the numbers and make sure it is one of the two, preferably the 1227747 which has the most support of all the computers out there. If you get one at a parts house then specifically ask for that computer. There are other computers out there and many of them have aftermarket support as well, but some have few programs and or compatibility with the existing chip burning systems etc. so in other words if you get one that is not listed you might pick up one that is not widely supported and you will have a headache on your hands. Additionally there are many aftermarket chipped and modded computers and if you have decided to go with a 4bbl throttle body or a dual throttle body setup or a super duper throttle body etc then you will most likely need some type of modded or upgraded computer. Should you choose not to go with the stock setup make sure you look into purchasing the proper computer before proceeding. On another note, many of the aftermarket computers need to be set up differently from one who is using a stock computer. Some of the aftermarket computers have their own cables and do not need flash cables or other cables necessary to flash the chip. if you are purchasing an aftermarket computer make sure to read the manufacturers instructions before purchasing the flash chip machines, and cables etc.


    6. TBI to air cleaner spacer - when you pick your Throttle body up dont forget to get the spacer that goes between the throttle body and that air cleaner. There are different size spacers out there and if you have an aftermarket air cleaner that sits really high it can create spacial problems when trying to close the hood. Secondly the spacer will fit the particular TBI that you have. some of them sit higher and some sit lower. its best just to pick up the one that is already on the vehicle that you pull the tbi from. If you get a new one make sure that you get the tbi and spacer from the same vehicle when giving the parts guys the vehicle info. Pictured below are two spacers, as you can see they are both different heights, yet they are exactly identical (Other than height wise) And they work the same.


    7. A fuel pump block off plate - The stock pump does not put out enough juice to keep the hungrier throttle body fed. If you try to run the TBI off the stock pump you will never get the project going and your project will end here. The stock pump in most cases is removed and the hole that housed the stock fuel pump needs to be plugged. (Otherwise dirt and other things will get into your engine and oil will fly out every time you start your rig!). A fuel pump block off plate will do the job. Our rigs use the same block off plate that the big block chevy engines use. It should be diamond shaped and it is pictured below. (Please note that some have actually retained the stock pump and used and aftermarket pump at the same time. I have no experience in this area so I cannot guide you should you choose to do so.)


    88 Grand wagoneer AMC 360 all stock
    89 Grand Wagoneer AMC 360 (Deceased)


    Upgrades

    1. Electric Radiator Fan 10/15/11
    2. Cs-144 Alt 10/1/11

    All completed long ago (cannot remember when)
    1. TBI
    2. New fuel tank
    3. AW-4 Transmission
    4. Aluminum condensor
    5. Custom Gauge Panel

    Comment

    • Wagoneerlover
      350 Buick
      • Jan 18, 2004
      • 1456

      #3
      8. Electric fuel pump - You will need an electric fuel pump for the install.
      Option 1. - an external aftermarket fuel pump. The brand and type does not matter. What you are looking for most is the output of the pump. In this case external would mean any pump that is mounted outside of the tank. Typcially most mount it on the frame rail but some have mounted it in other places. I personally purchased a carter brand pump that puts out the 12-14 psi of pressure needed for TBI. If you are tuning your TBI for performance you may or may not need more than this. You can purchase pumps that put out more than this, however you will need a fuel regulator. (Some of the new efi pumps put out 30 - 50 psi or possibly more.) Needless to say these would need to be regulated to maintain proper pressure. Pictured below is an external fuel pump.

      Option 2. - An internal fuel pump - Any gm style pump that pumps within the specified range. The issue that you will run into here is modifying your tank to fit the new pump, pickup tube and sending unit. It has been done so don't get discouraged. Another option you may want to consider is swaping in a fuel tank complete with sending unit and pump from a vehicle with TBI. (See more on that below)
      9. Gm HEI ignition module - You may use a 7 pin or 8 pin GM HEI ignition module. It doesnt matter the 7 pin can be installed inside of some distributors. THe 8 pin is very large and will need to be installed externally.
      10. An oxygen sensor bung - this is just a little circular shaped thing that is welded into the exhaust in order to mount the oxygen sensor. Pick one up at your local race shop etc.


      List of necessary sensors


      1. Knock sensor (Pictured below)

      2. VSS (Vehicle Speed Sensor) The Gm rigs use mainly 2 pole and 4 pole vss's, you may retain your stock vss. The stock waggy vss is an 8 pole vss. I know that the newer rigs have them but not sure about the older rigs. It is at the end of the speedometer cable, it is a little box shaped thing with two wires coming off (In engine compartment near brake booster.). You will need to change some settings in the computer should you retain it. You may also swap in the vss from the gm vehicle. if this is the case make sure to pull the complete speedometer cable.
      3. TPS (Throttle Position Sensor)
      4. CTS (Coolant temperature sensor)
      5. 02 sensor (Oxygen Sensor) (Options here)
      Option 1. 1 wire 02 sensor - (In my opinion the worst choice, The 1 wire 02 sensor is simply just that. it has 1 wire coming off of it. This wire is the sending unit line. There are no ground wires and the assumption here is that your vehicle exhaust will ground out the sensor. This sensor is not heated and it takes a while to warm up enough to give accurate readings.
      Option 2. 2 wire sensor - The 2 wire O2 sensor is identical to the 1 wire sensor. The only difference being that the 2 wire sensor has an additional wire which is used as a ground wire. Thus your exhaust does not ground out the gauge there is actually a wire which is used for ground. Again this sensor takes a long time to heat up to proper operating temperature, and it will not give proper readings until it has done so. (I have heard that the time to reach these temps is often 5 minutes or more not sure but granted it wont read accurately immediately.)
      Option 3. 3 wire sensor - the 3 wire O2 sensor has its own heater element. This sensor has the same wires as the two wire sensor but it also has an additional wire for the heater element. Wires are as such (sensor, ground for sensor, and Heater wire) The heater element is grounded by the exhaust. The heater element allows the O2 sensor to reach the operating temperature that it needs to give accurate readings in a quicker fashion. (Supposedly it reaches proper temps in 30 seconds or so.) (Note this was not available on TBI vehicles you will need to get it from a newer EFI vehicle)
      Option 4. 4 wire sensor - the 4 wire sensor has 4 wires. It has a sensor wire, a ground wire for the sensor, a heater element and a heater element ground wire. This way you dont have to worry if your exhaust is grounded out. The ground wires which you would assumedly run to the frame or the body will do the grounding for you. As stated above the sensor gets into the proper operating range within 30 seconds or so. (Note this was not available on TBI vehicles you will need to get it from a newer EFI vehicle)
      Option 5. Wide band O2 Sensor - The wideband O2 sensor takes things to a new level. This sensor actually has computer components and a computer that will need to be wired into and integrated into the system. It is a big headache to get it all set up and get it to work with the TBi computer or other fuel injection computers, however once it is up and running it provides results that are amazing! Should you decide to use the wideband sensor you will need to spend time wiring the computer for it into the system, setting it up tuning it and getting it to colaborate with the fuel injection computers that you are running. (It is the ultimate in terms of accuracy, precision and advanced sensors.) Unfortunately, the wideband systems (I say system because you need the computer controller and the wideband sensor itself) that I have come across are quite expensive. However if price is not a bother go for it!
      6. Map Sensor (Manifold absolute pressure)


      Emmissions equipment and sensors

      Emmissions - I am listing the emmissions equipment seperately,. There are those of you who have emmissions exempt vehicles and those of you who will choose not to use emmissions equipment. I have to use the emmissions equipment so my article shall detail how to do so and how to activate it. For those who choose not to use it, please check your local smog stations on legality of ommitting emmissions equipment, as there are strict laws regarding emmissions equipment and it's removal or adaptation.

      1. Charcoal canister - Get the charcoal canister from the stock gm vehicle of your choice with TBI. The canister is a sealed type (Unlike my rig) And it has various properties that will affect emmissions and the computer etc.

      2. Air diverter valve - The air diverter valve for the TBI application is simliar to the diverter valve on our stock rigs. The TBI diverter valve has an electrical plug so that the computer may get information from it. Picture below is the Chevy TBi air diverter valve


      Lets get started!!

      Well what are you waiting for everyone? why are you still reading and not getting out there and getting this TBI set up and installed on your rig??? Let's begin shall we? Below I shall begin to detail the steps necessary to get everything set up and installed on your engine.

      1. Initiially, I began the project by getting the oxygen sensor bung installed in the exhaust. I had it installed in the y pipe on the drivers side. I actually did this before I technically begin the project. The carb was still in the vehicle and I was weeks away from doing the project. The reason that I feel it is important to do this step first is this. If you still have the carb in the vehicle you can drive to the exhaust shop and have them weld in the oxygen sensor bung and install the oxygen sensor. This can be done and it wont harm anything and you can drive home. The sensor will be installed and there will be no headache involved. If you dive into the project and figure out later on that you need to have the bung and sensor installed then you will have to pay towing fees to have the rig towed to the shop, or you will have to re-install the carb and drive there. For those of you with mig welders and other tools needed to work on your exhaust and weld in objects etc. you can ignore this as you have no concerns in this area.
      88 Grand wagoneer AMC 360 all stock
      89 Grand Wagoneer AMC 360 (Deceased)


      Upgrades

      1. Electric Radiator Fan 10/15/11
      2. Cs-144 Alt 10/1/11

      All completed long ago (cannot remember when)
      1. TBI
      2. New fuel tank
      3. AW-4 Transmission
      4. Aluminum condensor
      5. Custom Gauge Panel

      Comment

      • Wagoneerlover
        350 Buick
        • Jan 18, 2004
        • 1456

        #4
        2. The first part that I installed like many others who have done this swap was the actual throttle body. First take a good look at your carb and note the location and position of the following; the transmission linkage, the throttle linkage and the cruise control linkage. You need to disconnect them and you will be reconnecting them to the TBI later. You want to typically stick them back on to the TBI in a similiar fashion to the way they were on the carb. Remove them and set them aside for now. get your trusty socket wrench out and take a look at your carb. I had the stock motorcraft 2150 which is held in place by four nuts. (Before removing any of the nuts make sure to remove any and all vacuum hoses and fuel hoses. Label the vacuum hoses as you will need to reconnect these to the TBI. secondly you will also need to reconnect the pcv valve hose.) These nuts are located in the four corners of the carb locate them and remove them. After removing the linkages and the nuts, your carb should lift up and off the intake. (Older carbs and 4bbl and aftermarket carbs may be different so check when removing). Once your carb has been removed, remove the black carb base gasket and remove all traces of any carb gasket material that might be left on the manifold. Now its time to get out your trusty stud remover. The four studs that sit where the carb mounts need to be removed. I had to use a stud puller but I have seen others do it simply using a large wrench. Whatever technique you choose to use or whatever tool you use just make sure that they vanish. (Do not strip the holes or force them out you need to use these holes to mount the TBI)
        Once the carb has been removed make sure that the mounting surface is clean and all traces of old gasket material are removed. Remove the black carb plate. This is the time now to get your adapter plate and set it up for install. make sure that before installing the adapter plate that you have a gasket for it on both sides. The bottom should have a gasket for a carb (Should come with the adapter plate) And the top end should have the TBI gasket. Mount the aluminum adapter plate to the engine. It should come with four pan head type bolts, tourque it down so that it is flush up against the engine (make sure you put a gasket under it before installing. Do not torque the adapter plate down with gorilla strength. It is made of aluminum and you can and will crack it. Then your project ends until you get another one. For those of you who have manifolds that are already ready to accept the TBI or for those who have swapped to new Manifolds you may disregard the information about setting up and installing the adapter plate 9you don't need it!!) However, please take care in installing your new manifold as if you do not install it properly or it leaks, you will be up the creek without a paddle and your TBI will not operate properly. (Follow your manufacturers instructions for installation of the manifold and then go to the step on installing the TBI.)

        3. Take your TBI that you purchased or picked up from the salvage yard and take a good look over it. There are several different control arms on these throttle bodies and in my time pulling them at the junkyard I encountered at least five diffferent shapes and styles. Some control arms have several holes already drilled and are very large and others are the opposite having no additional ports or holes, and they are very small. Depending on which control arm (For the trans, cruise and throttle linkage) you have, you may need to drill additional holes or make modifications. One thing however that you must know, before you install the TBI, make sure that you cut of and drill out the tab that is used for the GM transmission linkage. The stock 727 trans linkage will not fit on it. (For those with th400's I have never looked closely at one yours might fit. For other transmissions Take a look and see.)
        Line the TBI up with the adapter plate or the stock holes for those who need no plate. Make sure you install a gasket under the TBI before installation. Torque the TBI down to (Will get number later). There are three bolts that hold it down and I hope that you pulled them when you pulled it at the junkyard. Take your stock throttle linkage and stab it back onto the clip at the top of the control arm. it isnt exaclty the same as stock but it will clip on and stay. There should be a hole near or behind the throttle port for the cruise control arm, (If not just drill one, I had to). Lastly the hole you drilled out for the stock trans linkage will simply need a bolt of some type to hold the trans shift linkage. Use a nut at the end after pushing the bolt through. For those who have 700r4 trans or other trans where the linkage connects with no mods then just stab it back on and get ready for the next phase.


        4. In school you always learned to tackle the hardest task first, so next I decided to go to the conversion of the distributor. (you will need to convert your distributor in order to allow the computer to control timing. etc.) If you have a stock distributor or aftermarket distributor don't worry they can be converted too. For my particular application I have an existing GM HEI unit. Below I shall detail how to convert it, for those with other distributors the conversion will be similiar and you can use this as a basis by which to go by.

        GM HEI Distributors (Big cap)
        5a. For those with the GM HEI distributor the conversion is a sinch. If you purchase the 7 pin HEI distributor module you can re-install it back in the cap!. Well lets move on now to the actual conversion from a mechanically and vacuum controlled system to an electronic computer controlled system (Note some out there have bypassed the computer controls of the ignition and kept vacuum and mechanical controls. Should you need to do this it can be done. I just don't see why you would want to as you will be losing certain aspects that make Fuel injection so attractive. Secondly I wont detail how to do it so again your own yor own!). The first step of course is to set your timing to TDC (Top dead center. make sure that it is on the compression stroke and not on the exhaust stroke, otherwise you will have a huge headache on your hands when you pull the distributor assuming that you need to pull it. Actually the conversion of the Big cap was so easy that when I look back now I would have left it installed. Next after setting the timing to TDC, pull off the cap from the distributor. make sure that you put some white marks or some other marking on the case in order to let you know where the #1 spark plug lies. (if you pull the cap and have set the timing at TDC you wont harm anything if you dont mark the location of the #1 plug. Any plug can be used as #1 just remember to change the plug wires to line up with the new settings if you change things.) Pull the rotor off the distributor next by removing the two screws that hold it down. Once the rotor is removed it should expose the mechanical advance weights. These weights need to be removed. They are held in by a few springs and I think a c clip or two. Remove the springs and the clips and take the weights off. In the pic below you will notice that one mechanical advance weight has been removed and the other remains. 
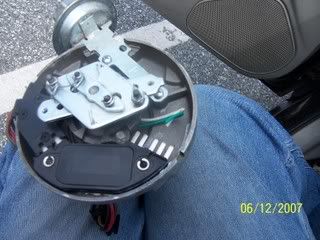
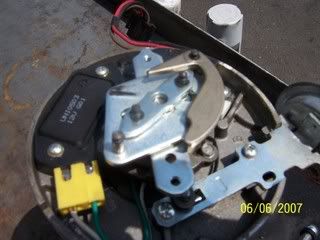
Once the weights are removed you will notice the mechanical advance arms. These arms will move freely back and fourth with the weights removed. (This is a bad thing for the fuel injected rig) The computer will control the advance so these arms need to be locked in place. You may use lockwire as I did, you can weld them in place, you can drill them and put screws through them or whatever method you choose as long as they dont move. Make sure that before you lock them in place you position them in a way that the rotor can be re-installed once finished. The first time I locked them in place I locked them in the fully closed position. The rotor screw holes did not align with the mechanical advance arm holes in this position!! (You need to be able to re-install the rotor!!). Once the arms have been locked in place you can turn your attention to the vacuum advance module. You have two options here, you can either leave the vacuum advance unit in place and simply remove the vacuum hose running to it which will disable it. The other option is to remove the vacuum advance module and to place a screw through the reluctor ring pin. (The vacuum advance module holds the reluctor ring in place and advances it etc yet if you remove the vacuum module you need another way to hold it still. Dont worry again the computer controls this now!) Once you have decided you may now turn your attention to the control module. The control module for the HEI is toward the rear of the case. It should have four pins with wires connected to each pin. Don't cut or splice these wires just yet, you will be re-using them on the 7 or 8 pin module later. If you have purchased the 7 pin module that is great as you can re-install it back in the case where the old 4 pin went. (It will fit with slight mods) Remove the connectors that are attached to the 4 pin HEI module. You may need to remove the module first. The module is held in place by two phillips head screws. simply remove them and unplug the connectors and remove the module. if you notice there is thermal grease all over where the old module used to be. Clean this up and get ready to install your new 7 pin module. Test fit the module a few times. It has tabs in the front and also two screw holes. The tabs in the front will fit in the stock position yet the screw holes will not align. You will need to drill new holes in the case.
        88 Grand wagoneer AMC 360 all stock
        89 Grand Wagoneer AMC 360 (Deceased)


        Upgrades

        1. Electric Radiator Fan 10/15/11
        2. Cs-144 Alt 10/1/11

        All completed long ago (cannot remember when)
        1. TBI
        2. New fuel tank
        3. AW-4 Transmission
        4. Aluminum condensor
        5. Custom Gauge Panel

        Comment

        • Wagoneerlover
          350 Buick
          • Jan 18, 2004
          • 1456

          #5
          Note below how the four pin module has been removed. The wires have been cut and the two holes for the screws which hold it in place are slightly further apart. (Yes I drilled new holes for it)


          Once you have drilled the new holes, take the new packet of thermal grease that came with your module and apply it under the module and install the module in the case. (Do not install it without thermal grease! The modules get extremely hot and it will overheat and destroy itself within mere minutes!!! your project will end there and you will be shelling out another 35-75 buckst to get a new module.) next we move on to the wiring phase of the module. With an internally installed module you will need to drill a hole in the Distributor somewhere so that you can run the wires out of the distributor case and out to the GM harness. (Yes there is a plug for the distributor wiring on the Throttle body harness.) Anyway, everyone has their own theories on where the hole should be in the case so i wont dictate to you where to put it. I drilled one beside the left side of the module and put a grommet in the hole and ran the wires out of it. You of course will be running five wires to the module. Two of the wires are already in the case and the new 7 pin module will plug directly back in to them as did the original 4 pin module. Take a good look at your new 7 pin GM HEI module. The module has 7 pins and each pin has a letter number or symbol beside it. I shall detail the pin setup and what wires go to where and I shall list out what each wire does in case you mix them up. You shall attach the wires according to what operation it performs. Take note not to mix them up or install them incorrectly or your vehicle will not start. You will need 1/8 inch or .110 blade type connectors to fit on the pins of the module. The larger pins connect back to the stock connectors. Below is a detail of the pins for the 7 pin module.

          1. + pin - this pin is the pin that is the power wire for the module it needs to be connected to a 14v power source.. Typically it is connected to the ignition coil positive power wire. If you have the HEI big cap distributor simply reconnect it to the same terminals that the stock 4 pin was connected to.

          2. C pin - This pin needs to be connected to the ignition coil negative terminal. So run it from the module to your ignition coil negative clip. If you have the HEI big cap distributor simply reconnect it to the same terminals that the stock 4 pin was connected to.

          3. Pin P - This pin is the one of the reluctor signal pins. It needs to be connected to the positive wire from the reluctor inside of your distributor.

          4 Pin N - This pin should is the other reluctor signal pin. It needs to be connected to the negative wire of the reluctor ring inside the distributor.

          5. Pin E - is the spark timing signal pin. This pin needs to be connected to the white wire one the connector that connected to the stock GM distributor. there is a 4 pin connector. run the wire from this pin to the white wire on the connector.

          6. Pin R - is the tachometer signal pin. This pin needs a wire connected to it that runs to the purple and white wire on the distributor connector from the GM harness.

          7. Pin B - is the override cranking signal pin. This pin needs a wire connected to it that runs to the GM distributor connector wire that is tan.

          8. The 8th wire is not a wire that is connected to the module, it is actually connected to the distributor connector on the GM harness. It is a ground wire and it is typically connected to a ground in the case. It can be grounded anywhere that you like. the wire is black and red.

          Adapting the stock distributor, using the 8 pin module and other aftermarket modules where the module will be installed outside of the case (Externally).


          First and foremost if you have decided that you will install the module outside of the distributor then you need to add one additional part to your list of parts that you will need to convert the distributor. You need to go to your local radio shack or some other store, and find yourself a heat sink. Many have used computer processor heat sinks etc. Follow the procedures above for locking out the vacuum and mechanical advance. your wiring will be exactly the same the only difference being that the wires will now be outside of the distributor and your module will be outside of the case. You will still have two wires that will need to exit the distributor. in order to run to the module so you will still need to drill a hole in the distributor at some point. The two wires that need to exit the case are the wires from the reluctor. (If your distributor does not have one then you need to convert to a distributor that has one. Otherwise you will not have computer controlled timing, you can still run TBI this way but I cannot detail how you set up the vacuum hoses etc. lastly why whould you want to???) Make sure that you find a nice place in your engine bay to mount the heat sink. it can be mounted ontop of the wheel wells, on the firewall or wherever else you may want to mount it. Once you have found a mounting location, apply thermal grease to the heat sink and mount the ignition module to the heat sink. You will need to drill holes in the heat sink in order to mount the HEI module. It will be subject to a lot of vibration and it needs to be sucred to the heat sink tightly. The electrical wiring is the same as for the Internally mounted HEI module. The only difference being that the two are mounted in different places. The 8 pin HEI module is extremely large and probably cannot be mounted inside. There is an additional pin that will need to be connected it is noted below, all the other pins are the same as the 7 pin module and are noted above. (Please note that you will need 1/8 inch or .110 size blade connectors to connect to the module. You will also need a larger size for the power wire but I dont remember the size.)

          1. Pin G (8 pin module only) This is actually a ground pin. Connect a wire and ground it out somehwere. either on the case or the body of the rig or wherever you choose!


          Your Distributor has now been converted and it is ready for electronic control! lets move on to a different phase of the conversion now.
          88 Grand wagoneer AMC 360 all stock
          89 Grand Wagoneer AMC 360 (Deceased)


          Upgrades

          1. Electric Radiator Fan 10/15/11
          2. Cs-144 Alt 10/1/11

          All completed long ago (cannot remember when)
          1. TBI
          2. New fuel tank
          3. AW-4 Transmission
          4. Aluminum condensor
          5. Custom Gauge Panel

          Comment

          • Wagoneerlover
            350 Buick
            • Jan 18, 2004
            • 1456

            #6
            Next we shall move to the electric fuel pump phase of the project. If you have chosen to install an external electric fuel pump then you will need to think carefully about the mounting location. I have heard of many mounting it directly above the stock fuel tank, others mount it along the frame and some mount it in other locations. I chose to mount mine on the frame parallel to the bottom of the fuel tank. If you chose to mount it higher up remember that you should never mount it more then 24 inches above the top of the tank or you will have problems with the pump and maintaining pressure etc. Below are photos of my installation and how I mounted it on the frame. First choose a mounting location on the frame. make sure to measure twice and cut once. You will need to cut the stock fuel send line and leave enough space so that the pump can be installed between the lines without interference. (yes you can use the stock fuel lines!! there should be a return and a send line. If there is not then you wil need to run your own return line, otherwise your fuel injection system will not operate properly. The newer rigs already have the return and send line. I am not sure about the older rigs, check when you climb underneath.) Drill a hole in the frame where you intend to install the pump. Whichever pump you purchase should come with a clamp and hoses. attach the clamp and install bolts through the frame to hold it in place. Please note that not all pumps come with clamps or hoses you might have to get your own. The carter pump that I purchased actually came with the clamps and things that I needed. Once the pump is installed, you may run wires for them now or later. There are two wires that will be required for the pump. One ground wire and another wire which you will need to run to the fuel pump wire near the fuel injection computer. I will detail that more later on. Reconnect the fuel hoses to the pump. Use soft lines and run them to the hard lines that you had to cut. Make sure to pay attention to the pump placement in terms of direction. My pump has an arrow that points forward, the arrow has to be pointing towards the engine. If you face it the wrong way the pump will actually try to pump fuel back into the tank thus causing your vehicle not to operate obviously. Once you have placed your pump and gotten the lines reconnected now you will have to pay attention to the other side of the line. The side that used to connect to the Carberuetor. This side of the fuel lines will need to be disconnected from the frame. They are connected via bolts and some of them were quite stubborn when I removed mine. No problem get your penetrating spray and use some elbow grease. Anyway the stock lines are bent to go up near the front of the engine where they were then connected to the carb with soft lines. the lines will need to be bent so that they go to the rear of the engine and up to the Throttle body somehow. Again this is another point of argument (everyone has their own theories on how the lines should be bent and where they should run to. Ie. over the transmission and up through the back, up the firewall and across etc.) So bend them around in the way you like and continue on. If you are running new lines then you will need to completely bend them as necessary all the way from the pump on up to the throttle body. Once the lines are bent to desired taste and everything is ready to be connected then make sure you have the proper fittings to connect your trottle body to the stock or new lines. Some people use quick connect fittings others use screw type fittings etc. There are too many variations here. Take the throttle body to your local race or performance shop and ask them if they have anything that can screw into the throttle body fuel ports (Look at the back of the throttle body where the fuel lines connect you will see what I am talking about!) Your goal here is to connect the new or stock lines into the back of the throttle body using conncetors etc. (You will not be able to use hose clamps on the throttle body you have to find some type of connector or adapter to plug into the fuel ports.!!!)
            88 Grand wagoneer AMC 360 all stock
            89 Grand Wagoneer AMC 360 (Deceased)


            Upgrades

            1. Electric Radiator Fan 10/15/11
            2. Cs-144 Alt 10/1/11

            All completed long ago (cannot remember when)
            1. TBI
            2. New fuel tank
            3. AW-4 Transmission
            4. Aluminum condensor
            5. Custom Gauge Panel

            Comment

            • Wagoneerlover
              350 Buick
              • Jan 18, 2004
              • 1456

              #7
              the article will be coming soon
              88 Grand wagoneer AMC 360 all stock
              89 Grand Wagoneer AMC 360 (Deceased)


              Upgrades

              1. Electric Radiator Fan 10/15/11
              2. Cs-144 Alt 10/1/11

              All completed long ago (cannot remember when)
              1. TBI
              2. New fuel tank
              3. AW-4 Transmission
              4. Aluminum condensor
              5. Custom Gauge Panel

              Comment

              • Wagoneerlover
                350 Buick
                • Jan 18, 2004
                • 1456

                #8
                article will be posted momentarily
                88 Grand wagoneer AMC 360 all stock
                89 Grand Wagoneer AMC 360 (Deceased)


                Upgrades

                1. Electric Radiator Fan 10/15/11
                2. Cs-144 Alt 10/1/11

                All completed long ago (cannot remember when)
                1. TBI
                2. New fuel tank
                3. AW-4 Transmission
                4. Aluminum condensor
                5. Custom Gauge Panel

                Comment

                • Wagoneerlover
                  350 Buick
                  • Jan 18, 2004
                  • 1456

                  #9
                  article information coming next
                  88 Grand wagoneer AMC 360 all stock
                  89 Grand Wagoneer AMC 360 (Deceased)


                  Upgrades

                  1. Electric Radiator Fan 10/15/11
                  2. Cs-144 Alt 10/1/11

                  All completed long ago (cannot remember when)
                  1. TBI
                  2. New fuel tank
                  3. AW-4 Transmission
                  4. Aluminum condensor
                  5. Custom Gauge Panel

                  Comment

                  • Wagoneerlover
                    350 Buick
                    • Jan 18, 2004
                    • 1456

                    #10
                    tbi article
                    88 Grand wagoneer AMC 360 all stock
                    89 Grand Wagoneer AMC 360 (Deceased)


                    Upgrades

                    1. Electric Radiator Fan 10/15/11
                    2. Cs-144 Alt 10/1/11

                    All completed long ago (cannot remember when)
                    1. TBI
                    2. New fuel tank
                    3. AW-4 Transmission
                    4. Aluminum condensor
                    5. Custom Gauge Panel

                    Comment

                    • Wagoneerlover
                      350 Buick
                      • Jan 18, 2004
                      • 1456

                      #11
                      The article and the pics and other things are shaping up everyone as promised.
                      88 Grand wagoneer AMC 360 all stock
                      89 Grand Wagoneer AMC 360 (Deceased)


                      Upgrades

                      1. Electric Radiator Fan 10/15/11
                      2. Cs-144 Alt 10/1/11

                      All completed long ago (cannot remember when)
                      1. TBI
                      2. New fuel tank
                      3. AW-4 Transmission
                      4. Aluminum condensor
                      5. Custom Gauge Panel

                      Comment

                      • Serious Johnson
                        AMC 4 OH! 1
                        • May 19, 2002
                        • 3831

                        #12
                        Thanks for the write-up! I had to learn carb tuning back when most mechanics shied away from "them new-fangled four-barrels", and got pretty durn good at it. But carburetors at best can only respond to three or four set situations (in which they perform as well as anything). Electronic fuel injection potentially (and the word potentially is key) responds to a far wider and finely varying set of circumstances.

                        Back when I "commuted" annually from 1,000' in Carolina to 12,000' in Colorado, it was just simpler & less smelly to swap carbs somewhere in Kansas than to dig down to jets & such in a 2150. I even had a favorite rock under which I would leave my "low altitude" carburetor for retrieval on the way back east. I tried bypassing the swap a couple of times, and that resulted in melted plugs & hammered pistons back east or about 30 HP & 4 MPG at altitude, plus tear-inducing richness right when you want to breathe good thin air. The 2150 is an "altitude compensating" carburetor, but that compensation is only good for maybe 5,000' of change.

                        I jumped onto the GM TBI bandwagon via customefis. I'd have preferred to do it myself, but was severely stretched for time just then. The setup worked great right out of the box, but there have been a few little glitches since, which of course I've had to finagle on my own. I really wish I'd been able to take the time to learn all about such systems before having to rely on the durned thing, and I'm sure that I eventually will have to anyway.

                        As for choosing an ECU, just get a 1227747. Supposedly, they're all the same, and by far the best supported thing around. That said, I've gone through several from junkyards before finding one that worked decently with my custom chip -- who knows what GM may have tried over the years and failed to document.

                        Forget 4-bbl vs 2-bbl -- that's carb-think. GM saw fit to make a larger-bore throttle body for the 454 motors, but that was likely an adaptation brought about because they didn't expect the big-block to remain viable into the era of fuel injection. Otherwise they'd have just sized the standard throttle body large enough from the get-go. Using the larger one on a smaller motor like a 360 won't hurt a thing (it's not quite like carb sizing in the old days because fuel atomization is not a problem), but the big ones are rarer and so more expensive. If you have a 401 that sees more than maybe 4,500 RPM you need the big one or you may as well have a 360. The 454 throttle body will come fitted with larger injectors than will a small-block or V-6 piece, so you'll have to work that out as well.

                        Speaking of injectors, they're pretty much the only mechanical wear item in the whole deal (everything else just fails randomly), so it's not a bad idea to budget for brand new ones, or have old ones rebuilt & blueprinted for about the same cost. Carrying spares of everything is always a good idea, and TBI sensors & such don't cost more or take up more space in the toolbox than anything else. The're also less smelly than a spare carb, and take fewer tools to diagnose & fix.

                        Chip, chip-aree:
                        An AMC 360 will run more or less decently on a stock GM 350 chip, but you could do better in a fixed environment with a well-tuned carb. If you operate your Jeep in diverse altitude/temperature/angle situations, even that stock chip will probably pay off. To get it really right you'll need some tuning, and that takes datalogging & chip burning software. I know a lot less about that than others here, so I'll shut up and wait for them to chime in.

                        S.J.

                        PS/Edit: Oh, one other thing. Unless newer software than the ALDL datalogging stuff I have has been invented, or someone has figured out a cable that works with USB, you'll need an older laptop that has a com1 port, a thing most newer ones lack.
                        "Carpe Mañana".

                        '83 Wagoneer
                        360, .030-over, K8600 cam, Crane springs, ported heads, Edelbrock Performer, G.M. TBI, TFI, 3" exhaust,
                        T-18a/208, D44/AMC 20 w/ limited slip in both, 3.73s, 33s, BDS 4" springs, Rancho 9000 shocks, etc., etc.

                        Comment

                        • Bill USN-1
                          258 I6
                          • Nov 11, 2006
                          • 360

                          #13
                          Sounds like it's been a while since you played with the systems...
                          The newer laptops work fine with winaldl and a usb to serial cable.
                          I run up to 4 devices at one time on mine.
                          From a wideband O2 system to a real time tuning adapter.

                          I will add that if you try to use the BBC TBI on a small block motor you need to be able to tweak the chip your self.
                          There are way to many differences for the stock chip to compensate correctly.
                          Bill USN-1
                          Fuel Injection Moderator at BinderPlanet
                          Hamilton Fuel Injection
                          75 scout XLC 345/727/JPD300/3.73's/33's/4wdisc/hydroboost/EFI/OBA/OBW
                          1977 Innocenti 1001 (Italian Mini)EFI 1275/DIS

                          Comment

                          • BRUTUS
                            360 AMC
                            • Dec 06, 2005
                            • 3442

                            #14
                            Good start to the article. Pad much?

                            Ever thought of posting this on a webpage complete with links and pictures instead of a thread? Just curious is all.

                            When this is finished it will definately be archive material.
                            "Brutus" '74 J10 360/T18/D20/Front D60 Pro Rock & ARB/2" shave, ARB, 15 bolt FF Rear/ 4.56 Gears/38.5 x 16 TSL
                            Current Jeep Status:Under The Knife
                            Current Homepage Status: RUNNING

                            Comment

                            • Rogue
                              360 AMC
                              • Nov 17, 2001
                              • 3439

                              #15
                              this post is soooo sweet its sticky
                              Jeff - 74 Cherokee S 401/400/QT - basically stock

                              Comment

                              Working...
                              X