Tell me your top wiring tips (my harness is in the mail)

Collapse
X
 
  • Filter
  • Time
  • Show
Clear All
new posts
  • tgreese
    • May 29, 2003
    • 11682

    #16
    Originally posted by Rusty76
    Hi thanks for the tip. Called Partsdude today. They don't have the board for my 76.
    Too bad that would have been perfect. I think I'm going to try and fix the pins.
    Found a great thread about using super small screws to act as pins.

    I started separating the front light wiring from the engine bay wires.
    The organization was a big help is thinking I just might pull this off.
    With lots of help from this forum. Which I'm lucky to have found.
    Stay healthy everybody.
    You can probably find a used board from a wreck/part-out if you don't want to repair what you have. According to my parts book, the '76-80 boards are all the same - maybe later too, but my book ends there. I have repaired some of these pins (the straight connector, not the round one) by putting a piece of solid copper wire inside the pin and soldering to the board. You could also fly around the connector with short wires that go direct from the harness to the board.

    The push-on pigtail is available if you can't reuse the ones from your old harness - I found a couple of sources recently by searching the net. I would just snip off the old connector plus a couple of inches of wire and splice it to the new harness.

    The wires won't be hot if you leave out the fuses to those circuits. I would leave a couple of inches of wire and cut them off. Splicing the wire back on to the harness, should you need that circuit, is trivial. You should cover the cut end of the wire with something. They make heat shrink caps specifically for this purpose.
    Last edited by tgreese; 03-18-2020, 09:53 AM.
    Tim Reese
    Maine beekeeper's truck: '77 J10 LWB, 258/T15/D20/3.54 bone stock, low options (delete radio), PS, hubcaps.
    Browless and proud: '82 J20 360/T18/NP208/3.73, Destination ATs, 7600 GVWR
    Copper Polly: '75 CJ-6, 304/T15, PS, BFG KM2s, soft top
    GTI without the badges: '95 VW Golf Sport 2000cc 2D
    ECO Green: '15 FCA Jeep Cherokee KL Trailhawk

    Comment

    • Rusty76
      258 I6
      • Jul 15, 2018
      • 331

      #17
      Thanks Tgreese for all the great tips. Still not sure which way I will fix that board. I like your method and the other one using small screws. Got lots of work in front of me first. Made my first connection on the engine today. Started with two easy ones. Temp sensor and Oil sender. Its early but I think I will like the process. Of course on my very first connection I forgot to put the heat shrink on! haha..

      The next few will take sometime. Basically goes like this.
      Read wire "Alternator Exciter", spend 20 mins figuring out what it does.
      Another 20 mins where it goes. Another 20 mins checking my work..
      Slow process but learning lots. Sure would be nice to find a local guy to toss some crinkle his way for a little mentoring.
      1976 Jeep Wagoneer
      Rebuilt, 360, TH400, QT.
      Still not running. Soon!

      Comment

      • Full Size Jeeper
        304 AMC
        • Jul 20, 2014
        • 2475

        #18
        You are doing it right, take your time, it is not a race. Glad to here you are getting after it!!!!
        1978 Wagoneer

        401/turbo 400 trans. Quadra-Trac BW1339 (with Low) 4" Rusty's lift with 31" Summit Mud Dawgs

        Mods:
        Fuel Tank, Red Holley Fuel Pump, Razor Grill (profile pic out dated), Rebuilt steering box

        Comment

        • rocklaurence
          Moderator

          Moderator
          • Jan 14, 2009
          • 1841

          #19
          Soldering is an option but Truthfully a properly Crimped connector is a lifetime connection. A lot of Engineering has gone into designing Crimped connectors. For example: all the connectors from the OEM are crimped. In the older days there were some soldered splices but not now. However, the Plastic Sleeved crimp-on connectors are Junk. Use the metal crimps with water proof/adhesive line shrink wrap. I sometimes use liquid-tape under the shrink wrap.

          Comment

          • Rusty76
            258 I6
            • Jul 15, 2018
            • 331

            #20
            Hey Everybody hope this finds everybody healthy. I'm working away here on the 76 Wagoneer, installing new wiring from EZ. ITs proving to be a little harder than EZ.
            hahaha. I'm very new to this and its slow but I'm enjoying it. I had a experienced buddy lined up this week to come help but with everything going on decided its best to work solo. I'm confident I can wire the rear and front of the wagon but I'm struggling with the engine. Even with the TSM, Haynes and the internet I think I would be further ahead if I just ask. Also hope I don't offend anybody but I'm going with crimped connections. Picked up the good connectors and proper crimper. Just seems easier to not screw up. Oh soooo many questions. Hope you find some comedy in this!

            Alternator:
            OK I have 3 wire type. From what I've deciphered I get
            where EZ wire 'Alt power' goes. I also learned that the 'Alt Exciter'
            connects to one of the male connectors on the Alt.
            The last wire original green colour is the voltage reader, I don't seems to have
            one of those in my new harness.

            1. I guess I just add this wire in. Run it from the fuse panel to the Alt?

            I'm going to list every wire that I need to run.

            IGN Switch Start Wire: I don't think I need this one because I'm running larger gauge wire from started solenoid directly to started?

            Solenoid Power Wire: Must go to solenoid but not sure where?

            Fan Wire: This must be for electric fan. Which I don't have. Not needed.

            Coil Pos Wire: I think because I'm using a DUI distributor I can forget about this wire?

            AC compressor Wire: AC compressor has been removed by PO. I will deal with that wire later.

            OK hope everybody is following along. Lets talk about my DUI distributor.
            Sounds to me that I need to run a 12 gauge wire from started solenoid to BATT connect on the distributor. It also has a TACH connector, I guess I run the Tach wire to this.

            Where on the solenoid does the DUI BATT connection run to? Can I use the big read Solenoid red wire for this?

            Also I understand that the Dui distributor has its own Coil and module built in.
            Does this mean that I can forget and remove. Coil, and both those boxes on the passenger fender. The electronic ignition box and the module box

            To make a confusing post maybe less confusing I have no idea what I'm suppose to do with.

            IGN Switch Start Wire
            Solenoid Power Wire

            Also '' Neutral Safety Switch" I get what it does but where is it and how does it get wired up?

            I'm sure most guys can wire these things up blindfolded. I hope to learn that much someday. Here are a couple random pics. With the kids off school I've been working on the rig from 5am to 7am and again from 8pm to 10pm. I dream about getting this thing on the road and cruising with the fam. Checking out new places in the mountains..
            Stay healthy everybody and thank you very much!!!!!!


            IMG_0748 by , on Flickr


            IMG_0747 by , on Flickr

            IMG_0745 by , on Flickr

            IMG_0744 by , on Flickr

            IMG_0743 by , on Flickr


            IMG_0741 by , on Flickr
            Last edited by Rusty76; 03-26-2020, 06:51 PM.
            1976 Jeep Wagoneer
            Rebuilt, 360, TH400, QT.
            Still not running. Soon!

            Comment

            • Rusty76
              258 I6
              • Jul 15, 2018
              • 331

              #21
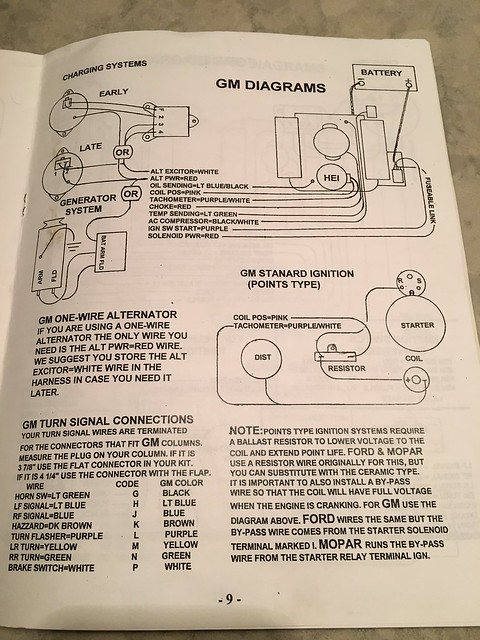
              I think I figured some of it out. If you stare blankly at enough diagrams eventually something clicks. I believe this is what I'm after. This pic finally made sense.

              Coil wire goes to DUI distributor.
              Solenoid Power wire goes to terminal of starter solenoid.
              Started solenoid goes down to starter.
              IGN Switch Start wire goes to starter solenoid.
              Battery + goes to same side on the started solenoid as the big red solenoid wire.
              Battery - goes from battery and splits to grounds. engine/ fender.
              Tach goes to DUI distributor.
              Alt Power Wire goes to Alternator.
              Alt Excite goes to one of the male connects of Alt.

              Couple things I need to research more is the;

              Neutral safety Switch and the 3rd wire on the Alternator (voltage reader wire)
              Also what I can toss now that I am using DUI distributor. Seems like some important stuff coming off both sealed boxes. The Electronic Ignition, module box.

              Thanks!


              IMG_0752 by , on Flickr
              1976 Jeep Wagoneer
              Rebuilt, 360, TH400, QT.
              Still not running. Soon!

              Comment

              • tgreese
                • May 29, 2003
                • 11682

                #22
                Which TSM are you looking at? I suggest you look at the 1982 wiring diagram on the Tom Collins site for an example of how the Delco alternator is wired. It has 3 connections -

                1) the big wire to the battery connects to the battery terminal of the solenoid.

                2) is the voltage sense wire. I think you call this the "voltage reader." Understand that the voltage regulator uses the battery voltage as feedback to tell it how much current to send to the battery. What may be confusing is that it regulates current to the battery by changing its output voltage. Jeep connects this wire right back to the alternator charge wire, #1 here.

                The voltage of the battery controls the alternator voltage to the battery. The battery is a big current sink, and the more of a sink it is, the more it will pull down the regulated voltage from the alternator. As the battery charges, it becomes less of a sink and the alternator makes less current to pull up the voltage. Whatever current it takes to pull up the voltage, that's the current the alternator makes.

                3) is the exciter wire. This comes from the ignition switch, and provides a tiny current needed to start the alternator from zero. The alternator uses its own current to make more current. This exciter wire is a bootstrap to get the alternator going. Once the alternator is charging, it holds the exciter wire at the same voltage as the ignition wire. You need some sort of blocker in this wire to prevent the alternato from backfeeding into the ignition switch when you turn off the ignition. This can be a resistance wire (what Jeep uses), an incandescent light bulb (the ALT light) or a diode.


                Automatic transmission? Only automatics use the neutral safety switch. Assuming you have the right solenoid for this Jeep (1976, right? Helpful if you'd put that in your signature file), there should be a terminal for this on the underside of the solenoid. Your solenoid should have the two big terminals, one to the battery and one to the starter. It should have two smaller terminals on the top labeled S (start) and I (ignition). The neutral safety connection is the ground wire for the solenoid coil. It goes to the neutral safety switch (NSS) on the shift linkage or transmission. The NSS connect to ground when the transmission is in park or neutral, allowing the solenoid to energize from the ignition. In any other gear, the NSS has no ground connection and the solenoid is disabled.


                The two sealed boxes should be the voltage regulator (VR) and the ignition control unit (ECU). The VR is replaced by the Delco alternator, which has a VR inside it. Same with the ECU and the HEI ignition.
                Last edited by tgreese; 03-27-2020, 08:47 AM.
                Tim Reese
                Maine beekeeper's truck: '77 J10 LWB, 258/T15/D20/3.54 bone stock, low options (delete radio), PS, hubcaps.
                Browless and proud: '82 J20 360/T18/NP208/3.73, Destination ATs, 7600 GVWR
                Copper Polly: '75 CJ-6, 304/T15, PS, BFG KM2s, soft top
                GTI without the badges: '95 VW Golf Sport 2000cc 2D
                ECO Green: '15 FCA Jeep Cherokee KL Trailhawk

                Comment

                • Rusty76
                  258 I6
                  • Jul 15, 2018
                  • 331

                  #23
                  Big thanks to tgreese and everybody else for taking the time.

                  Thats great news that with the DUI I can now delete the VR and ECU.

                  Looks like I might have the wrong starter solenoid on my 76 Wagoneer.
                  I only have one of the smaller terminal. The one towards the battery is present,
                  the started side is blank.

                  Prevent back feed on Exciter wire ok thanks. Yes the voltage sense wire does not seem to be part of my EZ wire harness. The alternator did have a third green wire connected. Will need to look into that.

                  I'm following the TSM that I printed off for the 76 Wagoneer. The wiring diagram in the back is very confusing but slowly getting it. I hope!
                  1976 Jeep Wagoneer
                  Rebuilt, 360, TH400, QT.
                  Still not running. Soon!

                  Comment

                  • tgreese
                    • May 29, 2003
                    • 11682

                    #24
                    Hi -

                    I suspect youhave the right solenoid. Some years do not use the I terminal (Prestolite Jeeps?), and the OEM solenoids for them just delete it. The service part has the I terminal; when replacing in the OEM harness, you leave it empty.

                    Looking at the diagram for '76, I'm wrong about the terminal on the bottom of the solenoid. Your Jeep has the NSS breaking the wire between the switch and the solenoid. Your NSS will be closed in park and neutral but not connected to ground. You need to run the wire to the S terminal from the ignition switch, to the NSS wherever it is located, and then to the starter solenoid. The solenoid coil grounds through the bracket of the solenoid.
                    Last edited by tgreese; 03-27-2020, 11:14 AM.
                    Tim Reese
                    Maine beekeeper's truck: '77 J10 LWB, 258/T15/D20/3.54 bone stock, low options (delete radio), PS, hubcaps.
                    Browless and proud: '82 J20 360/T18/NP208/3.73, Destination ATs, 7600 GVWR
                    Copper Polly: '75 CJ-6, 304/T15, PS, BFG KM2s, soft top
                    GTI without the badges: '95 VW Golf Sport 2000cc 2D
                    ECO Green: '15 FCA Jeep Cherokee KL Trailhawk

                    Comment

                    • Rusty76
                      258 I6
                      • Jul 15, 2018
                      • 331

                      #25
                      Decided to go grab a new Solenoid from Napa. Good price and gave me a reason to sneak out of the house. Excited to get some work done tonight!

                      IMG_0765 by Colin McArthur, on Flickr
                      1976 Jeep Wagoneer
                      Rebuilt, 360, TH400, QT.
                      Still not running. Soon!

                      Comment

                      • Rusty76
                        258 I6
                        • Jul 15, 2018
                        • 331

                        #26
                        Hope everyone is doing well. I'm about to start days off and am looking forward to knocking off most of this wiring harness. Couple rookie questions to get me going again. Please excuse my lack of proper jargon.

                        I'm a little stumped on the Alt wiring. I have looked at the wiring diagrams but I'm still a little fuzzy, or maybe its just the night shifts.

                        Here are some pictures of what I've done so far. Shouldn't I have some wire running directly from the Batt to my Alt? I wired it the way that I received it from the PO. Also on the back of my ALT I have two big terminals one with a Red disc the other with a brownish disc. IT seems to me that my ALT power should go to the RED connection. PO had it how I have it in picture going to brownish. The little black lines coming off solenoid power is the fusible link Stay safe everybody!

                        IMG_0781 by , on FlickrIMG_0782 by , on FlickrIMG_0784 by , on Flickr
                        1976 Jeep Wagoneer
                        Rebuilt, 360, TH400, QT.
                        Still not running. Soon!

                        Comment

                        • tgreese
                          • May 29, 2003
                          • 11682

                          #27
                          That's a Motorola alternator. It requires an external voltage regulator. Suggest you convert to the 3-wire Delco alternator. Your drawing above assumes all-GM, so you're mixing paradigms. Only the HEI is GM.
                          Last edited by tgreese; 04-01-2020, 02:42 PM.
                          Tim Reese
                          Maine beekeeper's truck: '77 J10 LWB, 258/T15/D20/3.54 bone stock, low options (delete radio), PS, hubcaps.
                          Browless and proud: '82 J20 360/T18/NP208/3.73, Destination ATs, 7600 GVWR
                          Copper Polly: '75 CJ-6, 304/T15, PS, BFG KM2s, soft top
                          GTI without the badges: '95 VW Golf Sport 2000cc 2D
                          ECO Green: '15 FCA Jeep Cherokee KL Trailhawk

                          Comment

                          • Rusty76
                            258 I6
                            • Jul 15, 2018
                            • 331

                            #28
                            Ah ok. Thanks! What amps would you recommend?
                            I dont plan on putting a massive stereo in. I do plan on maybe EFI if that makes a diif.
                            1976 Jeep Wagoneer
                            Rebuilt, 360, TH400, QT.
                            Still not running. Soon!

                            Comment

                            • tgreese
                              • May 29, 2003
                              • 11682

                              #29
                              That's likely a 30A Motorola. (Later - book says they came in 37A and 51A varieties. I'd assume this is std and optional HD.) Are you removing any ammeter? Don't run more current through the ammeter than the original alternator would make.

                              Last edited by tgreese; 04-02-2020, 05:37 AM.
                              Tim Reese
                              Maine beekeeper's truck: '77 J10 LWB, 258/T15/D20/3.54 bone stock, low options (delete radio), PS, hubcaps.
                              Browless and proud: '82 J20 360/T18/NP208/3.73, Destination ATs, 7600 GVWR
                              Copper Polly: '75 CJ-6, 304/T15, PS, BFG KM2s, soft top
                              GTI without the badges: '95 VW Golf Sport 2000cc 2D
                              ECO Green: '15 FCA Jeep Cherokee KL Trailhawk

                              Comment

                              • tgreese
                                • May 29, 2003
                                • 11682

                                #30
                                The brackets for the Delco alternators are slightly different. You can address this by either buying a Delco made specifically to replace the Motorola (look online), or by minor machining on the case of the Delco alternator.

                                You could buy a 10SI for a Jeep application, like a '76 with a 258. You'd still need to hack the case some. I think you drill out the bolt hole a bit and maybe cut off some of the length of the mounting boss. Search online - someone must have covered it. https://www.rockauto.com/en/catalog/...generator,2412 It's very easy to turn the case ("clock the case") to whatever angle you want. Use a toothpick to hold back the brushes when you put the case halves back together. There's a hole specifically for this.

                                You could also use the Motorola. It's a pretty bad alternator though - the diodes in them fail a lot. You'd also need to put the external voltage regulator back.
                                Tim Reese
                                Maine beekeeper's truck: '77 J10 LWB, 258/T15/D20/3.54 bone stock, low options (delete radio), PS, hubcaps.
                                Browless and proud: '82 J20 360/T18/NP208/3.73, Destination ATs, 7600 GVWR
                                Copper Polly: '75 CJ-6, 304/T15, PS, BFG KM2s, soft top
                                GTI without the badges: '95 VW Golf Sport 2000cc 2D
                                ECO Green: '15 FCA Jeep Cherokee KL Trailhawk

                                Comment

                                Working...
                                X