42 Gallon Suburban Fuel Tank Installation (With more Pics!!!)

Collapse
X
 
  • Filter
  • Time
  • Show
Clear All
new posts
  • Wagoneerlover
    350 Buick
    • Jan 18, 2004
    • 1456

    42 Gallon Suburban Fuel Tank Installation (With more Pics!!!)

    Hello again All, More pics and completion of the write up coming soon!!

    Wagoneerlover is at it again with another project write up. I would like to note that this is not my original idea, this idea was first attempted and completed by jeepinpete. His original install of the suburban 42 gallon tank is at the link below.

    Since my stock tank has sprung a leak, and is in the way of my new drive train, I have been doing some research on a rear mount tank. One of my goals is increasing my fuel capacity. 20 gallons doesn't go very far. Another goal is to keep it as tucked up as reasonable. I have a receiver hitch on the Cherokee, so that buys me


    Of course with all mods, whether it was my idea or not I still add an additional write up as a resource for others when I have time. Now for the write up.


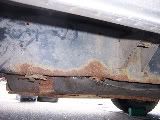
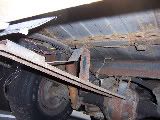
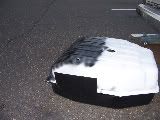
    We all have many reasons for wanting a new fuel tank. Sometimes its an additional second tank, sometimes we seek a different tank for specialized purposes and other times we just want a replacement that we feel is in a better position than our stock tank. Whatever the reason may be, installing a new fuel tank is doable with a few simple tools, preparation and careful planning. In my particular case, My stock tank skid plate was rusting out and with continued usage it would most definitely have fallen out and hit the ground at some point (Hopefully not while I was driving on the freeway. would not have been good!) Below you will find pics of my stock tank hanging down below the frame. (This is a common trouble spot and happens on many of these rigs, especially in the snowy northern and mid-eastern states where salt is heavily used on snowy days.


    Things that you will need for this project. (GM part numbers listed beside each item)

    1. A fuel tank from a c-1500 suburban years 1992 - 1996 (GM# 15662735)
    2. A fuel sending unit from a c-1500 suburban years 1992 - 1996
    3. A fuel tank skid plate from a c-1500 suburban years 1992 - 1996 (GM # 15640573)
    4. 2 fuel tank check valves from a c-1500 suburban years 1992 - 1996. (Gm# 15640448)
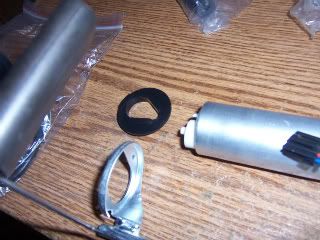
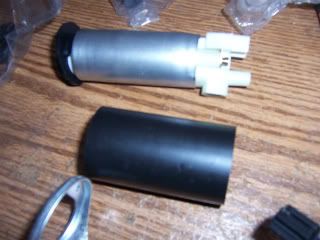
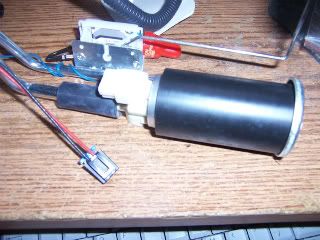
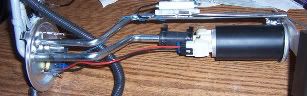
    5. The stock fuel pump if you are running TBI. (Other pumps will fit if you intend to run a carbed application or a multi-port efi system or system that requires a higher output than that stock TBI system)
    6. Common hand tools
    7. A dremmel, jigsaw or some other type of tool which you can use to cut holes in the frame metal, (You might possibly need this tool to cut bolts which are rusted solid and are immovable without herculean strength!!)
    8. a welder or possibly some JB weld.
    9. 1 inch copper pipe or whatever other pipe that you may choose which is fuel safe. (Stainless steel, etc) You need about two or three feet of it.)
    10. 1 inch 90 degree elbow joints for the same pipe mentioned above, again it needs to be fuel safe, you will need 2 of them.
    11. A copper reducer (Needs to be a 2" to 1" reducer) Again it needs to be fuel safe (Rated to handle fuel safely) it doesn't need to be copper it can be your choice of metal (Steel, stainless steel, copper) as long as it is fuel safe.
    12. The stock fuel tank straps or whatever alternative you would like to use in place of them. (I used galvanized steel straps (Flexible))
    13. Possibly some angle iron or I bars to set up mounting points for the skid plate.
    14. New fuel line to run to the new location.
    15. some flexible fuel hose.


    !Warning! if you perform this swap you will lose your under the rig spare tire carrier!


    First and foremost obtain the parts listed above. It will make the install go easier and of course as with every project even when you get everything, there will be little items that you forget here and there. I have tried to list it all out so that those who attempt this mod will have it all up front but I may have missed one or two little things.

    2. For those of you who are removing your stock fuel tank, this is the time to get it out. Check under the stock fuel tank. There are several bolts which hold the stock fuel tank skid plate in place. (The skid plate actually holds the tank up and it doesn't have any straps that hold it to the body). There are about 4 bolts on the frame that run through the skid plate on the fuel tank side (Drivers) There are also ab out 4 bolts that hold the skid plate to the body that are under the rig. You need to crawl under and you will see them. Two up near the front of the skid plate and two near the rear. The rear ones are a PITA to get out as they have a vent tube line near them which also has a bolt holding it down and it is hard to get a wrench on top of them. (For those of you who plan on running dual fuel tanks you can ignore this and go directly to step 6)

    3. The bolts on my skidplate were rusted so tight up against the body that they would not budge. I had pre-soaked them in wd-40 for a week and they would not move. it was almost as if they had simply fused into the body and become one. Next came the cutting wheels from my dremmel, they made short work of the bolts. Some would have preferred to heat the bolts up and remove them after they get hot and expand. (Whatever works as long as you can remove them.) (Just remember if you are thinking of heating up the bolts that you have a tank which has had fuel in it, right near and above/beside all of the bolts. It is probably a better idea to think of an alternative method as you dont want to run the risk of causing a fire or causing the tank to explode.

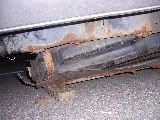
    4. Make sure that you place something under the gas tank and skid plate before completely removing all of the bolts. Pictured below you will notice that I have wood blocks under mine to catch the tank. My skidplate was rusted through so after removing the rear skid plate bolts and the fuel filler line hoses. the tank simply dropped out. at least partially, as half of the skidplate was gone. Make sure to remove the fuel tank fill lines before removing all the bolts for the skid plate. The tank will sort of hang on the fuel tank fill lines and it will dangle there even though the skid plate has dropped out. (You can let the tank drop down but it is easier to remove these without the weight of the tank against them.


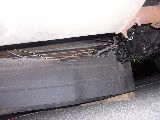
    Notice how the skid plate rusted through and is sort of torn at the side. (It wasn't supporting the tank anymore. The tank was sort of being held in by the fuel filler tubes! Not good, very poor design on the part of AMC)


    The Tank is Out!


    Hooray!

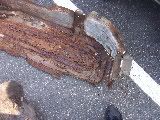
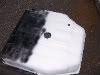
    Below is a pic of the skidplate after being removed. Note how it is almost completely gone at some points. Hence, these plates cannot last through the salty winters we have here. Besides that the poor design idea of leaving them right up against the frame leaves no runoff point for water, give you a rust torn frame and skidplate after 20 years.


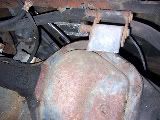
    6. Now you will want to begin the arduous task of preparing your rig to accept the 42 gallon suburban fuel tank. There are a few things that you must do in order to prepare your rig. First, take a look under the rear of the rig. Hopefully by this point you have removed the spare tire that you have under the rig. If not take the time to do so. Once the tire is removed you should notice the long tire mount that holds the tire in place. This will need to be removed. Remove the bolt that holds the tire carrier to the frame in the rear. The rear half of the tire carrier will drop down. (Spare tire carrier without tire pictured below)


    7. Near the rear axle you will notice the other mounting point for the rear tire carrier. There is a mount for the carrier that is welded to the rear cross member that sits in front of the rear axle. You will need to remove this mount. You may go about removing it using various methods. Pick one that you like. (I used a dremel and cut it out with a cutting wheel.) Others who have done similar mods have used welding devices to remove the weld or other cutting tools. ) (Below the rear tire carier mounting point above the rear axle is pictured. Note how it has already been cut down and only a piece remains which will be cut momentarily.)


    8. After removing the spare tire carrier you will want to turn your attention to the exhaust. The exhaust sits right in the way of where you will want to install your tank and it will need to be removed and re-routed or relocated. For those of you who have already re-routed your exhaust to exit in front of your rear tires (Near rear passenger door) then you may disregard this. For now you can simply remove the section the exits behind the rear tire and set it aside so that you can fit the tank up into the rear area. (Dont fit the tank yet there is more work to be done) Now might be a good time to think about that new muffler or cat that you wanted since chances are you will need to remove them to get the dang exhaust out anyway. mine were rusted together and would not come apart that easily, so I removed them as a unit.

    9. After removing your exhaust you will want to turn your attention to the tow bar (Hitch) Mine had a class III hitch stock. The tow bar (Hitch) can become a problem for those performing this swap. If your tow bar (Hitch) extends beyond the lip of the rear frame then it will need to be removed completely or moved back a few inches. On my rig the middle section of the tow bar (Hitch) actually went past the lip of the frame therefore it needed to be removed.

    Continuation of the article below.
    Last edited by Wagoneerlover; 07-29-2010, 12:04 PM.
    88 Grand wagoneer AMC 360 all stock
    89 Grand Wagoneer AMC 360 (Deceased)


    Upgrades

    1. Electric Radiator Fan 10/15/11
    2. Cs-144 Alt 10/1/11

    All completed long ago (cannot remember when)
    1. TBI
    2. New fuel tank
    3. AW-4 Transmission
    4. Aluminum condensor
    5. Custom Gauge Panel
  • unkaed
    230 Tornado
    • Aug 01, 2008
    • 12

    #2
    Id have to get a second job to fill that rascal up!

    Comment

    • Chumley360
      350 Buick
      • Sep 06, 2007
      • 780

      #3
      That's a lot of gallons! I thought the 33 gl. Bronco tank I put into the M was big untill now.
      1968 M715-Driveway queen/in progress

      Comment

      • Nick1224
        232 I6
        • Jun 05, 2002
        • 222

        #4
        I saw JeepinPetes posts a bit ago and thought about this...especially since I'm going to engine swap soon. How did you work around the crossmember and frame? JeepinPete had to do some cutting, did you too?
        88 GW...6.0/4l80e/241c swap. Just finishing loose ends. Old MSII TBI wasted spark for sale.

        Comment


        • #5
          Wagoneerlover: You don't happen to have part numbers for the skid plate and check valves do you? I've got the tank and sender, but I still need to acquire the other three parts. I assume these are dealer only items?


          Thanks,


          aa
          1983 J-10 - 4.6L(MPFI)/CS130D/Hydroboost/NV3550/D300/44/44/3.54/Disc-Disc/32s/42 gallon 'burb tank

          Comment

          • Wagoneerlover
            350 Buick
            • Jan 18, 2004
            • 1456

            #6
            10. Once it is determined if the tow bar (Hitch) needs to be removed or if it can stay in place then you may proceed. Now a decision will need to be made regarding the front and the rear crossmembers. You will need to decide if you want to modify the front or the rear crossmember. The tank is actually quite long and it cannot fit without this part of the process being completed so take your time and think hard and carefully. If you decided to leave the rear tow bar (Hitch) in place and it is flush with the frame of the rare frame crossmember then you will need to turn your attention to the front crossmember. If you removed your rear tow bar ore it sits well behind the lip of the rear crossmember then you can modify the rear crossmember. Either way one of them needs to be cut. You will need to take out a section approximately 1 inch wide and xxx long (Depends on if you decide to modify the front or rear. If you modify the front then measure the width of the front of the tank and you will need to take out a section that wide. If you decide to modify the rear then you will need to take out a section that is as wide as the length of the rear of the tank and 1 inch deep. I decided to modify the rear. If you take a section out of the front, the tank will be very close to the rear diff. The photos below will help to clarify.

            **Warning* Do not attempt this step with a fuel tank that has had fuel in it. I performed this step with a new tank. If you have a used tank or one that has had fuel in it, do not attempt to weld it or do any type of welding to it. Any tank that has had fuel in it will still be extremely dangerous as it will explode!**

            Perform step 11 only if you have a new tank that has never had fuel in it. (For those with used tanks and tanks that have had fuel in it proceed to step 11b)
            11. Ok time to turn your attention to the tank for a moment. The tank inlet is 2 inches and the jeep fill tubes are 1 inch. This is where your reducer comes in handy. Take the 2 inch to 1 inch reducer that you purchased and prepare it to go onto the tank. The tank filler tube has a lip on it that you might need to remove in order to install your reducer. Once you have gotten the reducer on and it is in place. Either weld, or solder. Whatever method you decide it doesn't matter. Just make sure that it goes on and stays on and is sealed so that fuel cannot seep out. A bad weld will leave it prone to leaks. (Pictured below is the 2 inch to 1 inch reducer.) Showing it so that when you go to the hardware/plumbing supply store and the person at the counter says it doesnt exist you know it does and you can ask the one person who knows what they are talking about to find it for you. (If you performed this step then disregard step 11b below.)


            11B. Again, do not attempt to weld the tank or weld any adapther or other peripherals to the tank. In the instance that you obtain a used tank you will need to use another option.

            1. Install a reducer in the actual fuel hose (No welding required.)
            2. Change the size of your fuel outlet (On the rig, it runs from the gas inlet to the underside of the rig, (I don't know the name of this part) pipe. (again the same as the tank, do not weld a fuel inlet that has been used) Some have custom made fuel inlet pipes etc. (I have not done this so I cannot detail it for you.)
            3. Find some type of fuel hose or get some custom made that is the size of the inlet of the tank on one side and the size of the fuel outlet pipe on the rig on the other side (Similiar to factory hose, which is a different size on both sides)


            12. Finally, you will be ready to test fit the tank for installation. If you made your incisions on the frame properly and removed everything, your new fuel tank will fit right in. it will be a tight fit but it will go in. Position the tank and use a jack stand or a lift to hold the tank in place. Make sure to place a block of wood between the tank and the jackstand or lift so that you don't damage the tank. While the tank is in place, now is the time to figure out exactly how you want to hold the tank in place. Take whatever item you may have decided to use for tank straps and figure out exactly how you want them to hold the tank in (Mounting points). Remember the tank is a heavy sucker and to add to that when you fill it up with fuel it will be extremely heavy. Stay away from plastic straps of any kind you will need metal to hold this thing up. Keep in mind that the skipdplate will also need to fit around the tank so if you come up with a wild and crazy mounting point that prevents the skidplate from mounting under the tank, you will be cursing yourself when you have to remove the mounting straps to mount the skid plate.


            Below are photos of me prepping the tank. The tank came with a coat of paint but I wanted something that would help it to resist rust. (Por15, Rustoleum you know the deal). Note the white is the primer. I primed it first and the black is the flat base paint that I used. Of course I finished painting it after a few days (Drying time for each coat)


            13. Once you have a general idea of how you would like the tank to be mounted you can move on to other things. You will need to determine if you are going to use the plastic protection plate or the skid plate, or both. In the pictures above you can see the plastic protection plate mounted under my tank. It should be noted that some ditch this and use the metal skid plate. The way the tank is designed it is designed for you to use the tank mounted in the plastic protection plate and that skidplate is designed to fit underneath the protection plate. At this time you also want to take a look at a few other areas. Take a good look at the fuel lines. Obviously the old stock lines will not reach nearly far enough to get to this tank. The stock lines terminate about halfway down the frame and you will definitely need all new lines to get this project done. Just look over the underside of the vehicle, the frame and the crossmember and begin to try to get an idea of how you want to run the lines. Typically the stock lines wont be in the best of shape so it is probably a good idea to ditch them and run all new lines instead of trying to save them. You will also want to take a look at how the angled reducer you fit into the tank looks in conjunction with the stock fill cap tubes. You will need to construct some type of pipe to take the tank from the fill tube down to the tank. (Everyone has different ideas on how this should be done so you can make your own determination on how to route the lines and the pipes necessary. (I will show pics below of how I did it). Also make sure to get a good idea of how you want the tank to be mounted while it is in. If you need to remove more of the frame pieces now is the time to find out. (you are almost ready to finalize the deal so measure, check, and double check.


            Fuel Tank Sending unit

            1. For a moment let's turn our attention away from the tank. Now is the time to get the stock tank pump and sending unit assembled and ready for usage in the tank. Since you will most likely have gone out and purchased these things new, you will need to assemble them. gather all of the components (The sending unit which should come with some gaskets and rubber pieces etc.) And the fuel pump of choice that will fit in the pump location. (If running TBI just get the stock pump for the suburban that the tank would come in. For other forms of injection or carbed apps, check the specified ranges that the pump needs to put out and order one that puts out those pressures.

            2. Take the stock sending unit and your new fuel pump. Notice that there is a sloted area at the bottom of the sending unit where the fuel pump will fit. There should be a rubber isolator that goes on the bottom of the pump. It fits between the bottom of the sending unit and the bottom of the pump. set the isolator on the bottom of the sending unit. (isolator and bottom of sending unit pictured below)


            3. Take the pump and install The rubber vibration dampner? around it. The dampener looks like a plastic tube and it fits snuggly around the pump. The pump should come with one. (Pictured below)


            4. There should be a rubber hose that is sort of thick that fits ontop of hte pump. Take the hose and slip it onto the top end of the fuel pump send line (It should be a thicker type rubber that comes with the pump or the sending unit (New one) slip one end overtop of the top end of the pump.

            5. You will need to take the other end and sort of slide the pump into the bracket, while keeping the isolator positioned at the bottom of the sender assembly. Slip the end of the hose that is connected to the top of the pump onto the fuel send line hose. Your assembly should look like the one pictured below. Note how the rubber isolator that goes at the bottom of the pump is installed, as well as the tube that connects the send line on the pump and the sending unit. Lastly the rubber vibration dampner? is also installed around the pump itself.

            Last edited by Wagoneerlover; 07-29-2010, 12:16 PM.
            88 Grand wagoneer AMC 360 all stock
            89 Grand Wagoneer AMC 360 (Deceased)


            Upgrades

            1. Electric Radiator Fan 10/15/11
            2. Cs-144 Alt 10/1/11

            All completed long ago (cannot remember when)
            1. TBI
            2. New fuel tank
            3. AW-4 Transmission
            4. Aluminum condensor
            5. Custom Gauge Panel

            Comment

            • FSJ Guy
              • Mar 20, 2005
              • 10061

              #7
              Tow bar??? What are we talking about here??
              Ethan Brady
              1987 Grand Wagoneer, slightly longer than stock.

              www.bigscaryjeep.com

              Don't mess with me. I once killed a living hinge.

              Comment

              • crazydog
                350 Buick
                • Nov 19, 2005
                • 865

                #8
                Originally posted by FSJ Guy
                Tow bar??? What are we talking about here??
                My guess would be he is talking about the receiver hitch.
                1979 Cherokee - Built 401, NV4500, Dana 300, 6" BJ's Lift w/ Bilstein 5125 Shocks, Goodyear Wrangler MT/R 35X12.5R15, Front Brake Upgrade w/ GM 2500 Calipers & EBC Pads, Rear Disc Brake Conversion, Z&M Jeeps Dash Insert w/ VDO Series 1 Gauges, Tad Rack, Ramsey Hidden Winch w/ REP8000, Hydroboost, CS140

                1967 J3500 - Making plans

                Comment

                • Wagoneerlover
                  350 Buick
                  • Jan 18, 2004
                  • 1456

                  #9
                  re-read, I made the corrections, yes I was talking about the hitch. Everything doesn't flow so well when you only have an hour of sleep. No more writing articles on instinct. And Yes I was talking about the Tow Hitch.

                  6. There will be some plastic hose clamps and metal hose clamps in the box with your new pump or sending unit. Take the clamps (Decide on the rubber or plastic, it doesn't matter which one) and clip one side on where the rubber hose connects to the fuel pump and the other end should go on the end where the hose connects to the fuel send line. Make sure that they are tight!! (Pictured below.)


                  7. Next connect the wiring harness that is on the underside of the fuel sending unit. It should be a connector with one red wire and one black wire. This is the power line and the ground line for the pump. Plug them into the top of the fuel pump. The connector only fits one way. (Note if you purchase a different pump you may have to change this connector. The pump comes with about three different connectors) Since I had the stock pump the installed connector worked.

                  8. Take the fuel sock that came with the pump and install the fuel strainer on the bottom of the pump. A small portion of the pump should be sticking out below the pump. Use the fuel strainer and connect the two pieces together. (Do not use the pump or any pump without installing the fuel strainer on the bottom)

                  9. Now that pump and assembly is ready to go into the tank!! Take the tank (if you still are doing test fittings etc you may set the pump assembly aside until you finish doing what you need. Take the assembly unit and if you look at the hole and the assembly unit it is sloted. There is only one way that the fuel pump and sending unit assembly can fit into the tank.

                  10. Slide the assembly into the tank and take the lock ring and slide the lock ring onto the assembly. Turn the lock ring until the tabs are flush up against the tabs on the fuel tank. Thus locking the fuel pump assembly in place. The only thing left above the fuel pump assembly should be the lines of course and the wiring harness.

                  11. Take careful note of the location of the fuel tank sending unit wires and how you wish to route them around the vehicle. The harness is actually pretty long so you may want to figure out a way to secure it when it is under the rig. you are pretty much done with this part of the tank. Dont forget to figure out how to wire up a harness to power it and for the sending unit signal. Also take note of the location of the fuel lines coming off the sender so that you can run new lines to them to your TBI or carb or injection.

                  Fuel sending unit specs
                  Here are the specs for the fuel sending unit. In case you need them. The sending unit reads 0 - 90 OHMS so if your fuel gauge does not read in that range it wont work properly. Either change your fuel gauge to a different one or try to retrofit a different sender into the tank.

                  Wiring harnesses
                  Under the sender assembly
                  Red wire - Fuel pump power wire
                  Black wire - Fuel Pump Ground wire

                  Above the sender assembly (To be connected to vehicle harness)
                  Purple - Fuel sending unit wire
                  Grey - Fuel pump Power wire
                  Black - Ground
                  Black and White - Ground


                  Now we can turn our attention back to the tank. I wont detail how to run fuel lines to the tank but note that you will need to run new fuel lines. The stock tank fuel lines terminate halfway down the frame and simply are not long enough to get anywhere near the suburban tank sending unit. Running such a long length of soft line is probably not a good idea so go get yourself some new line and keep going! (You are almost done). Additionally you will have to make a wiring harness what will run from the fuel sending unit wire (3 pin connector and one hook connector for ground)

                  Another step that you may want to consider is cutting yourself a small access panel (Just like the stock later model rigs) I have the access panel for the old stock tank but I sealed it off. I cut myself a new access panel so that when I need to change the pump or sending unit I don't have to drop the entire tank and spend four hours getting it down and re-installing it just to get to the tank and install a sending unit.


                  Now back to the tank!!

                  14. The Tank actually has two ports on the top which are for vent valves. Make sure to install them. It is pretty self explanatory and easy. The install with a half of a turn and it is slotted so again only one way to do it. (Actually two but if you install it backwards it is akward and you will know.

                  15. After installing the vent valves, make sure to get some 1/4 inch fuel hose to run from the vent valves to the front of the tank. You will need to connect a line that runs from these to the fuel vapor canister up front. Again the stock lines for the stock tank wont reach. So you will need to run new lines. The two valve lines should be connected with a T fitting and then run up to the front of the tank where it should connect to a line going to the charcoal canister fuel port.

                  15. Ok so now you have your sending unit in the tank and you are ready to move on. Hopefully you have finalized the position of the tank now that you have installed the fuel tank sending unit and fill tube onto the tank. Now that the position is final you want to consider methods with which you can keep the tank mounted. I personally went with galvanized steel straps. Flexible type out of my local hardware store. You don't have to use these you can chose whatever type you like as long as it will hold the tank firmly in place and can support the weight. There are many auto parts stores that sell steel universal harness mounts and you can use those also.

                  15. Measure out how and where you want to mount your straps and drill holes for the straps to mount to the front and rear crossmemeber pieces of the frame. Mount the straps and make sure that they fit into the slots under the tanks shield or skidplate (Whichever you decided to use.) They have slots for the mounts

                  16. Run the new fuel lines for the tank. (Make sure to install and inline fuel filter in the fuel sending unit send line. Fuel injectors are really sensitive and without one you can run into serious trouble down the line. I mounted mine on the frame (In fact I mounted two of them, running dual fuel filters). Whether you are running a carb or injectors you still have to make sure to determine a route which the tubing will travel in order to get from the tank to the carb or injectors. Take careful note and remember measure twice and cut or bend once. Also run the lines for the fuel vent tube (Dont forget about that!!) Please note you will need a send line and a return line for the fuel tank! and one line for the vent tube check valves to the canister.

                  17. Now turn your attention to the fill pipe and the vent tube. For the fill line you will need to get some 1 inch pipe. (Galvanized or stainless steel its up to you.) You will need to bend the line or make it curve in order to get it to go from the stock fill cap line to the fuel tank fill line. Mine came out sort of like a figure S. I have a photo of a copper one that I used for test fitting below. I used that for test fitting and had another made out of stainless steel.

                  18. the vent tube that is on the sending unit requires a size line?? (Will get the measurment later forgot what it is) Get a soft line from an automotive store and connect it there and to to the vent port on the fuel tank fill cap area.

                  19. With your S shaped or whatever shaped pipe connect this as well to the proper points. you will need some 1 inch soft line to connect the ends.

                  20. Connect the wiring harness

                  21. Connect the fuel lines to the sending unit return and send lines and connect the check valve lines. You are now ready to go!


                  Last edited by Wagoneerlover; 07-29-2010, 12:02 PM.
                  88 Grand wagoneer AMC 360 all stock
                  89 Grand Wagoneer AMC 360 (Deceased)


                  Upgrades

                  1. Electric Radiator Fan 10/15/11
                  2. Cs-144 Alt 10/1/11

                  All completed long ago (cannot remember when)
                  1. TBI
                  2. New fuel tank
                  3. AW-4 Transmission
                  4. Aluminum condensor
                  5. Custom Gauge Panel

                  Comment

                  • ThisGuyUKnow
                    350 Buick
                    • Mar 25, 2008
                    • 1463

                    #10
                    What about mounting the skid plate?
                    '85 CJ7 Laredo- Rebuilt 360, Tuned Port Injection, T-176, D300, W/T 3.31 w/Trac Loc, 31x10.5x15 BFGs

                    Comment

                    • okjeep
                      258 I6
                      • Jan 08, 2008
                      • 359

                      #11
                      I saw a guy at the Colorado Scramble last summer that had done this conversion in a scrambler on 40's. It was sweet!

                      Comment

                      • Wagoneerlover
                        350 Buick
                        • Jan 18, 2004
                        • 1456

                        #12
                        FOr the skid plate you have to be creative. You can use some angle iron or some brackets and fabricate a mount for it. Additionally there is another plate that you can purchase that most dont get when doing this conversion. There is a plastic plate that sits between the fuel tank and the skid plate. most new vehicles (Like the cherokees) use the plastic cover only and dont have a skidplate. I have both. The plastic cover and the skidplate too. It does make things sit about an inch lower but now I have more protection and an extra way to support the tank.
                        88 Grand wagoneer AMC 360 all stock
                        89 Grand Wagoneer AMC 360 (Deceased)


                        Upgrades

                        1. Electric Radiator Fan 10/15/11
                        2. Cs-144 Alt 10/1/11

                        All completed long ago (cannot remember when)
                        1. TBI
                        2. New fuel tank
                        3. AW-4 Transmission
                        4. Aluminum condensor
                        5. Custom Gauge Panel

                        Comment

                        • Wagoneerlover
                          350 Buick
                          • Jan 18, 2004
                          • 1456

                          #13
                          more pics and the write up continues!
                          88 Grand wagoneer AMC 360 all stock
                          89 Grand Wagoneer AMC 360 (Deceased)


                          Upgrades

                          1. Electric Radiator Fan 10/15/11
                          2. Cs-144 Alt 10/1/11

                          All completed long ago (cannot remember when)
                          1. TBI
                          2. New fuel tank
                          3. AW-4 Transmission
                          4. Aluminum condensor
                          5. Custom Gauge Panel

                          Comment

                          • ThisGuyUKnow
                            350 Buick
                            • Mar 25, 2008
                            • 1463

                            #14
                            Hey wagoneer lover. How has this setup been working for you. I have been meaning to install a smaller 30 gallon blazer tank. I am curious tho if I wanted to run an external low pressure pump for my carb instead of an internal pump(I want to be able to more easily swap between Carb and FI later on) Would I just simply run a line from where the internal pump would hook up to the sending unit and run it to the bottom of the tank? Would rubber fuel hose work for that?? Also does the sending unit accurately read on your fuel gauge in the cab?
                            '85 CJ7 Laredo- Rebuilt 360, Tuned Port Injection, T-176, D300, W/T 3.31 w/Trac Loc, 31x10.5x15 BFGs

                            Comment

                            • Wagoneerlover
                              350 Buick
                              • Jan 18, 2004
                              • 1456

                              #15
                              Originally posted by ThisGuyUKnow
                              Hey wagoneer lover. How has this setup been working for you. I have been meaning to install a smaller 30 gallon blazer tank. I am curious tho if I wanted to run an external low pressure pump for my carb instead of an internal pump(I want to be able to more easily swap between Carb and FI later on) Would I just simply run a line from where the internal pump would hook up to the sending unit and run it to the bottom of the tank? Would rubber fuel hose work for that?? Also does the sending unit accurately read on your fuel gauge in the cab?

                              It has been running for approximately a year now. Still going strong. As for running your own line, that is probably an option. One thing to consider though is that you would not want the line to run flush down to the bottom of the tank. Even in the stock setup after installing the pump etc, the pump doesn't touch the bottom two or three inches of the tank. (Reason for that?) Well it helps to prevent sediment, crud etc that builds up in the tank over the years from getting into your fuel pump, or worse into the engine. Rubber might work but you would probably want to work out something with some type of hard line.. It might be easier for you to simply install the electronic fuel pump and install a regulator somewhere in the fuel line in order to regulate the fuel down to the level necessary for the carb. That way when you want to switch to fuel injection, the pump would already be in place and you could simply remove the regulator.
                              88 Grand wagoneer AMC 360 all stock
                              89 Grand Wagoneer AMC 360 (Deceased)


                              Upgrades

                              1. Electric Radiator Fan 10/15/11
                              2. Cs-144 Alt 10/1/11

                              All completed long ago (cannot remember when)
                              1. TBI
                              2. New fuel tank
                              3. AW-4 Transmission
                              4. Aluminum condensor
                              5. Custom Gauge Panel

                              Comment

                              Working...
                              X