Custom Relay'd headlight harnesses. 217 sold so far.

Collapse
This topic is closed.
X
X
 
  • Filter
  • Time
  • Show
Clear All
new posts
  • SNO*MAN
    258 I6
    • Mar 01, 2008
    • 476

    #16
    FYI for Oregon users

    In regards to auxilary or fog lights in Oregon:
    The way I read it, the factory auxilary driving lights are wired backwards - except that they can be turned off completely via a switch....so they are still legal.


    According to Oregon law, fog and/or auxiliary lights must be used like the high beam headlight system of your car. They must be turned off within 500 feet of approaching an oncoming vehicle and 350 feet when following another vehicle. The color of fog and/or auxiliary lights is also regulated. Fog lights may be either white or amber (yellow). Rules prohibit other colors such as blue.

    SO, for me I want mine wired so they can be on with the high beams.
    Last edited by SNO*MAN; 12-31-2011, 12:18 PM.
    1989 "KRONK"
    Detroit front/rear 4.27 gears
    Ramsey 9000 modified bronco winch bumper
    Built 360/ 700r w/ 241c Lokar floor shifter
    Hydro-boosted brakes
    20" wheels w/ 35" Toyos
    15" Welds w/35" Uncut mud boggers
    Dual Ram Air /MSD TFI Ignition /Dakota Dash
    www.fastfinishor.com
    www.fastfinishor.blogspot.com
    www.facebook.com/fastfinishor

    Comment

    • serehill
      Gone,Never Forgotten.
      • Nov 22, 2009
      • 8619

      #17
      It will be safe

      Originally posted by SNO*MAN
      I always thought the stock configuration was backwards. I prefer the driving lights on with the high beams myself. Since it is lifted, It appears that most people get blinded more by the driving lights and the low beams over the high beams alone. Adjustment wont fix that.
      I need it to be easy to install though. An electrical issue burnt my last jeep to the ground before I got it fully insured. So electrical is a big concern of mine.
      The sytem is gong to come completely protected that's one of the parts I'm waiting on is a fuse housing. It will be protected by a 30 amp fuse that will be connected right at the battery as stated in the original discription it will be pretty elementary with full support. The circuit will be completely fuse protected from as close to the source as the fuse can be. It will use 30amp gm type fuses. The realys & housings will be american made. The relays will also have a plug in harnes & are a standard buy anywhere replacements to ensure they are servicable. I could solder them to the relays but that would make trouble shooting a PITA. As the first couple of people will see it is a well thought out protected servicable system. LOL now I wishing I had the parts.
      These sytems are based of of the same system & controls GM is using in their trucks. I have no problem telling you I will have $41.00 just in unassembeld parts. Could I build it cheaper well NO!!!!

      Reading about the laws I haven't found any that has restrictions with respect to beam connections. But it can easily be made to operate the beams in any combinaton. you can actually build the 4 headlight system with all 4 lamp having hi & lo beams
      Last edited by serehill; 02-24-2012, 06:08 AM.

      80 Cherokee
      360 ci 727 with
      Comp cams 270 h
      NP208
      Edlebrock performer intake
      Holley 4180
      Msd total multi spark.
      4" rusty's springs
      Member, FSJ Prissy Restoration Association

      If you can't make it better why waste your time. No use repeating the orignal mistakes. I'm to old to push it that's why.

      Comment

      • serehill
        Gone,Never Forgotten.
        • Nov 22, 2009
        • 8619

        #18
        I may do some post

        Originally posted by WXALL
        I'd be interested, also. Could you post pics of the installation?
        Once I built a couple of them I can do a mock up.
        Last edited by serehill; 02-24-2012, 06:09 AM.

        80 Cherokee
        360 ci 727 with
        Comp cams 270 h
        NP208
        Edlebrock performer intake
        Holley 4180
        Msd total multi spark.
        4" rusty's springs
        Member, FSJ Prissy Restoration Association

        If you can't make it better why waste your time. No use repeating the orignal mistakes. I'm to old to push it that's why.

        Comment

        • serehill
          Gone,Never Forgotten.
          • Nov 22, 2009
          • 8619

          #19
          Tigger they will work on all years

          Originally posted by Tigger4X
          Sounds advantageous. What years would this work for? My '70 and '74 J-trucks only have 37 amp alternators. Will these work on them? I hope so!


          Curiosity ...

          I have been trying to figure out how to splice the wiring from an 80's alternator into them so I'd have a 65 amp alternator that only costs $40 new from my local parts house VS the freakin' $85 for an alternator and external regulator. Do you know anything about alternator wiring? I'd be up for a "paint by numbers" tech write up to make it happen on my trucks. For sure the headlight upgrade would not be an issue then. TIA!
          CJ Jeepsters FSJ Tons of other if it has the square or 7" round headlight this will work. It will work for standard Halogen Xenon & HID Lamps.
          Last edited by serehill; 02-24-2012, 06:10 AM.

          80 Cherokee
          360 ci 727 with
          Comp cams 270 h
          NP208
          Edlebrock performer intake
          Holley 4180
          Msd total multi spark.
          4" rusty's springs
          Member, FSJ Prissy Restoration Association

          If you can't make it better why waste your time. No use repeating the orignal mistakes. I'm to old to push it that's why.

          Comment

          • serehill
            Gone,Never Forgotten.
            • Nov 22, 2009
            • 8619

            #20
            All FSJ's CJ's Jeepsters.

            Originally posted by WXALL
            I'd be interested, also. Could you post pics of the installation?
            Anything with a square or 7" round headlights all Chevies ford dodges.
            Any lamp with an H4 /9003 type socket

            80 Cherokee
            360 ci 727 with
            Comp cams 270 h
            NP208
            Edlebrock performer intake
            Holley 4180
            Msd total multi spark.
            4" rusty's springs
            Member, FSJ Prissy Restoration Association

            If you can't make it better why waste your time. No use repeating the orignal mistakes. I'm to old to push it that's why.

            Comment

            • SNO*MAN
              258 I6
              • Mar 01, 2008
              • 476

              #21
              Will the wiring be good for HID lighting?
              1989 "KRONK"
              Detroit front/rear 4.27 gears
              Ramsey 9000 modified bronco winch bumper
              Built 360/ 700r w/ 241c Lokar floor shifter
              Hydro-boosted brakes
              20" wheels w/ 35" Toyos
              15" Welds w/35" Uncut mud boggers
              Dual Ram Air /MSD TFI Ignition /Dakota Dash
              www.fastfinishor.com
              www.fastfinishor.blogspot.com
              www.facebook.com/fastfinishor

              Comment

              • mathman
                350 Buick
                • Sep 12, 2007
                • 785

                #22
                In post #19:

                Originally posted by serehill
                CJ Jeepsters FSJ Tons of other if it has the square or 7" round headlight this will work. it will work for standard Halogen Xenon & HID Lamps.
                David
                '78 J-10; '78 J-20 8400GVW
                '79 Cherokee
                '50 Willys (not Willy's) 4WD Pickup

                Comment

                • j10jim
                  327 Rambler
                  • Jan 11, 2003
                  • 605

                  #23
                  I'm down for 1
                  1980 J-10<br />Rusty\'s 4 inch lift<br />2 inch body lift,<br />35 in Xterrains on J20 axles<br />4:30 gears<br />Detroits<br />In-Cab cage thru the dash

                  Comment

                  • 78J-10
                    327 Rambler
                    • Apr 15, 2008
                    • 584

                    #24
                    I would deff be down for one. my lights need help and i plan on upgrading here soon anyway.
                    78 J-10: 258 w/2100,D20,HD44,14 Bolt,36's (SOLD )
                    79 J20: 360 T18 D20 33s 36k: current state:
                    88 Waggy: 360/727/Quad All stock rusty roof 78k :
                    Tow Rig: 2013 CCLB 4x4 w/ 6.7L Cummins


                    Comment

                    • serehill
                      Gone,Never Forgotten.
                      • Nov 22, 2009
                      • 8619

                      #25
                      Update

                      I have recieved most of the parts & rejected one. It's appears the rest of the parts will be in this week if shipping from the holidays.

                      I built a prototype last night & this works fine for the quad socket modifications,driving light modifications. It appears just for the standard conversion this will take 90+% of the load off of the light switch. Also as stated they're will not be any difference in the operation of the dimmer or light swicth it will operate as it is suppose to. The light switch I used was one out of a 72 model. I intitailly connected the system without the bypass system & the switch was indeed hot. After connecting the bypass the switch went to room temperature. I did simulate the tailight load in the test. Taillight load went from 13 amps worst case to a little lass than 4 amps. the tungsten headlight load is a real intense load. the load reduction does indeed do what it is supposed to do. I have a jeepster commando project that i will be running a full blown istall & test Saturday. Because of my travel schedul my completion of the first ones will still be th ewek of the 23rd.
                      These systems far surpass the units you can buy for HID conversions today. There's also no mofifications to this, there are to HIDs t makethem do this. The This is one of the reasons I came up with this idea. I had 3 problems with mine bought bypass system. The wires were over heating which were #16. The relay burned up & I found ther is no servicable relay replacements without buying another harness. So I decideed to replace it with a built system & when I started to remove it I found the light sockets were deformed from heat. This system had only been on the truck for 5 weeks. One more advantage to my system, I will utilize 2 relays. This will be primarily to keep heat load down & balance power distibution. Eliminates HID flucyuation also. The 2 relay system offers a distinct advantage, if something were to happen to one relay you would only lose one light. All of the systems I've looked into deploy a single relay for HIDs. If that relay quits you have no lights. So my relays are capable of carrying the entire load. The hid relays which were rated 40 amps could not carry 10. Since there is no quality requirments on these & no one ensure the specs are correct they sell them. I was wondering why when you go into these customizing shops that do HID conversions you'll see ballast & wiring harnesses laying everywhere. The service tech there a guy I've known for years told me that these harnesses were great because the failure of those & cheap ballest has become a great resource for him.
                      Response for questions. is I am putting great thought into making this system a simple install. The drivers are a good system that trully removes all headlighting load which is 90% of your headlight swithes load. Results are the load removal & improved lighting, better electrical distribution utilizing one of the primary physics of electricty. That is being the least path of resistance. Basically this is done by wirng the lighting from the battey straight to the headlights via the relay system. Instead of the power running from the battery to the fuse block from the fuse block to the headlight switch, from the switch to the dimmer & then to the lights.

                      Once these are complete I will set up some kind of install instuctions probably with a few pictures. I wil develop that after the full blown mock up Saturday.

                      The install/difficulty level on this on a 1 to 10 level should be an 3 or less. 1 being the easiest 10 being the hardest.
                      Last edited by serehill; 02-24-2012, 06:32 AM.

                      80 Cherokee
                      360 ci 727 with
                      Comp cams 270 h
                      NP208
                      Edlebrock performer intake
                      Holley 4180
                      Msd total multi spark.
                      4" rusty's springs
                      Member, FSJ Prissy Restoration Association

                      If you can't make it better why waste your time. No use repeating the orignal mistakes. I'm to old to push it that's why.

                      Comment

                      • spankyway
                        232 I6
                        • Oct 29, 2009
                        • 36

                        #26
                        I am interested in one but please forgive my ignorance. I will be installing it in an 84 GW. Would I need to buy new or different headlamps/bulbs or will it work with the sealed beams? I am just trying to figure the total cost of this upgrade. I am not real good with automotive electricals so this is very daunting to me and I want to make sure I know what I'm getting into before I start.

                        Comment

                        • serehill
                          Gone,Never Forgotten.
                          • Nov 22, 2009
                          • 8619

                          #27
                          No worries that is what the kit is for

                          Originally posted by spankyway
                          I am interested in one but please forgive my ignorance. I will be installing it in an 84 GW. Would I need to buy new or different headlamps/bulbs or will it work with the sealed beams? I am just trying to figure the total cost of this upgrade. I am not real good with automotive electricals so this is very daunting to me and I want to make sure I know what I'm getting into before I start.
                          It will work with any bulb.

                          80 Cherokee
                          360 ci 727 with
                          Comp cams 270 h
                          NP208
                          Edlebrock performer intake
                          Holley 4180
                          Msd total multi spark.
                          4" rusty's springs
                          Member, FSJ Prissy Restoration Association

                          If you can't make it better why waste your time. No use repeating the orignal mistakes. I'm to old to push it that's why.

                          Comment

                          • serehill
                            Gone,Never Forgotten.
                            • Nov 22, 2009
                            • 8619

                            #28
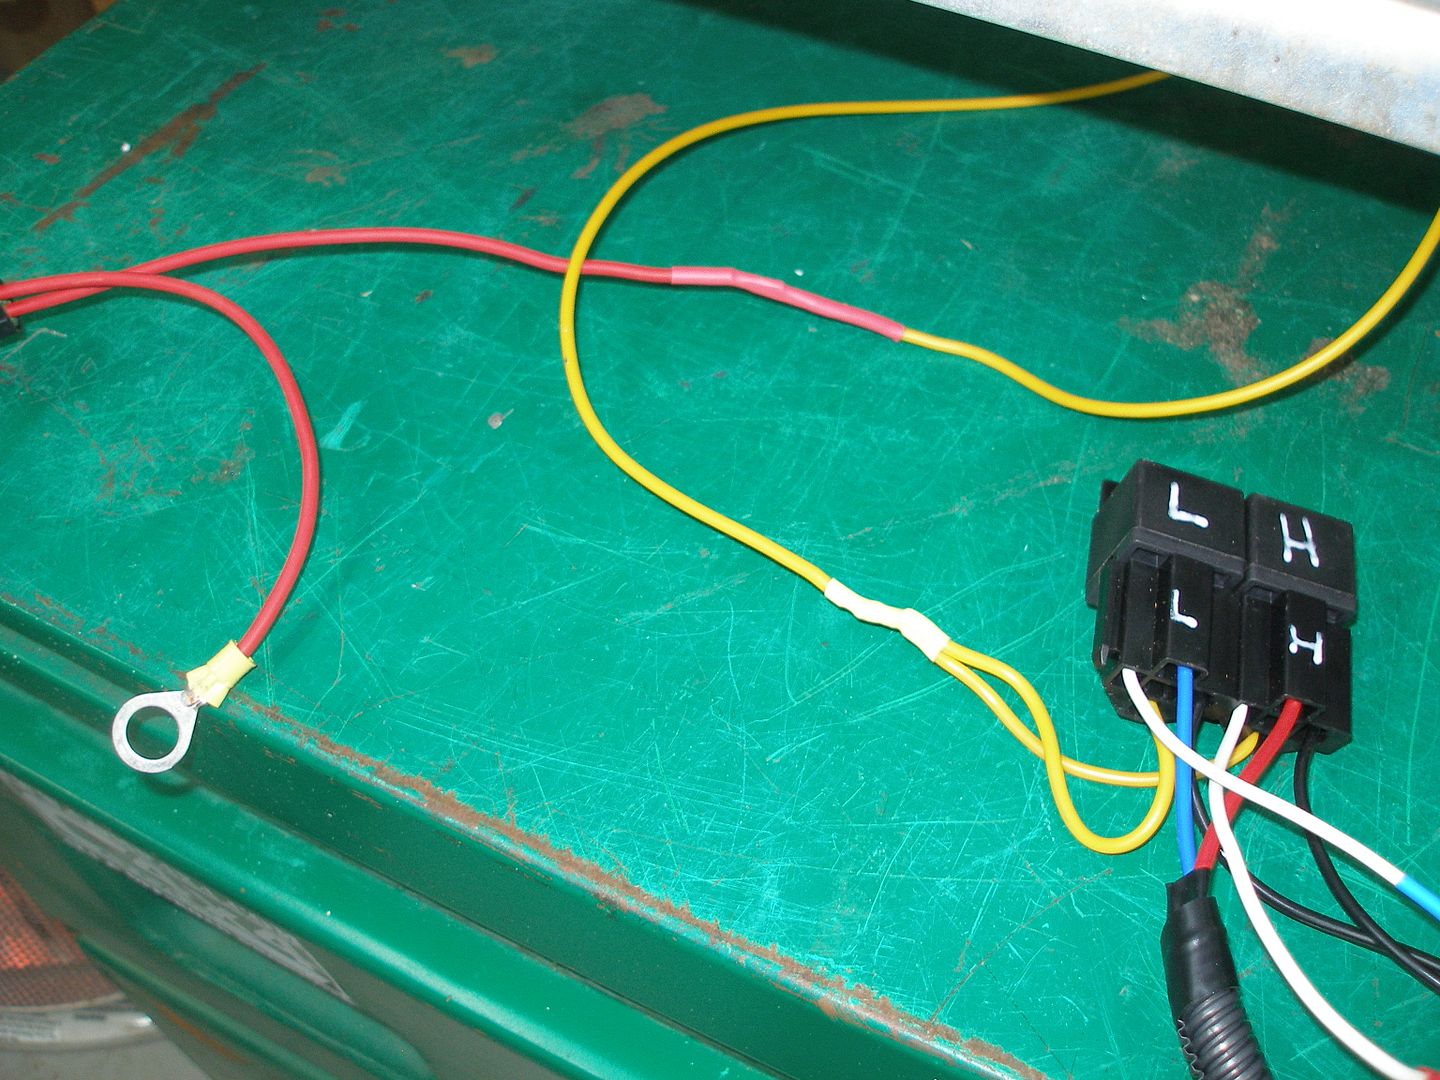
                            Done develpoment complete here's some pics

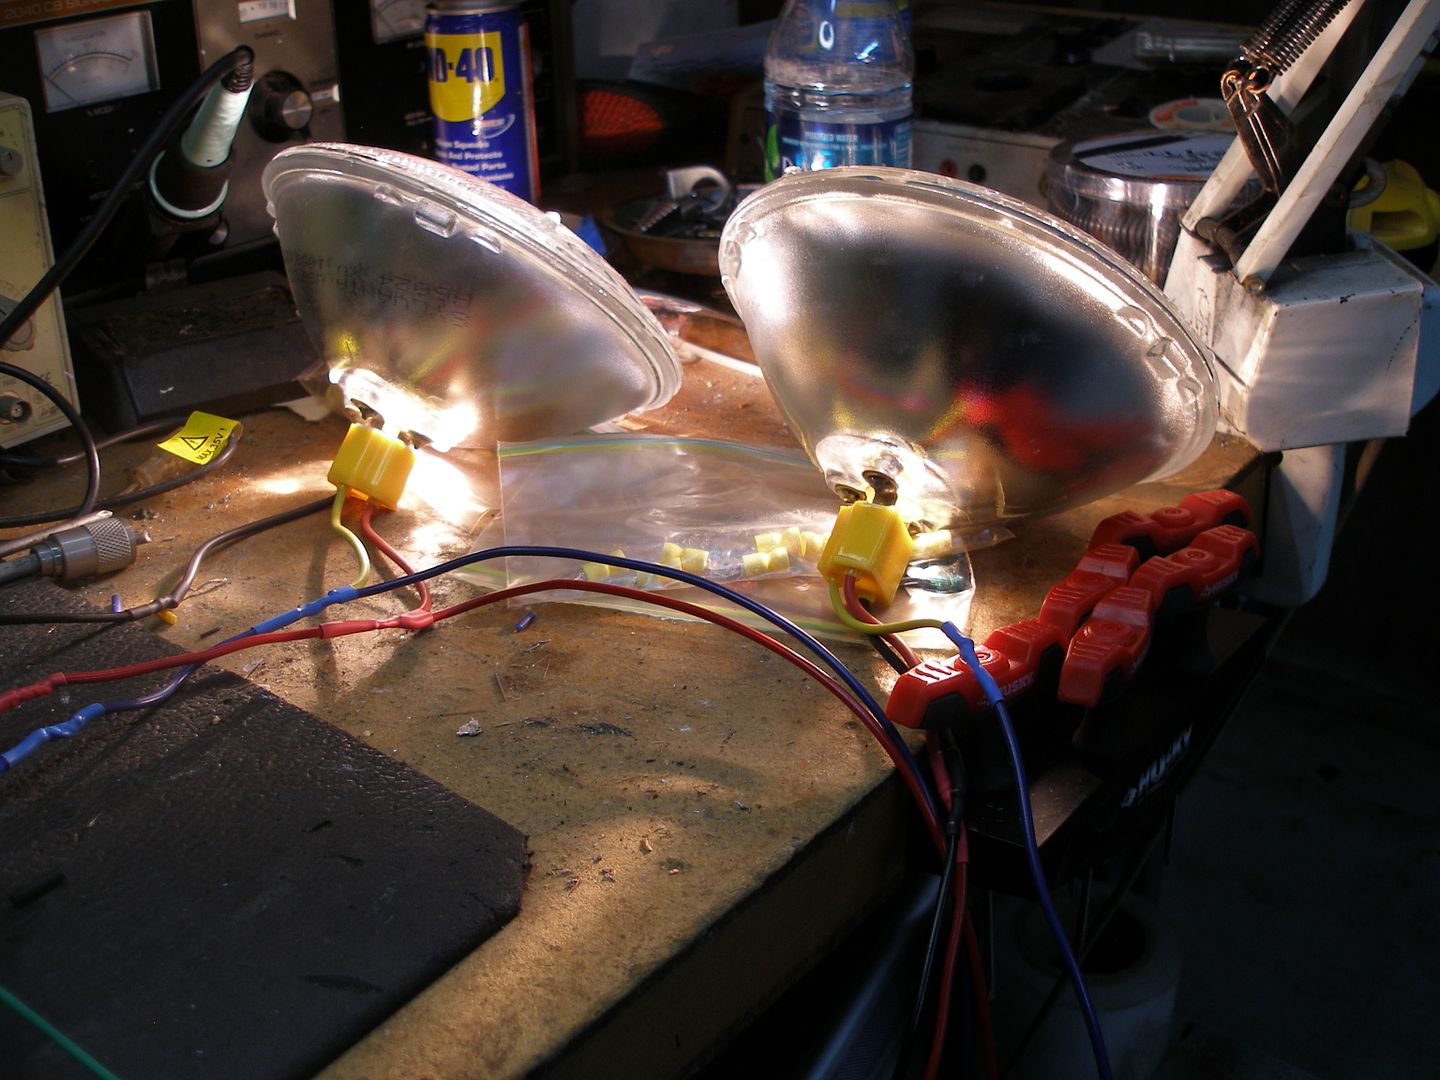
                            OK these sat on the lab burning for 2 days. Notice the yellow sockets are porcelain! These are twice as heavy as they have to be. The relays are good for 40 amps each! That's 80 amps total. They are fused for 30 amps. This is all top quality easy to find parts. The fuse holder can be mounted also.


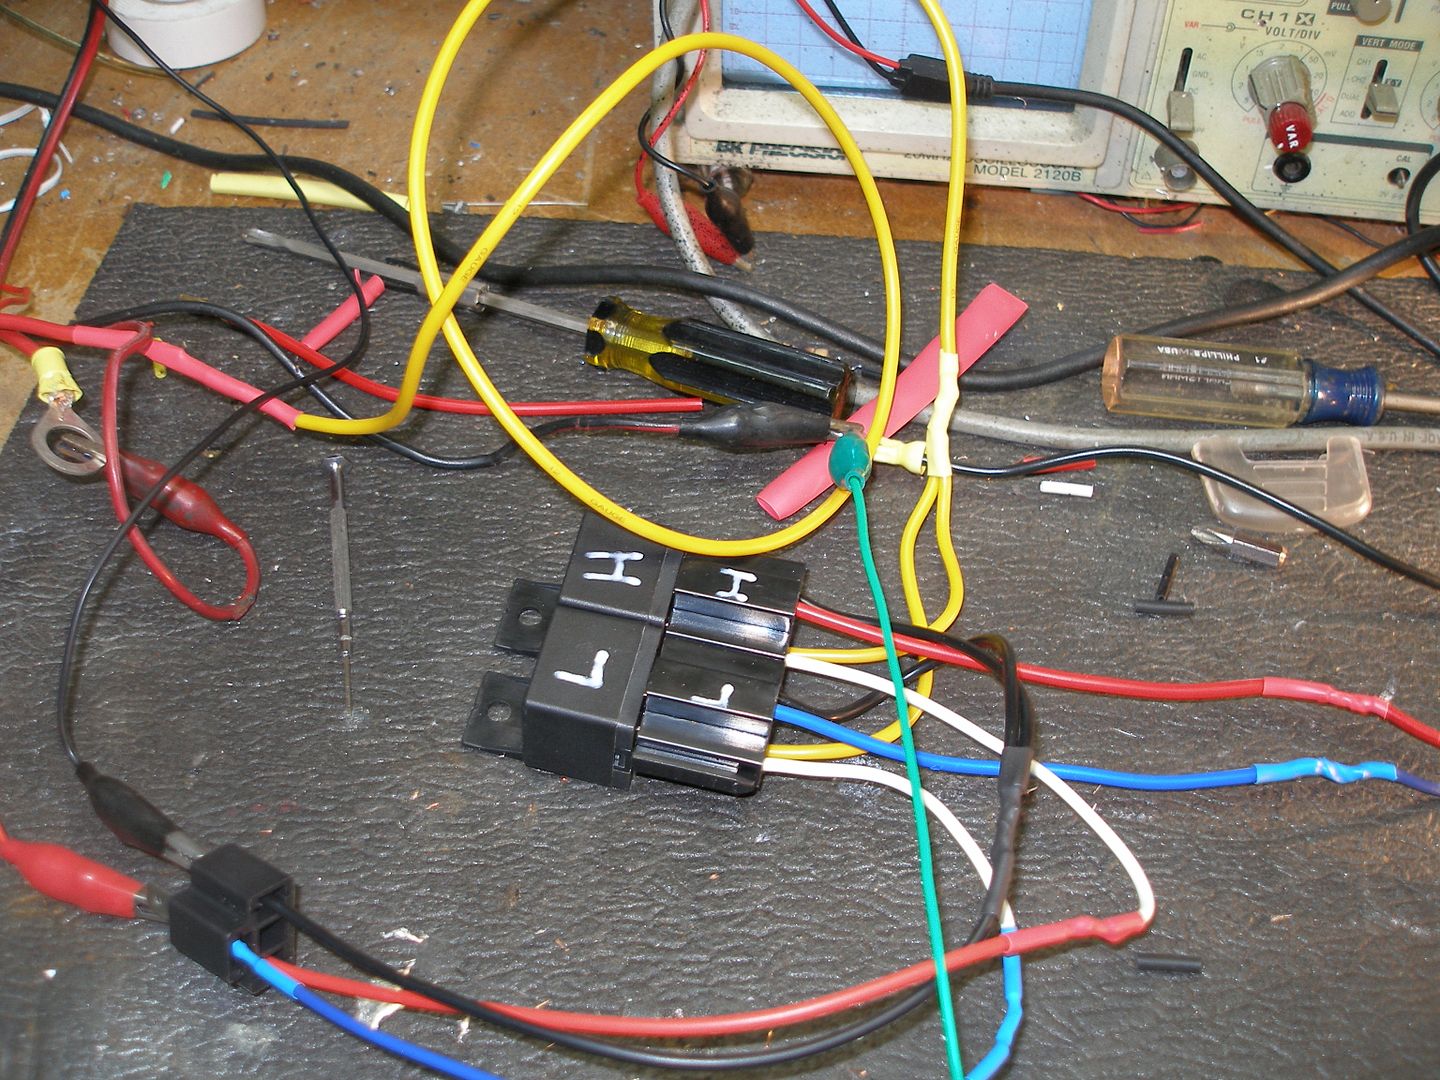
                            Here's the relays & sockets.


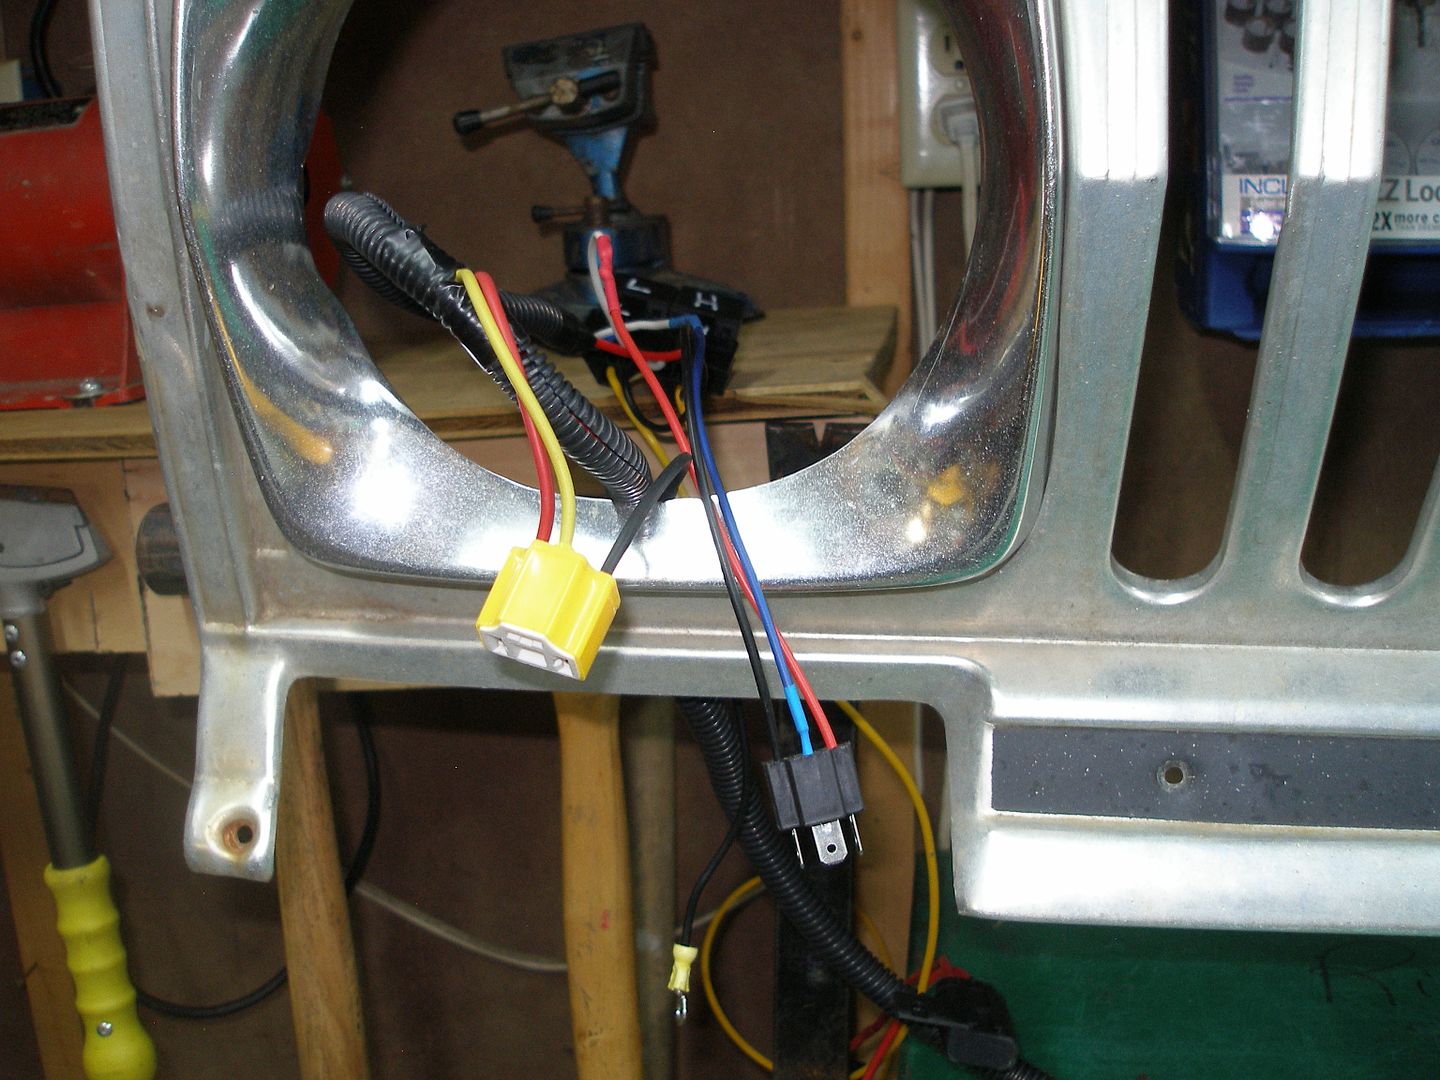
                            Ok here's the mock up left side. What you're looking at is the main location of the system. You will mount the relays behind the left headlight using a self taping screw. You see the black & yellow light sockets. The black socket connects to the original headlight socket. The yellow socket connects to your headlight. You will mount the relays using self tapping screws. Connect the black wire on the yellow socket to ground via the terminal bottom of picture the little ring, with self tapping screws.


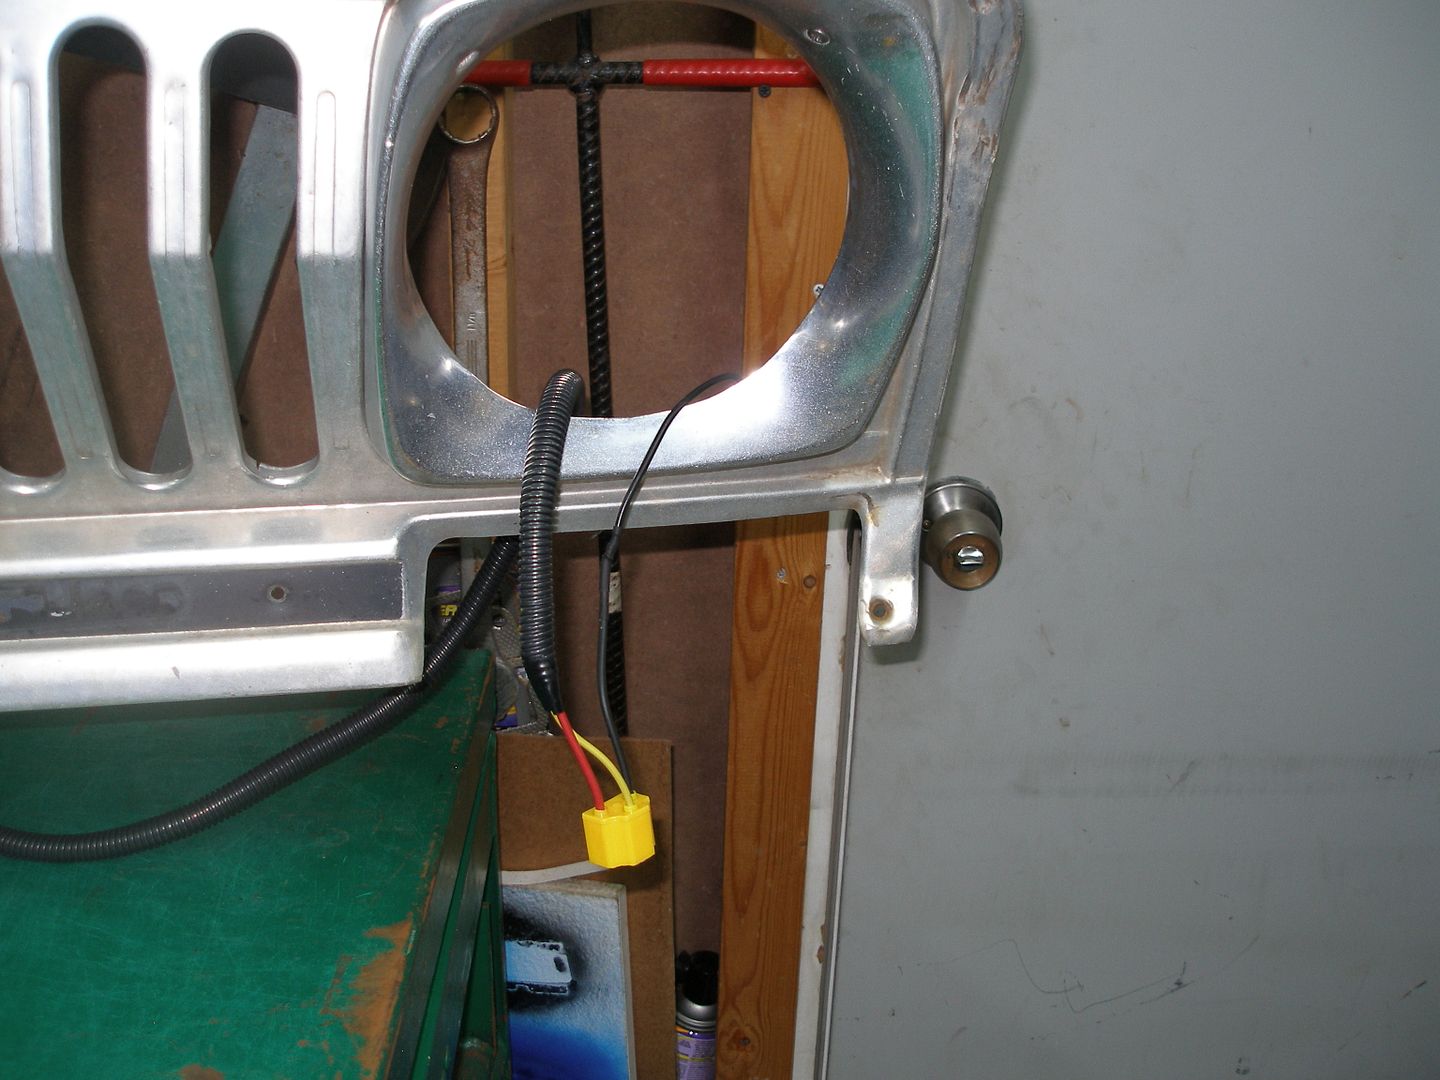
                            Right side: Run the (yellow) socket from the left side to the right headlight assembly. Take the light loose from the original socket Tape the original socket up & plug your headlight it into the yellow one. Connect the black to ground with the self tapping screw the same as the left side. Remember there are existing ground locations you cab attach these to.


                            Last but not least you will run this wire with fuse holder from the relays behind the headlight to the stater solenoid & connect it to the battery side of the starter solenoid. Put your head lights back in & you're done. The relays will now control power to your lights the headlights & dimmers will work just as they are suppose to. I installed this in my Commando yesterday no problems. This can be modified as stated for 4 lights or driving lights etc.


                            I will build about 10 of these this week. If you're on the list I will contact you they will be ready to ship this comming weekend. Let me know if you have any questions there is no doubt this is the easiest way to do this & it is made out of the best parts. these are by far more heavy duty than anything offered for the hardwire bypass that doesn't bypass the dimmers. Paypal or money order will work. the only thing you should beed are wire ties. Besides a few hand tools.
                            Last edited by serehill; 01-10-2012, 09:02 AM.

                            80 Cherokee
                            360 ci 727 with
                            Comp cams 270 h
                            NP208
                            Edlebrock performer intake
                            Holley 4180
                            Msd total multi spark.
                            4" rusty's springs
                            Member, FSJ Prissy Restoration Association

                            If you can't make it better why waste your time. No use repeating the orignal mistakes. I'm to old to push it that's why.

                            Comment

                            • trailscape
                              258 I6
                              • Feb 23, 2009
                              • 338

                              #29
                              Looks good.. Might have to go this route while I'm in the midst of rewiring everything.
                              1974 J10 258 T18/D20
                              Project since 2009. Collecting dust while in school.

                              2002 Tundra - Daily Driver

                              Comment

                              • serehill
                                Gone,Never Forgotten.
                                • Nov 22, 2009
                                • 8619

                                #30
                                let me know I was driven by a couple of issues that these things correct.

                                I'll build 30 That's what I bought parts for. The intent is to bypass the light circuit with the load so you can upgrade your light & make even the stock light brighter. A couple of menebers brought t to my attention that fols have cought their rigs on fire because of eadlight switch & dimer isses. this will fix that. The bulbs being demoed are Sylvania Holgens.
                                Last edited by serehill; 01-09-2012, 07:51 PM.

                                80 Cherokee
                                360 ci 727 with
                                Comp cams 270 h
                                NP208
                                Edlebrock performer intake
                                Holley 4180
                                Msd total multi spark.
                                4" rusty's springs
                                Member, FSJ Prissy Restoration Association

                                If you can't make it better why waste your time. No use repeating the orignal mistakes. I'm to old to push it that's why.

                                Comment

                                Working...
                                X