rang-a-stang's summer project/build

Collapse
X
 
  • Filter
  • Time
  • Show
Clear All
new posts
  • rang-a-stang
    Administrator
    • Oct 31, 2016
    • 5505

    Originally posted by MysticRob
    What's the reason for the move to Idaho, and where specifically? I just made the permanent move from the SF bay area up here a few months and love it. Did a mission up here in 2018 so was kind of familiar with the area by the time the company decided to move ops up here, so I felt comfortable getting the hell out of CA.
    Because CA is crazy and getting crazier. The wife and I both love the weather up there and the cost of living is much better. We bought a house south of Meridian about 10 minutes and West of Boise about 10 minutes. If my son was not so well plugged in at school, getting such good grades, doing so well with his sports, and had such a good attitude we would just pack up and go.
    Originally posted by chubbinius
    That's a bummer on the flare, but at least you know how it happened. Had my Wagoneer out two weeks ago for a quick stop at Home Depot, came out to three nice scrapes into the paint on the passenger side front door.
    (No note, or apology left. Parking lot camera video didn't show anything of value either as it was opposite side of the camera)

    The rear window is very handy when putting them to work...hauled a bunch of eight and ten foot long 4x6 redwood posts in mine when my son was working on his Eagle project.
    Bummer! Crankyoldman had a similar story from his truck! Fresh bumps and scratches, no notes. Congrats on your son working toward his Eagle Scout!
    Originally posted by Heep-J4000
    I can only say that it's time to let your son work for his own car!
    Or tell him that he has to start using your Jeep in a more careful way!
    When my brother and I just got our license and got to drive our dad's older classic car we never trashed or messed it up.

    I know it's a old work truck , but just hate to see this happen, even more with a good looking classic car!
    You make a valid point but this flare was not him being careless or wreckless. I honestly think he heard me when I balled him out about the dash and the seat. He has been much better about being careful with it. I really think he respects it now. He also gets super excited when we work on it. He likes it when it has problems because he gets to fix it. I expected him to wreck this truck as most teenagers do; I didn't expect a slow degradation like this. The flare is a bummer but not a big deal.
    *********************
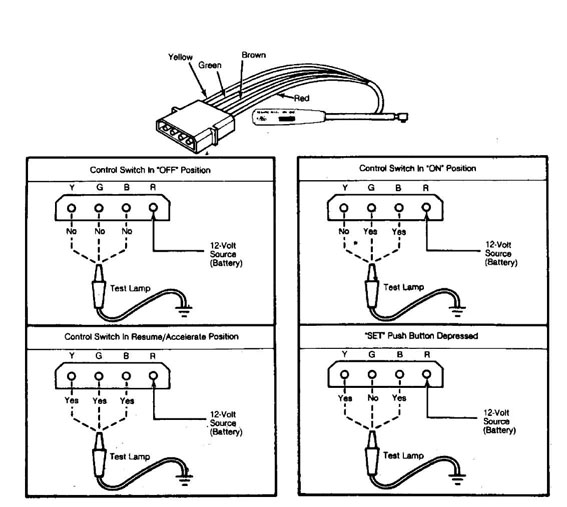
    Turn signal stock/Cruise control switch showed up today. Here's what I got:

    I took my multi-meter and checked it in accordance with this check and it all checked out:

    My turn signal switch is waiting for me to pick it up tomorrow. I'll borrow the steering wheel puller from McParts when I pick it up and get it all put together. I'll take some good pictures.

    I also had some time to kill tonight so I pulled my passenger side power seat bottom out off the shelf and started lubricating it and getting it ready for install. When I first applied power to it, it was really slow. After a ton of light oil and cycling, it works pretty well now. I have the factory harness for it so I might hook the passenger side up this weekend. Maybe. Look at all the areas where it takes oil...

    Two of the motors measured 1.4-1.5 ohms across the leads and the third one was about 2.2 ohms. It was also a little slower than the other two so it might be on its way out but it works for now so I'll stab it in. I got these seat bottoms on Craigslist years ago (mwood has the seats that were bolted on to them in his Cherokee). The passenger seat bottom bolts in but the driver side one does not so it will not go in before I go on my next bidness trip.
    Chuck McTruck 71 J4000
    (Chuck McTruck Build Thread)
    (8.1L swap questions - PerformanceTrucks.net Forums​)
    79 Cherokee Chief (SOLD, goodbye old buddy)
    (Cherokee Build Thread)
    11 Nissan Pathfinder Silver Edition 4x4
    09 Mazdaspeed3 Grand Touring
    00 Baby Cherokee

    Comment

    • rang-a-stang
      Administrator
      • Oct 31, 2016
      • 5505

      I bought a new passenger side mirror from McParts this weekend and will install it this week. I got Pilot part number MI-015. It looks VERY similiar to the stock factory passenger mirror. It's chromed plastic and feels as cheap as it was but I am not too worried about it. Pics when I install it.

      Saturday I swapped the turn signal switch and stock. I bought Duralast SW324 because it had a lifetime warranty. The AC Delco part was the same price but only had a 2 year warranty. Fit and finish was good. I took tons of pics so I could be sure I put it back together in the right order. I figured I would post them all here since I took them. Tons of pics to follow. Most you all won't care about but they are here.
      Here's what broke (if you look behind the remant of the turn signal stock, you can see the crack I mention in a few pictures below):

      Unhooked the negative battery terminal. I lowered the driver side of the A/C vent but you don't "need" to. It made things easier, though.
      Pull the horn button off. I grab at the top of the button and peel toward you and down'ish. There are 3 knubs that hold the button to the horn switch that you have to pull off.

      Remove the 3 screws you see and remove the top of the horn button

      Remove the nut and washer holding the steering wheel on (I do not have a pic for this). Remove the next 3 screws on the horn switch and remove the second half of the horn switch

      Install your steering wheel puller and pull the steering wheel off. I used a borrowed tool from McParts but it was hashed. One bolt had been stripped and the bolt had broken off while the other bolt head was severely damaged. I guess I got what I paid for.


      Remove the steering wheel

      Remove the trim ring you see. It just comes off (no tools needed)

      Install your lock plate tool and depress the lock plate off the retainer clip

      Using a pick and small pry bar, remove the small retainer clip

      Pull the lock plate off

      Remove the horn slip ring holder

      Remove the horn slip ring holder spring

      Remove the hazard light switch knob (just unscrew it)

      Unhook the wiring connector at the bottom of the column

      Unhook the cruise control connector

      Cut the cruise control connector off the switch harness and tape a small rope or cable to the harness. The rope should be a good 5 feet long.

      Cut the old turn signal switch connector off BUT DON'T CUT THE LAST WHITE WIRE (like I did here). This is where I was comparing old connector to new connector and verifying wiring. The wires all match except the horn wire colors. They wires were routed correctly, just the wrong color. DO NOT CUT THE WHITE WIRE.

      Stick a tool in the connector like this to remove the white wire from the connector. This tool (or a straightened paper clip) will depress the locking lug and allow you to remove the pin/wire.

      Connect another, about 5 foot rope or cable to the cut off end of the turn signal switch

      Unscrew the screws that holds the turn signal stock on and pull the harness out of the column from the steering wheel side, letting rope feed through the column. Unscrew the 3 screws holding the turn signal switch to the column and pull it out, letting the rope feed through the column.

      Here are the 2 switches next to each other. They appeared identical other than the color.


      I noticed that not only was the stock broken but the switch was cracked, too. I know the pic is fuzzy; you'll have to take my word that it was cracked.

      At this point, you should see this:

      I found it was MUCH easier to remove the wires from the connector for the turn signal switch (with my little tool), then connect the wires to my rope before pulling it down through the column. I tired it once with the connector still on and it got stock about 1/4 of the way down.
      I soldered the white wire I cut, put the wires back into the new connector, and then broke the new connector.
      Took the wires back out of the now broken new connector, put them into the old connector, and hooked it all back up. Reassembly is the opposite of assembly. The cruise control switch comes with a new connector and it's labeled for easy assembly.

      The new turn signal switch is much more crisp. I was so used to the old slopped switch, I assumed that was just they way they were.

      Hopefully mirror pictures tomorrow. Another BIN tonight on the way home from work and I need to get the front half of the headliner down. Time is running out before I leave for a month...
      Chuck McTruck 71 J4000
      (Chuck McTruck Build Thread)
      (8.1L swap questions - PerformanceTrucks.net Forums​)
      79 Cherokee Chief (SOLD, goodbye old buddy)
      (Cherokee Build Thread)
      11 Nissan Pathfinder Silver Edition 4x4
      09 Mazdaspeed3 Grand Touring
      00 Baby Cherokee

      Comment

      • rang-a-stang
        Administrator
        • Oct 31, 2016
        • 5505

        Did anouther 5k+RPM run last night. it really sounds nasty. It runs well to 5,500 RPM now.
        Except it chucked the belt again. I contacted Gates today to see what the next size smaller belt would be.

        Earlier this weekend, my son called me saying it wouldn't start. He faced-timed me and I heard the tell tale scream of a starter gear spinning without engaging the flex plate. There is no hammer in my tool kit in there so I grabbed a hammer from my tool box and headed out to him. I went down to smack the starter with the hammer and saw that the starter had come loose. I re-tightened the upper bolt but the bottom bolt had stripped out. Cool! But at least he was back on the road, temporarily until I could fix it.

        Last night I pulled it in the garage, removed the starter and re-threaded the stripped hole for a 7/16" coarse thread bolt vice the 3/8" coarse that was in there. Also threw a lock washer on there. Done.

        Installed my new passenger mirror, too. I am happy with it; It's good enough for my turd. I matched the up and down location to the driver side mirror (just below the decal line) and put it in a place where I can open the vent window more than all the way. I can see about 80% of the mirror from the driver seat but really this is a dummy mirror so my truck looks balanced. Only 2 small holes in the door, also, so if I decide to change mirrors again, later, it should be easy to weld those little holes up.

        Chuck McTruck 71 J4000
        (Chuck McTruck Build Thread)
        (8.1L swap questions - PerformanceTrucks.net Forums​)
        79 Cherokee Chief (SOLD, goodbye old buddy)
        (Cherokee Build Thread)
        11 Nissan Pathfinder Silver Edition 4x4
        09 Mazdaspeed3 Grand Touring
        00 Baby Cherokee

        Comment

        • Wagoneer Taylor
          258 I6
          • Dec 17, 2018
          • 434

          Holy cow so much to comment on!

          Too much in fact so I will stick with exellent work all around and amazing walk through on the steering wheel, wish Id had this when I did some stuff on mine and broke my plastic beauty trim ring collar.

          Love the Mirror, reminds me I need to get going on finding a matching set for my rig.

          All around inspiring stuff for me!
          Some call me Taylor...

          1977 Jeep Wagoneer (Wedding Wagon)
          Pewter, Blue Interior, Original 401
          PO swapped in a 360, soon to be a 401 again!
          "Soon" is a relative term.
          Cracked cylinder put a hurt on me + bad connecting rods.

          Comment

          • bkilby
            350 Buick
            • Jan 10, 2016
            • 1083

            Originally posted by rang-a-stang
            Except it chucked the belt again. I contacted Gates today to see what the next size smaller belt would be.


            Sounds like you might need to put a straight edge on the pulleys again to check alignment. What size is the belt now? I can look in my old Gates book to see what it shows. Text it to me.
            1974 Cherokee S. It's driving but needs more work. As usual!

            Comment

            • Ristow
              • Jan 20, 2006
              • 17292

              Check the idler bearings. They fail constantly. I had a idler fall off and had to get a tow home. Put the stock belts on and be done with it.
              Originally posted by Hankrod
              Ristows right.................again,


              Originally posted by Fasts79Chief
              ... like the little 'you know what's' that you are.


              Originally posted by Fasts79Chief
              I LOVE how Ristow has stolen my comment about him ... "Quoted" it ... and made himself famous for being an ***hole to people. Hahahahahahahahahha!

              It's like you're unraveling a big cable-knit sweater that someone keeps knitting...and knitting...and knitting...and knitting...

              Comment

              • rang-a-stang
                Administrator
                • Oct 31, 2016
                • 5505

                I ordered a belt from Amazon and it was slightly too short. Exchanged belt shows up tomorrow. Current belt (that is barely too long) is a K0601080 (108.75"). I ordered a K061058 (106.25") and it was too short. So the one that is coming is K061073 (107.75")

                I'll straight edge the pulleys again when I pull the engine out in a couple weeks. I did check the idler bearings and they feel good.

                We have had a ton of rain here lately and it is super nice. So of course my boy had to go out and exercise it a little! hahaha! He was lightly feathering the throttle (I asked him not to let it rev up too much until I get the knock sensor on). This Jeep is changing my kid in a good way; brings a tear to my eye. Makes me proud! I am pretty convinced he will always own a Jeep from here on out. Good thing the wipers and washers work!
                Dirt Doughnut video

                Today I went underneath to hook up the QT switch and saw the chassis bracket where the shift linkage connects/pivots had come VERY loose. Not sure how it stayed on there with the bolts that loose. I had to remove the 1/2" bolts and drill/tap the holes for 7/16" bolts because they were so stripped out. Got the xfer case into 4WD but there is vacuum leak in the hard line down to the shift motor and it will not pull enough vacuum to pull it out of 4WD. So I swapped the hoses to take it out of 4WD and made a note to check the hard line when the engine comes out again. Told my son to stay out of the mud until then.

                While I was underneath he pulled the forward half of the headliner down.

                Again, no hidden rust. Yessssss... Funny, we found 3 factory well nuts up there that had obviously fallen through the roof and were never crimped by AMC. The rubber was ROCK hard but other than that they were perfect.

                I knew I would enjoy working on the Jeep with him, but it is SUPER awesome working on it with him. We chat and just have a nice time. He is mature enough where I can point out what to do and he does it mostly himself and I can tend to other things. He feels like he is contributing to the build and learning about tinkering and he really likes that. I like that he is doing more than just holding a flashlight and getting me tools.

                Also noticed the radiator has a pinhole leak right in front of the fan. Added to the list of things to fix when the engine comes out.

                Here it is with it's new mirror.


                With this whole coronavirus BS going around, the government is cutting travel like mad. My big trip this month hasn't been officially cancelled yet but it probably will be by close of business on Monday. My son is home from school for the week (high school is cancelled for at least a week) so if I get word my trip is cancelled on Monday, I am going to pick up my buddy's engine hoist and start pulling the motor out ASAP. There isn't a huge single reason to pull it out; it's a TON of little things (like the 3 I just mentioned in this post) that would be much easier to do with the engine out of the way.
                Chuck McTruck 71 J4000
                (Chuck McTruck Build Thread)
                (8.1L swap questions - PerformanceTrucks.net Forums​)
                79 Cherokee Chief (SOLD, goodbye old buddy)
                (Cherokee Build Thread)
                11 Nissan Pathfinder Silver Edition 4x4
                09 Mazdaspeed3 Grand Touring
                00 Baby Cherokee

                Comment

                • SOLSAKS
                  304 AMC
                  • Jul 25, 2016
                  • 1781

                  cool video !
                  dave in NC
                  SOLSAKS - dave
                  1976 J-10 HONCHO Fleetside
                  1982 J-10 Fleetside
                  1988 grand wagoneer
                  2004 RUBICON jeep
                  Benson, NC

                  Comment

                  • bkilby
                    350 Buick
                    • Jan 10, 2016
                    • 1083

                    Originally posted by rang-a-stang
                    I ordered a belt from Amazon and it was slightly too short. Exchanged belt shows up tomorrow. Current belt (that is barely too long) is a K0601080 (108.75"). I ordered a K061058 (106.25") and it was too short. So the one that is coming is K061073 (107.75")


                    I'm reading this thinking, why doesn't he just move the alternator a tad to make the belt fit? Then I go look at your pics and realize your Alt bracket is different from the one I had. Too bad yours wasn't slotted like mine. Post #54.

                    Hi folks. I bought this Cherokee Chief on 1-7-2016 as a project vehicle. The PO had the engine rebuilt, put it in the Jeep and stopped. The trans and tcase were out of the vehicle when I bought it. I decided to pull the engine back out, go through it a little and clean it up (paint). I got to a point that I needed to order a
                    1974 Cherokee S. It's driving but needs more work. As usual!

                    Comment

                    • rang-a-stang
                      Administrator
                      • Oct 31, 2016
                      • 5505

                      Originally posted by SOLSAKS
                      cool video !
                      dave in NC
                      Thanks Dave! Once I get a knock sensor on it and can dial in the timing and what not, the doughnuts should get much better.
                      Originally posted by bkilby
                      I'm reading this thinking, why doesn't he just move the alternator a tad to make the belt fit? Then I go look at your pics and realize your Alt bracket is different from the one I had. Too bad yours wasn't slotted like mine. Post #54.

                      http://www.ifsja.org/forums/vb/showt...=178154&page=3
                      Oh yeah. Yours is different. I don't think I would be able to swing it in, even if mine was slotted. This alt (CS144) BARELY fits in the bracket I have.
                      Originally posted by Driftwood
                      Wait....What.....Why are you pulling the motor?
                      I was gonna drop it on a pallet and donate it to a retired Coastie up in Nampa but I guess if you don't want it....sheesh! LOL!

                      When I was in the final throws of getting it running, I was just trying to get it running and didn't do a lot of little things like:
                      -Wire up the fan on the trans cooler
                      -Wire up the trans temp gauge
                      -Conduit all the wires under the hood
                      -Wire up the offroad lights on my bumper
                      -Hook up my carbon canister
                      -find where the oil leak is coming from
                      -Add a wire from my new fuse blocks to the cab for power seats and seat heaters
                      etc.
                      I have about 15 things to do, about $150 worth of work. Some things will take less than 5 minutes, some will take a couple hours, total. I do not plan on opening up the motor at all (unless I find I need to to fix my oil leak). In fact, it will probably not even come off the engine hoist.

                      Nothing all that big, and nothing that requires the engine to come out in and of itself, but if I pull the engine out, it will make all the little tasks a
                      lot easier. Engine will probably only be out for a couple nights.
                      *********************************
                      K061073 (107.75") worked. With the belt tightened, the power steering pump is at midway in the adjustment slot. I probably could have gone a tiny bit smaller but, meh, good enough for government work.
                      Chuck McTruck 71 J4000
                      (Chuck McTruck Build Thread)
                      (8.1L swap questions - PerformanceTrucks.net Forums​)
                      79 Cherokee Chief (SOLD, goodbye old buddy)
                      (Cherokee Build Thread)
                      11 Nissan Pathfinder Silver Edition 4x4
                      09 Mazdaspeed3 Grand Touring
                      00 Baby Cherokee

                      Comment

                      • asphaltrockdweller
                        350 Buick
                        • Jul 09, 2009
                        • 1218

                        Since it is out of your Chero, maybe you should drop a HEMI in there?


                        I know someone with one in his shop right now!
                        Betya that someone would sell it for a good price too??????
                        (Ristow)fram!....that deserves a ratchet upside the head.

                        Comment

                        • rang-a-stang
                          Administrator
                          • Oct 31, 2016
                          • 5505

                          Originally posted by asphaltrockdweller
                          Since it is out of your Chero, maybe you should drop a HEMI in there?

                          I know someone with one in his shop right now!
                          Betya that someone would sell it for a good price too??????
                          HAHAHAHA! I know of this Hemi you speak, and the price is indeed GREAT! I told him if he would have had it about 6 weeks ago, I woulda bought it and stuffed it in! for sure!!!
                          *****************************************
                          Had an AWESOME day of wrenching!!! Took us about 2 hours to get the engine out.


                          First task was to straight edge the pulleys. Here is how it all looks all installed with a good belt on it. I hate this system... but it does look good.

                          Alt looks good, A/C looks good, Water pump looks good. These are all the accessories where I had to make my own spacers since they were missing from my second hand kit.


                          But when I checked my Power steering pump, I found this:

                          Which is odd because this one is a factory mount; No spacers.
                          Not sure how I am going to fix this. I may need to grind on the factory bracket. The pulley IS seated all the way on.


                          It was awesome having my son out there with me, again. He's REALLLLY into it now. Learning like mad. My other 3 older kids hated wrenching. I guess I did a good job teaching him about the proper footwear for working on a FSJ.

                          He pulled the front diff cover of and the oil was BLACK. Probably original. Here's the inside of the cover and you can see the sediment running down the cover.

                          This picture does not do the inside of the pumpkin justice. It was GROSSS!

                          He spent some time cleaning the cover off, removed old gasket material, used an entire can of brake cleaner scrubbing the inside out, and then he painted the cover gloss black. He also cleaned off the bolts, and gave them a shot of ghetto chrome. Those (cover and bolts) will go on (with pics) hopefully tomorrow or Monday.

                          I moved my Vehicle speed sensor up. I unplugged the AMC cruise control module, pushed the speedo cable down behind the brake booster and used the VSS to couple both Speedo cables together. This puts the VSS on the wheel well, next to the master cylinder. It's actually a pretty nice spot for it. When I get a chance to go to the wrecking yard, I will pull a GM Cruise control module and copy babywag's Cruise Contol set up.
                          See this link for what I am talking about
                          Tomorrow I will secure the speedo cables with padded straps to keep them from moving around.


                          Next we started putting conduit on the wires and hooking up the carbon cannister. I got the passenger side done and the oxygen sensor and knock sensor harness that goes down from my engine harness behind the bell housing.


                          Then I started inspecting for oil leaks. I don't leave spots where I park but the bottom of the engine and trans are usually slimy with oil in spots. I found the first leak; It runs from the bottom of the dipstick tube, down to the oil pan, and it would come out below the rear main. I ordered a new dip stick tube and it should get here Monday. You can also see where I put my Knock sensor. I hope that works correctly!


                          Next one I kinda expected. The rear of the intake manifold popped out and leaks a little. Not sure if I am up for pulling the intake off to fix this leak. it's pretty minor and an intake gasket set is pretty expensive. Maybe I'll just dig some of the gasket out and try to press some gasket maker in there. Someone talk me out of it.


                          Last one was up at the front, near the timing cover, where it meets the oil pan. Again, not sure what I am going to do about this one.


                          Spent about 30 mins verifying my QT vacuum lines are sealed. They are but when in E-Drive, it leaks down a little. It still goes into 4WD but it has a leak. I am sure that's from the shaft seal. I used red zip ties on the 4WD line and green zip ties on the lines for 2WD.

                          Son swapped the 160 degree T-Stat for a 195 degree one and he cleaned and painted a trans dipstick tube. The one that is on there is not correct and fairly loose. The bracket that is suppose to get pinched in between the trans to engine bolt was not on this one.

                          Saw this, too. I literally JUST threw one of these away, like 2 weeks ago!!!


                          More to follow. Tomorrow is mostly wiring and is going to be really boring. But when I am done I should have head lights on relays, trans cooler fan on a relay, off road lights on a relay, Trans temp gauge wired up, tach wired up, and some other little tasks. When those are done, I will conduit the drivers side and hope that all the wiring is solid.
                          Chuck McTruck 71 J4000
                          (Chuck McTruck Build Thread)
                          (8.1L swap questions - PerformanceTrucks.net Forums​)
                          79 Cherokee Chief (SOLD, goodbye old buddy)
                          (Cherokee Build Thread)
                          11 Nissan Pathfinder Silver Edition 4x4
                          09 Mazdaspeed3 Grand Touring
                          00 Baby Cherokee

                          Comment

                          • bkilby
                            350 Buick
                            • Jan 10, 2016
                            • 1083

                            Originally posted by rang-a-stang
                            Alt looks good, A/C looks good, Water pump looks good. These are all the accessories where I had to make my own spacers since they were missing from my second hand kit.


                            That alternator looks way off to me Marc. The straight edge is touching the pulley on the DS of the crank pulley but looks like it's lifted a tad on the PS of the crank pulley which tells me the alt is a tiny bit too far forward. However, the whole face of the alt pulley should be touching the straight edge. If only one side is touching like in your pic, the alternator might be set front to rear but it's twisted. You need to figure out how to fix that. Flat serpentine belts don't like bending sideways to accommodate misaligned pulleys. They aren't forgiving like V belts.
                            1974 Cherokee S. It's driving but needs more work. As usual!

                            Comment

                            • bkilby
                              350 Buick
                              • Jan 10, 2016
                              • 1083

                              Also, think about this...if the edge of the serp belt is say...1/8" away from the straightedge at the crank, it should be 1/8" away on all of the pulleys as you move that straightedge around. Look at the distance at the crank pulley at lower right, look at the distance at the alt pulley where it's touching the straightedge, now look at the idler pulley in between the two. Maybe it's just the angle of the camera but you should double check that.
                              1974 Cherokee S. It's driving but needs more work. As usual!

                              Comment

                              • rang-a-stang
                                Administrator
                                • Oct 31, 2016
                                • 5505

                                Originally posted by bkilby
                                Also, think about this...if the edge of the serp belt is say...1/8" away from the straightedge at the crank, it should be 1/8" away on all of the pulleys as you move that straightedge around. Look at the distance at the crank pulley at lower right, look at the distance at the alt pulley where it's touching the straightedge, now look at the idler pulley in between the two. Maybe it's just the angle of the camera but you should double check that.
                                Yep! I measured for those first. Its the angle of the pic. I didn't really spend much time on the idlers since the belt surfaces are flat. I just ensured the belt was riding, generally, in the middle of each one... and they are. I kind of want to remove one of the idlers and put a tensioner on there instead... NO D@MM!+!! Stay focused! Stay focused!!!
                                **************************
                                I only had about 2 hours to wrench yesterday. All I got done was putting the trans cooler fan on a relay, dug through my pile-o-parts and found a brass T fitting so I can insert the temp switch for the fan inline with the trans cooler, and started wiring the lights on my bumper to a relay. I am not sure if I should put the trans temp switch on the inlet side of the cooler or the outlet... It also took me a while to tool up from wrenching to electrical'ing.

                                My son took the fan off the Rad and this is what was behind it.

                                There is about 3/4" clearance between the nose of the water pump and the fan when everything is installed and I *think* when it chucked the belt, the belt went between the fan and water pump and pushed the fan into the rad. I cannot see a hole anywhere, but it is leaking. Hopefully the only local radiator shop is open these days and can fix it.

                                Also waiting on data about my headers. Updates on these threads:
                                The AMC Forum
                                IFSJA Forum

                                Ran to Frabor Height for some more conduit last night and saw this sign on the door:

                                VERY AWESOME!!! I love this store already and reading this makes me appreciate them that much more. I went on a USCG Auxiliary Patrol with the founder one time about 15 years ago. He was a USCG Vet and super nice guy. HF is headquartered about a mile from my house and I pass it everyday on my way to work.
                                Chuck McTruck 71 J4000
                                (Chuck McTruck Build Thread)
                                (8.1L swap questions - PerformanceTrucks.net Forums​)
                                79 Cherokee Chief (SOLD, goodbye old buddy)
                                (Cherokee Build Thread)
                                11 Nissan Pathfinder Silver Edition 4x4
                                09 Mazdaspeed3 Grand Touring
                                00 Baby Cherokee

                                Comment

                                Working...
                                X