
 Tweet
Tweet
Originally posted by royaustin2000
-
I think, in retrospect.. if one had to deal with the wrinkles, I would lightly weld the seam from behind, grind very little, and smooth it with quality body putty.Last edited by cu4whln; 09-19-2008, 08:28 PM.It's not yours 'til ya bleed on it . . . https://forums.ifsja.org/core/images...s/rolleyes.png
1977 "401" 'Da Chief
1979 Chero: "Madness" [Sold]
1972 J4000
1985 CJ : Renegade -locked and loaded
2005 Unlimited Rubicon - Built
2012 Artic JK 4 door, 2016 JK 2 door
'Da Chief here: http://www.ifsja.org/forums/vb/showt...ighlight=chief
Round 2- LT Swap: 'Da Chief:
http://www.ifsja.org/forums/vb/showthread.php?t=188457
"Madness" build here:
http://www.ifsja.org/forums/vb/showthread.php?t=89280 -
Thanks!Comment
-
VERY good read...you make me want to do the same to my cherk...which coincidentally also came from Bend OR last year!
So how did you get the flares cleaned out? I had the same sand/dirt issue in my rear quarters...they had almost 3 gallons of crap...but couldn't figure out how to get into the flares...Dale
79 WT Cherokee
401
TH400
D20 Twin Stick
Unnamed as of yet....Comment
-
Dale -Originally posted by dlowrance
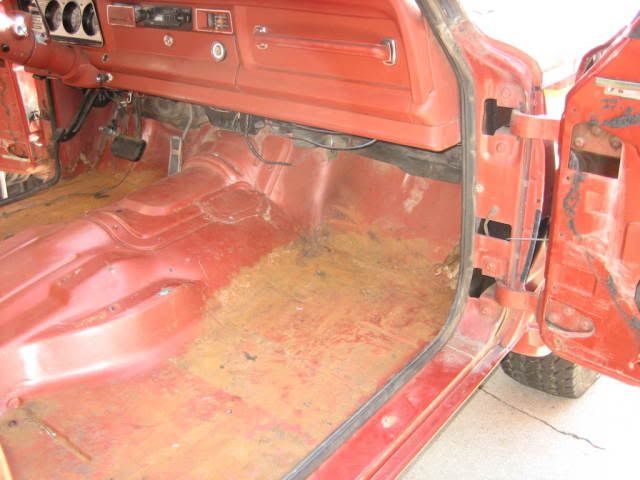
Well, here are some pics... But really, the only flair that had issues was the pass rear due to it being damaged and left that way. It let the dirt in and it stayed in there, wet. That equals the dreaded rust [ which we know - "Never Sleeps" ]
If I had a decent body, I would clean the flairs / sills out very well once a year at least.. do a search, I found some great info on how to prevent dirt buildup in the WT flairs.. I removed the interior panels and washed them out with a hose.... You can reach a good portion of the rear quarter with your hands and a vacuum first.
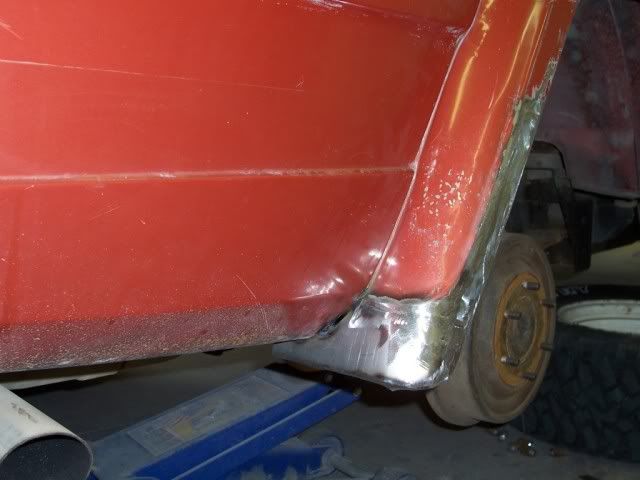
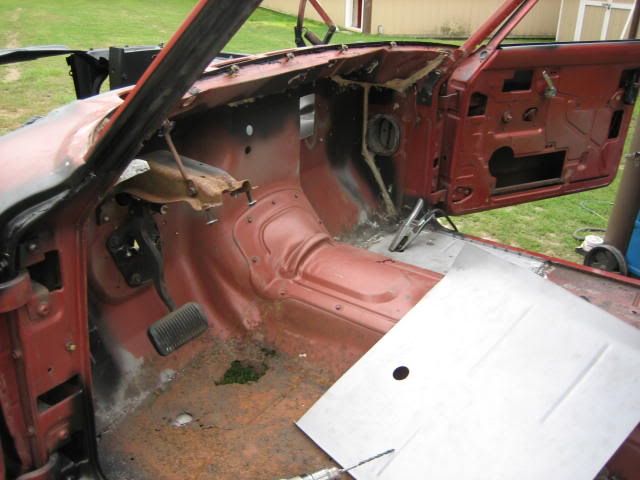
So, onto the pics.. Basically, he removed the inner wheelwell so he could get good access to the dented outer. This also let him "rebuild" the innner and outer sheet metal.
First pic: inner wheelhouse "rebuilt"
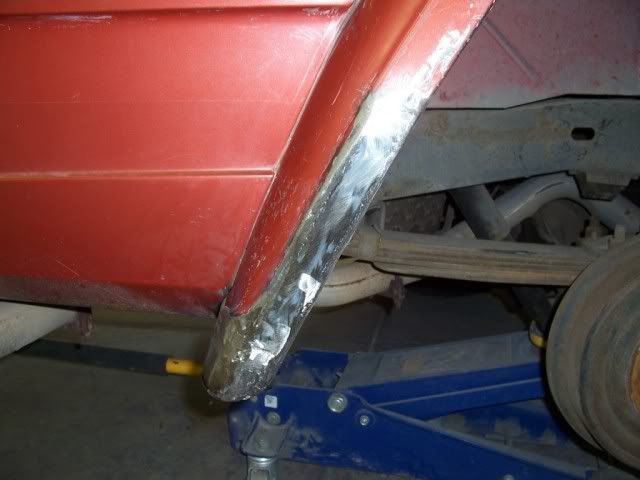
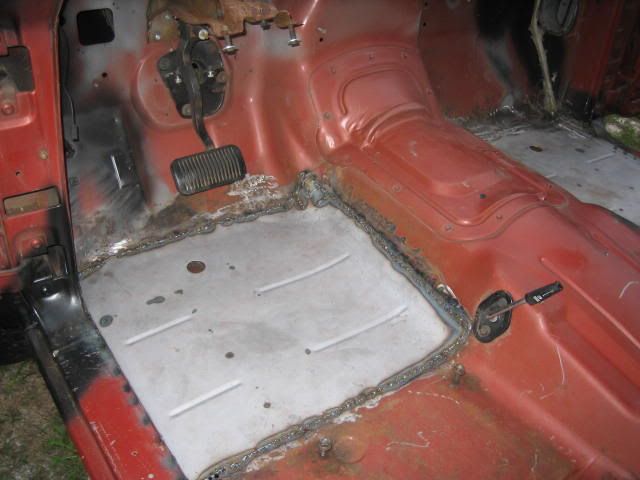
pic 2 : botton edge of flair rebuilt.
pic3: looking into the rear quarter without the innner installed yet.
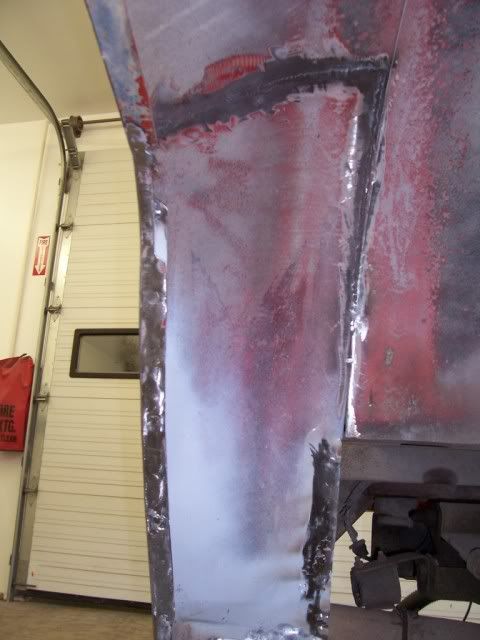
pic4 : Final work, all metal inner / outer, a skim coat of filler and I have a fully new, metal flair.
Woo Hoo !
Oh, he also fixed the pushed in rear quarter too
 Last edited by cu4whln; 05-05-2009, 07:12 PM.It's not yours 'til ya bleed on it . . . https://forums.ifsja.org/core/images...s/rolleyes.png
1977 "401" 'Da Chief
1979 Chero: "Madness" [Sold]
1972 J4000
1985 CJ : Renegade -locked and loaded
2005 Unlimited Rubicon - Built
2012 Artic JK 4 door, 2016 JK 2 door
'Da Chief here: http://www.ifsja.org/forums/vb/showt...ighlight=chief
Round 2- LT Swap: 'Da Chief:
http://www.ifsja.org/forums/vb/showthread.php?t=188457
"Madness" build here:
http://www.ifsja.org/forums/vb/showthread.php?t=89280Comment
-
SWEET...

Comment
-
CU4Wheelin is fast becoming my hero
Seriously. You said what your were planning to do and your doing.
The project looks awesome and your inspiring me to get back and chase the Dream. My J-10 is at the welders shop having a flat bed built now. Reverse front shackles and some additional protection.
Keep us posted on the mysterious FI engine choice.
Your going to be the best thing that has happened to the FSJ world in a while. Jeep Junkie should do a story on you some day soon.
Wish i had the mechanical talent and skills you have.
Daughter wants a horse so i have to build a fence Barn and keep working on my pasture.
Keep posting
Chris in North GaChris in North Ga
*Never forget 9/11
81 J-10 Honcho Flat-Bed,360ci built,AMC-20Detroit, Dana 44 ARB, Warn 9k , F&R bumpers rock slider Bars, 34" Super Swampers, spring over with 4" Superlift, original interior.
This was my Pa's Truck.
I love 4 WheelingComment
-
Took some time Sat to help my buddy Matt - His 89 has been running so poorly he wasn't driving it anymore I hate that !!
So.. some investigation - carb was shot. Leaking fuel, power valve bad... wouldn't start after sitting.. hot restart issues.... "The usual"
Go to NAPA - carb rebuild kit.....
After a full rebuild with some friends in attendance, sucess !
Now it runs and starts fine.. drives really well,and no hot restart issues !
Another Wagoneer back on the road.Last edited by cu4whln; 10-03-2008, 08:37 PM.It's not yours 'til ya bleed on it . . . https://forums.ifsja.org/core/images...s/rolleyes.png
1977 "401" 'Da Chief
1979 Chero: "Madness" [Sold]
1972 J4000
1985 CJ : Renegade -locked and loaded
2005 Unlimited Rubicon - Built
2012 Artic JK 4 door, 2016 JK 2 door
'Da Chief here: http://www.ifsja.org/forums/vb/showt...ighlight=chief
Round 2- LT Swap: 'Da Chief:
http://www.ifsja.org/forums/vb/showthread.php?t=188457
"Madness" build here:
http://www.ifsja.org/forums/vb/showthread.php?t=89280Comment
-
Been Busy - - -
Soo.. been making some progress. All the "little" stuff sure takes some time. AND, all along the way, I am planning.. laying out the build plan.. balanced with the limited buget
Anyway, I have a date this Friday ! No, not THAT kind of date.. I am pulling the powertrain. Isn't vacation grand ?? The last time the 360 will breath in the Cherokee . . . BUT, it is finding a good home in a very nice CJ 8
Anyway, the body shop situation has delayed me until early Nov.. no problem ! Now I can do some other stuff before paint. One of these "things" is to do some minor blasting of a few areas to remove the old caulk in the fender seams.. and a few surface rust spots. My buddy has a sand blaster btw.
Then plan to put some DP 90 epoxy primer on it. Also on the list.. I am peeling out all the old sealing putty from the factory. I will be resealing the complete cowl as it leaks like a seeve ! And a few other areas too.
And, will be cutting out the rusty floorpans.. hopefully getting the new ones installed.")
Alright .... nowback to work !
 Last edited by cu4whln; 05-05-2009, 07:25 PM.It's not yours 'til ya bleed on it . . . https://forums.ifsja.org/core/images...s/rolleyes.png
1977 "401" 'Da Chief
1979 Chero: "Madness" [Sold]
1972 J4000
1985 CJ : Renegade -locked and loaded
2005 Unlimited Rubicon - Built
2012 Artic JK 4 door, 2016 JK 2 door
'Da Chief here: http://www.ifsja.org/forums/vb/showt...ighlight=chief
Round 2- LT Swap: 'Da Chief:
http://www.ifsja.org/forums/vb/showthread.php?t=188457
"Madness" build here:
http://www.ifsja.org/forums/vb/showthread.php?t=89280Comment
-
Recovery Plans????
are you planning on having a winch on both ends or in a receiver hitch to move front to rear?
have you considered undercarriage lighting for night rides?
i am thinking about that because we do alot of that and if you get high centered a flick of the switch and you can see what your doing. Just a few cheap old tractor lights is what i plan to do
ChrisChris in North Ga
*Never forget 9/11
81 J-10 Honcho Flat-Bed,360ci built,AMC-20Detroit, Dana 44 ARB, Warn 9k , F&R bumpers rock slider Bars, 34" Super Swampers, spring over with 4" Superlift, original interior.
This was my Pa's Truck.
I love 4 WheelingComment
-
Need 3 pc bumpers
Hi Chris -
No, I am not planning a winch at this time.. [ I am NOT going to get stuck . . Riiigghhht ! ] I will be fabricating some serious tow points though.
Actually, I am looking for a perfect set of front and rear 3 chrome peice bumpers. I have yet to find a set that is "perfect".
I want it to look "Traditional".. well, except for the lift.. tires... engine.... trans.. t-case... paint.... Oh, never mind LOL It's not yours 'til ya bleed on it . . . https://forums.ifsja.org/core/images...s/rolleyes.png
1977 "401" 'Da Chief
1979 Chero: "Madness" [Sold]
1972 J4000
1985 CJ : Renegade -locked and loaded
2005 Unlimited Rubicon - Built
2012 Artic JK 4 door, 2016 JK 2 door
'Da Chief here: http://www.ifsja.org/forums/vb/showt...ighlight=chief
Round 2- LT Swap: 'Da Chief:
http://www.ifsja.org/forums/vb/showthread.php?t=188457
"Madness" build here:
http://www.ifsja.org/forums/vb/showthread.php?t=89280Comment
-
Vaction Day !!

So - took a vacation day this Friday, [today].
Started "work" on the Chero at 9 am.... by 1 the complete drivetrain was out.... then the little details started . . .
Well.. after getting the engine up in the air... hanging there... I rolled the Jeep back. Jack sezs.. quick, the engine is shifting... he tries to gently let the engine down... and.. Free fall ! He closes the valve.. the engine jerks on the chain.... the cherry picker tilt-a-whirls ... Oh :o:o:o:o.. RUN !
BAM. hard hit on the ground. Smashed the oil pan We both escaped injury. YIKES. Decide it's time to take a break. We have been at it hard for 4 hours. Go grab a Big Mac and rest. Then back at it.
I guess we were just not careful enough? No big deal, the oil pan can be replaced. [ Actually have an extra ] But somebody could have been hurt. Kinda scared me.
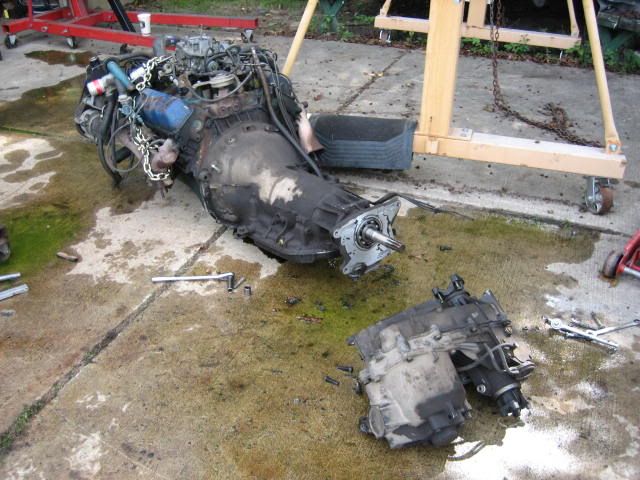
So, took the rest of the wiring out, seperated the trans and t-case...[ of course, I dropped a deep well socket just right.. into the fender. Had to loosen up the bottom to get it out ]
Then pushed the Chero into the yard.
Sat: [tomorrow] Start the sand blasting on some selected areas for cleanup. Then it's some DP 90 epoxy primer... assumming the rain holds off.
Oh - side comment. Hmmm, seems I am not as young as I used to be?? I am exhausted after an 11 hour Jeep day.
Some pics later.. if the site will let me add more. Aparently, I am doing something wrong... too tired to deal with that right now..
Goodnight ! Last edited by cu4whln; 10-20-2008, 04:38 PM.It's not yours 'til ya bleed on it . . . https://forums.ifsja.org/core/images...s/rolleyes.png
1977 "401" 'Da Chief
1979 Chero: "Madness" [Sold]
1972 J4000
1985 CJ : Renegade -locked and loaded
2005 Unlimited Rubicon - Built
2012 Artic JK 4 door, 2016 JK 2 door
'Da Chief here: http://www.ifsja.org/forums/vb/showt...ighlight=chief
Round 2- LT Swap: 'Da Chief:
http://www.ifsja.org/forums/vb/showthread.php?t=188457
"Madness" build here:
http://www.ifsja.org/forums/vb/showthread.php?t=89280Comment
-
And another "Jeep" day -
So - great weather today. Pop out of bed bright and early- do a few work chores and by 9 AM I am at the paint store picking up some DP 90 epoxy primer and activator. I don't remember it costing so much ?? Oh well.
Buy 600 lbs of fine sand for the blaster - we do not recycle the sand obviously... just do it out back of the shop - then start some final prep work for sand blasting and paint.
Have 2 freinds helping today ! WOOT ! These guys rock !!
Remove coluum, remove hood, tape off the plenum, remove the rest of the old caulk in the upper inside dash.. tape off anything that needs to stay clean so to speak.
Do a somewhat major repair on the tailgate closure- it had a broken weld on the pass side where the tailgate guide pin is located. What a pain! Had to clean up the metal in a really tight area- and weld it up, than grind it down to look presentable.
Remove a bunch old goopy butel [ sp ? black sticky stuff ] sealer, than clean with thinner. remove old exterior caulk that is dried up and cracked.
Take out the window regulators and glass on both sides, take out the tailgate regulator/glass, remove the side glass.. can't quite figure out the windshield - let it go and put a tarp over it for protection.
Do a minor weld repair in the cowl to plug a hole left by a PO... then glass and bondo over it to ensure it is water tight. Remove the final wires - aka the fuse box.... and the accel pedal. All thats left is the brake pedal.
And then the real fun begins.. with the sun beating down !
Put on the gloves, blasting hood, and start at it. under the dash blasting was not a lot of fun let me tell you.... the hood is a lot less effective laying on your side/back ! But get the cowl/plenum caulk areas clean and ready for new sealant.
Then start on the hood.. needed to clean up a few areas. Then onto the engine compartment. Spend a lot of time "IN" the engine bay removing paint. Then onto each seam that has caulk - blast each area to make sure caulk is intact. Do each door upper where the seals go.. do the lower tailgate, has a little surface rust..
All in prep for some DP 90. Then it happens... I ran out of daylight ! Darn it ! Had to cover it up with some tarps and hope for no rain. I am concerned the dew will make the bare metal rust overnight.
Oh well, can't Do anything about it .. time just ran out
Tired, and happy,
Good ay.Last edited by cu4whln; 09-21-2008, 06:11 AM.It's not yours 'til ya bleed on it . . . https://forums.ifsja.org/core/images...s/rolleyes.png
1977 "401" 'Da Chief
1979 Chero: "Madness" [Sold]
1972 J4000
1985 CJ : Renegade -locked and loaded
2005 Unlimited Rubicon - Built
2012 Artic JK 4 door, 2016 JK 2 door
'Da Chief here: http://www.ifsja.org/forums/vb/showt...ighlight=chief
Round 2- LT Swap: 'Da Chief:
http://www.ifsja.org/forums/vb/showthread.php?t=188457
"Madness" build here:
http://www.ifsja.org/forums/vb/showthread.php?t=89280Comment
-
Today - again . . .
Another "vacation" day to work on the Jeep. I like 4 day work weeks !Need the body off next week as the engine/trans and a load of other stuff is sitting at my buddies place... and the paint shop needs the body in 4 weeks.....
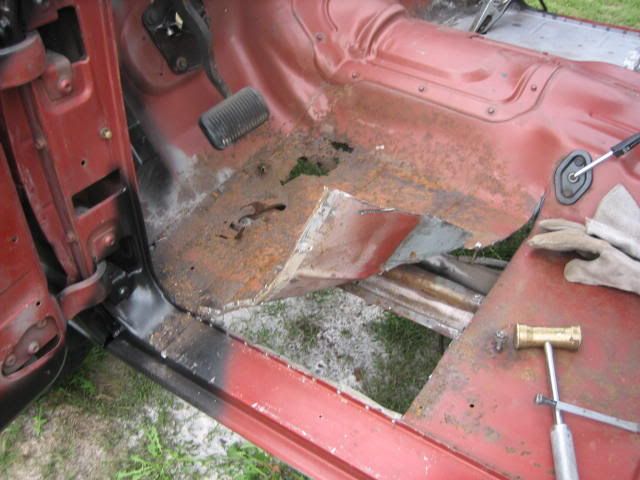
Today, for the first time, I did some "body work". I have never really done any of that.. took on the pass floorpan today. Learned about spot welds and how to drill them out.... used a cold chisel to finish them out.. some serious cutting with a die grinder.
Lined up the replacement floor [ from OBX - excellent parts btw ] and started to tack it in place. Discovered why it sucks welding rusty metal Yes, I had it ground down to all shiney, but the extra thin sections have a way of disappearing....

Also took out the windshield with an experianced friend. Found out someone had glued it in...
Also, as I had previously removed all the sealing caulk from under the dash.. and blasted / primed those areas.... I borrowed my buddies super cool electric caulk gun [ it was very easy to use on my head ! ] and replaced all the sealer in the cowl area. I am pretty sure it's not going to leak there anymore !
Tomorrow: Driver floor pan, then POR 15 the floorpan and the inside roof area. Will also find any other exposed rust inside the body and give that a quick coat of POR as well. Oh, must reinstall the coluum to steer it on the trailer too.
Hopefully, then it's trailer time again, off to the next friends shop to use the 2 post to take the body off.Last edited by cu4whln; 10-27-2008, 08:34 PM.It's not yours 'til ya bleed on it . . . https://forums.ifsja.org/core/images...s/rolleyes.png
1977 "401" 'Da Chief
1979 Chero: "Madness" [Sold]
1972 J4000
1985 CJ : Renegade -locked and loaded
2005 Unlimited Rubicon - Built
2012 Artic JK 4 door, 2016 JK 2 door
'Da Chief here: http://www.ifsja.org/forums/vb/showt...ighlight=chief
Round 2- LT Swap: 'Da Chief:
http://www.ifsja.org/forums/vb/showthread.php?t=188457
"Madness" build here:
http://www.ifsja.org/forums/vb/showthread.php?t=89280Comment
-
.GEEE/ZOOO, YOU KEEP PLUGING MY FLOORS,I'M STARTING TO FEEL SORRY, THAT I EVEN CHARGED YOU MONEY FOR THEM!...Originally posted by cu4whln  .....HEY! I WOULD USE A 2 LB HAMMER AND A FLAT 3 INCH BRICK CHISEL TO CUT SPOT WELDS,IT'S FASTER THAN DRILLING THEM OUT AND I NEVER LIKED USEING A SPOT WELD CUTTER, YOU HAVE TO GRIND THE SPOT WELDS ANYWAY, TO FIT THE NEW PANELS!....ME 2 CENTS..
Comment
-
Sooo - you could send me a refund ! lolOriginally posted by OBX-AUTOMOTIVE
Seriously, your parts really did fit very well - I calls them likes I see them !
__________________________________________________ ________
Trust me - I used a chisel.. and a pry bar.... and some choice words
I found drilling the weld through helped get them loose from the vehicle. I also discovered, in the rusty areas, I could get a sizable pry bar under there to pull the welds free.
I tried the edge weld method on the pass side.. cut right to size and weld the 1/16 gap. Worked OK.
I used the leave a 1/4" area to overlay the pan on and then weld method on the driver side. I think the driver side both looked better and was somewhat easier to do.
Keep in mind, I have never done this type of thing before... It's not yours 'til ya bleed on it . . . https://forums.ifsja.org/core/images...s/rolleyes.png
1977 "401" 'Da Chief
1979 Chero: "Madness" [Sold]
1972 J4000
1985 CJ : Renegade -locked and loaded
2005 Unlimited Rubicon - Built
2012 Artic JK 4 door, 2016 JK 2 door
'Da Chief here: http://www.ifsja.org/forums/vb/showt...ighlight=chief
Round 2- LT Swap: 'Da Chief:
http://www.ifsja.org/forums/vb/showthread.php?t=188457
"Madness" build here:
http://www.ifsja.org/forums/vb/showthread.php?t=89280Comment


Comment