Tutorial on trouble shooting a cruise control system

Collapse
X
 
  • Filter
  • Time
  • Show
Clear All
new posts
  • PaulD
    232 I6
    • Jul 04, 2017
    • 125

    Tutorial on trouble shooting a cruise control system

    With my 89 GW cruise control not working and no official system tester (AM P-C-1R tester) in hand, I started trying to trouble shoot the system. Major pains since some of the components and connections that need testing are under the dash and can be hard to get to. I then realized that the P-C-1R tester works by removing the control module (in yellow box under dash passenger side) and then plugging the tester into the 14 pin connector where the control had been plugged in. By studying the wiring diagram in the service manual, it is easy to see multiple test that can be performed at this connector since it touches all components in the system. I then started checking pin reading for proper ohms, VDC and VAC reading. In that way, I discovered that my cruise control module was not receiving the proper 12VDC on pin 7. Without that power, the module was dead. I traced down the problem (bad connection to fuse panel) and got power back to the module. Happily, my cruise control is back in business.
    Manually testing via the 14 pin connector is not hard but it can be tedious. To help others trouble shoot problems with their cruise control, I have prepared the following tutorial on testing the cruise control system. Note that this is based on an 89 GW. Your FSJ system may be different but the principles are the same. Refer to the wiring diagrams in your FSJ to help work out any difference.

    For starters, let’s take a quick look at the main components in the system.
    1) Control module – circuit card in a yellow box under dash. My yellow box was under dash next to left foot of passenger. This testing does not test the module. It tests everything BUT the module. If everything else test OK then that implies that the module is bad.
    2) Multi-function lever on steering column – inputs commands to system for setting and adjusting speeds
    3) Brake control switch – mounted above the brake petal. It is an open circuit until you hit the brakes then it allows 12VDC to flow to the module on pin 13. The module monitors pin 13 to know when you applied brakes so it can turn cruise off when you apply the brakes
    4) Inline 4 amp glass fuse that feeds 12VDC to the multi-function lever. I think it is a slow blow fuse but not sure. If blown, nothing will work. Impacts reading on pins 5, 10 and 14. This fuse is buried deep under dash and very difficult to get to.
    5) Speed sensor – sensor mounted to transmission and lets module know your speed. Inputs to the module via pins 2 and 3. Voltage readings are AC (not DC). That tells me that the sensor is a small motor (generator) that generates a variable VAC depending on speed.
    6) Control servo – Mounted on driver side fender under hood. Uses vacuum and signals from cruise module to control gas to carburetor. Linked to cruise module via pins 4, 6, 11 and 12
    7) Fuse panel – mid left side of panel has a slot (marked for cruise control) to plug the cruise control power wire into. The plug gets it power from the yellow 20 amp HAZ/STOP fuse. This power wire goes to pin 7 in the 14 pin connector
    8) Ignition key – position of ignition key is important in the testing since the cruise control system is like an accessory and only works when key is in RUN position
    9) Connectors and connections – even if all components are good, a bad connection is very possible and will cause bad or erratic readings. Always tough to track down the specific bad spot.

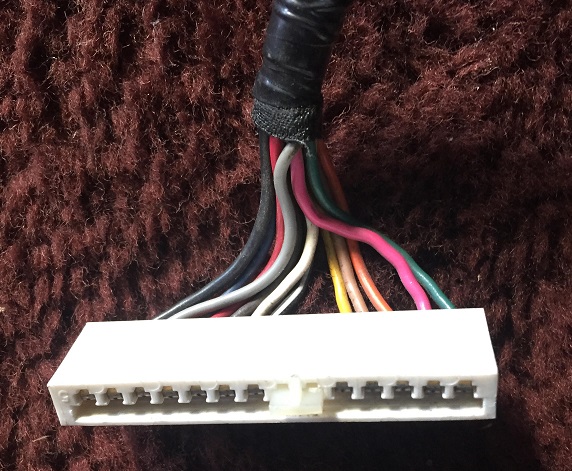
    Recap of the 14 pins in the connector shown below. Pins numbered 1-14 from left to right.
    1 – Ground wire
    2 – Speed sensor and Cruise control servo
    3 – Speed sensor
    4 – Cruise control servo
    5 –Multi-function lever
    6 - Cruise control servo
    7 – 12VDC from fuse box
    8 – Unused
    9 – Unused
    10 - Multi-function lever
    11 - Cruise control servo
    12 - Cruise control servo
    13 – Brake switch
    14 - Multi-function lever


    The following test are grouped by type of test. All tests are done with a simple VOM meter that can measure ohms, VDC and VAC. These tests are electrical in nature only. Does not test your vacuum (must be OK for control servo to function) and the linkage to the carb (properly adjusted). All these test will do is point you to the circuit that has a problem. You will probably need to do addition testing to isolate the problem in a bad circuit.
    Last edited by PaulD; 08-16-2017, 09:30 AM.
    89 GW - Fun kick-a-round driver
    06 XK Commander Limited - daily driver
  • PaulD
    232 I6
    • Jul 04, 2017
    • 125

    #2
    Ohms test
    Not all pins provide a meaningful ohms reading. Start by attaching your black lead to a solid ground point (not pin 1). Use the red lead to probe the pin noted below.
    With Key OFF and cruise switch OFF:
    Pin 1 ? CLOSED ? since this pin is supposed to be a ground for the module, this pin should show closed circuit
    Pins 2-3 ? no test at this point
    Pins 4-7 and 10-14 should show OPEN. If not, something in circuit it shorted to ground.
    Now remove the black lead from its grounding point and use the red and black leads to measure ohms between pins 2 and 3. Should read between 15-50 ohms.
    Now use black and red leads to measure ohms between pins 2 and 11 while engine is running. Should read from 240 to 4K ohms as you advance throttle from idle to full throttle.
    89 GW - Fun kick-a-round driver
    06 XK Commander Limited - daily driver

    Comment

    • PaulD
      232 I6
      • Jul 04, 2017
      • 125

      #3
      VDC test
      This is a DC voltage test with red probe while black probe is attached to good ground. Key and cruise switch position varies as noted below.

      Pin 1 - Zero volts with key on or off – if not, it is shorted to 12V somewhere
      Pin 2 & 3 – Should not have any DC current in either pin. If you do, the wires are shorted to a DC source somewhere. See AC test later for proper AC voltage test on these pins
      Pin 4 – No test identified
      Pin 5 – 0 VDC (Key ON/Cruise OFF)
      12VDC (Key ON/Cruise ON)
      12VDC (Key OK/Cruise RA)
      Pin 6 - No test identified
      Pin 7 - 12VDC all time. The current flows through the 20 amp HAZ/STOP over to the Cruise Control connect point. If no power, problem could be blown HAZ/STOP fuse or bad connection. If Hazard lights work OK then fuse is good.
      Pin 8 - Unused
      Pin 9 - Unused
      Pin 10 - 12VDC (Key ON/Cruise RA)
      0 VDC (any other key or cruise position)
      Pin 11 - No test identified
      Pin 12 - No test identified
      Pin 13 - 0 VDC (Key ON/Brake OFF)
      12VDC (Key ON/Brake ON). If no power, the problem involves the brake light switch circuit. If brake lights work but no power, then problem is in the connection or line from brake light switch to pin 13.
      Pin 14 – 0 VDC (Key ON/Cruise OFF)
      0 VDC (Key ON/Cruise ON)
      12VDC (Key ON/Cruise set ON via push button on end of lever)
      Last edited by PaulD; 08-16-2017, 09:40 AM.
      89 GW - Fun kick-a-round driver
      06 XK Commander Limited - daily driver

      Comment

      • PaulD
        232 I6
        • Jul 04, 2017
        • 125

        #4
        VAC test
        This is an AC voltage test while vehicle moving or on lift with rear wheels free to turn. This test is only for the speed sensor thus only involves pins 2 and 3. The speed sensor is a small A/C motor that generates current when driving. The A/C current varies according to speed
        Ignition; ON with motor running
        Gear: Drive
        Cruise switch : ON
        Test VAC reading between pins 2 and 3 starting at 30 MPH. Should get a 0.9VAC reading at 30 MPH and increase 0.1VAC for each 10 MPH.
        Last edited by PaulD; 05-10-2018, 05:02 PM.
        89 GW - Fun kick-a-round driver
        06 XK Commander Limited - daily driver

        Comment

        • PaulD
          232 I6
          • Jul 04, 2017
          • 125

          #5
          Other test
          1) With engine running, transmission in park and cruise control ON, advancing speed via the R/A switch should cause engine RPM to increase
          2) With key on, inserting a jumper wire between pins 7 and 13 should cause brake lights to come on. This is effectively bypassing the brake switch.
          3) Service manual has a bunch of test and procedures for adjusting the cruise control module itself. They are designed to set various adjustments on a working module. I did not try to address any that here.
          89 GW - Fun kick-a-round driver
          06 XK Commander Limited - daily driver

          Comment

          • PaulD
            232 I6
            • Jul 04, 2017
            • 125

            #6
            That is all I have for now. If I discover any more useable test, I will post them here. If anyone discovers an error in my info, let me know.
            89 GW - Fun kick-a-round driver
            06 XK Commander Limited - daily driver

            Comment

            • KnoxvilleWag
              232 I6
              • Mar 05, 2013
              • 46

              #7
              That's great info, thanks Paul. I'm a novice on auto electrical issues.
              Here's what my cruise control is doing (I also have an 89 Wag): I turn the cruise control "on" on the multi-function lever and press the button on the end of the stalk to engage the cruise. All is well for a few seconds. Then I notice the car is picking up speed. As it continues to accelerate, if I hit the engage button again, nothing happens and it continues to go faster. Even if I turn off my multi-function switch (to "off"), it continues to accelerate. The only thing that can stop it in hitting the brakes.
              Any thoughts? I think I picked up another control module from Pick-A-Part. Is it worth just plugging in the used one to see if it will work? I have replaced the Servo 2 times. It seems to cause the cruise control to work for a time and then it begins to act erratically (the previous one just stopped working).
              Thanks for the help, and again, thanks for the information.
              1989 Grand Wagoneer, Rebuilt AMC 360 (300hp, 400 ft.lbs.), Repainted in close-to-original Burgundy (Land Rover "Anniversary Claret" 2006), replaced faux wood decal and rubber trim with 70s style wood stripe and chrome trim.

              Comment

              • PaulD
                232 I6
                • Jul 04, 2017
                • 125

                #8
                Originally posted by KnoxvilleWag
                That's great info, thanks Paul. I'm a novice on auto electrical issues.
                Here's what my cruise control is doing (I also have an 89 Wag): I turn the cruise control "on" on the multi-function lever and press the button on the end of the stalk to engage the cruise. All is well for a few seconds. Then I notice the car is picking up speed. As it continues to accelerate, if I hit the engage button again, nothing happens and it continues to go faster. Even if I turn off my multi-function switch (to "off"), it continues to accelerate. The only thing that can stop it in hitting the brakes.
                Any thoughts? I think I picked up another control module from Pick-A-Part. Is it worth just plugging in the used one to see if it will work? I have replaced the Servo 2 times. It seems to cause the cruise control to work for a time and then it begins to act erratically (the previous one just stopped working).
                Thanks for the help, and again, thanks for the information.
                I replaced the control stalk on the steering column as part of my testing because I had a wiper problem I suspected was due to a problem in the stalk. It has internal switch contacts related to the accelerate function that may be shorted. Replacing the stalk is not hard but can be tedious. Basically, the stalk will unplug from the steering column with a sharp tug but it has a wire attached that goes down thru the steering column. I found a tutorial on how to replace it on the web. The basic approach is to attach a pull wire to the end of the cable at base of steering column, then pull the stalk with wire out. Then attach the new stalk & wire to the pull wire and pull it back down thru the steering column. A stalk is not expensive but there are many varieties out there. Be sure to get the correct one. The steering column is a GM item. I used the stalk #25111262 from Amazon. Works great.
                This may not fix your problem but it is an inexpensive attempt.
                89 GW - Fun kick-a-round driver
                06 XK Commander Limited - daily driver

                Comment

                • Old Ironsides
                  258 I6
                  • Jul 06, 2014
                  • 435

                  #9
                  Does the 79 and down have the same system?
                  Grant

                  Old Ironsides: '76 J-10, 401 (1406/2131/DUI/RV Cam), TH400, Part Time, 3" lift, 33s, 346K Miles
                  Ironsides: '75 J-10, 360 (1406/2131/MSD), TH400 QT, 6" lift, 33s, 110K Miles
                  '77 Cherokee Chief, 401/Th400, QT, 4" lift... Totalled
                  '79 Wagoneer, 360, TH400, QT

                  Comment

                  • FSJunkie
                    The Nigel Tufnel of the FSJ world.
                    • Jan 09, 2011
                    • 4040

                    #10
                    Originally posted by Old Ironsides
                    Does the 79 and down have the same system?
                    I would say not. My 1977 AMC Hornet has cruise control but it is not like the system described in this post. It uses a mechanical control unit under the hood that ties into the speedometer cable and controls the throttle with a vacuum actuator mounted to the throttle with a ball chain. It is purely mechanical. The only thing electrical is the control stalk under the dash and a couple wires going to the fuse panel and the brake light switch.
                    '72 Jeep Wagoneer Custom, 360 V8

                    I love how arguements end as soon as Ristow comments. Ristow is right...again.

                    Comment

                    • Cherokeeowner
                      258 I6
                      • Jul 25, 2010
                      • 478

                      #11
                      Can someone pin this?
                      Member FSJ Prissy Restoration Association

                      "Proud to be prissy."

                      1988 Grand Wagoneer

                      1986 Grand Wagoneer

                      Comment

                      • 61Hawk
                        258 I6
                        • Jul 18, 2009
                        • 377

                        #12
                        And if you switch to LED taillight bulbs, your cruise control won't work.

                        Comment

                        • KnoxvilleWag
                          232 I6
                          • Mar 05, 2013
                          • 46

                          #13
                          Paul, I ordered and replaced the multi-function control stalk as you suggested. It still does the same thing. I can turn the cruise to "on" and then set it (sometimes it won't set with the button at the tip of the stalk, but it will set if I push the accelerate/resume switch). It will keep speed for a little bit, and then it will lose or gain speed. If it gains speed i have to use the brake to turn off the cruise--the stalk switches won't stop it. Any thoughts? Thanks for the help.
                          1989 Grand Wagoneer, Rebuilt AMC 360 (300hp, 400 ft.lbs.), Repainted in close-to-original Burgundy (Land Rover "Anniversary Claret" 2006), replaced faux wood decal and rubber trim with 70s style wood stripe and chrome trim.

                          Comment

                          • PaulD
                            232 I6
                            • Jul 04, 2017
                            • 125

                            #14
                            Originally posted by KnoxvilleWag
                            Paul, I ordered and replaced the multi-function control stalk as you suggested. It still does the same thing. I can turn the cruise to "on" and then set it (sometimes it won't set with the button at the tip of the stalk, but it will set if I push the accelerate/resume switch). It will keep speed for a little bit, and then it will lose or gain speed. If it gains speed i have to use the brake to turn off the cruise--the stalk switches won't stop it. Any thoughts? Thanks for the help.
                            The acce/resume switch is a temporary input. I would not expect it to set the speed to any level other than the original setting on a good working system. My next guess is the cruse control module in the yellow box. If you know someone with a GW, try to borrow their module and swap them out to see if that fixes it. I don't have any other suggestions.
                            89 GW - Fun kick-a-round driver
                            06 XK Commander Limited - daily driver

                            Comment

                            • Haleyville
                              230 Tornado
                              • Oct 27, 2015
                              • 17

                              #15
                              I know this is an old thread.
                              LED taillight bulbs will prevent it from working. I put regular bulbs back in my taillight/brake sockets and my cruise started working again. Not often but, sometimes thing can be fixed simply. Good luck.
                              1988 Jeep Grand Wagoneer

                              Comment

                              Working...
                              X